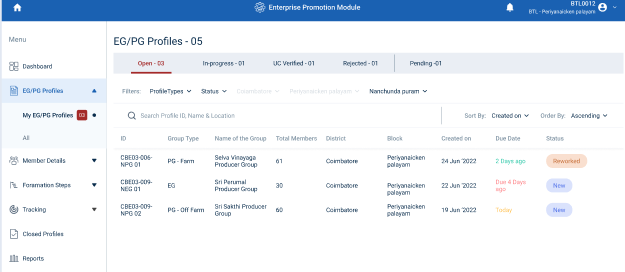
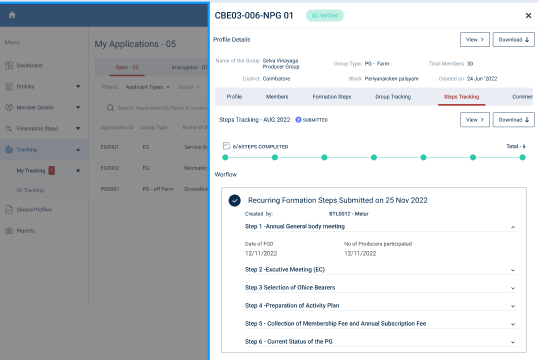
1. How to Login and Check the Profile :

Step 1 : Log in with their respective BTL username and password and click Login

Step 2 : After logging in to the VKP staff portal, select the Enterprise Promotion Module name
Step 3 : After selecting the EPM module, the user will be redirected to the respective home page
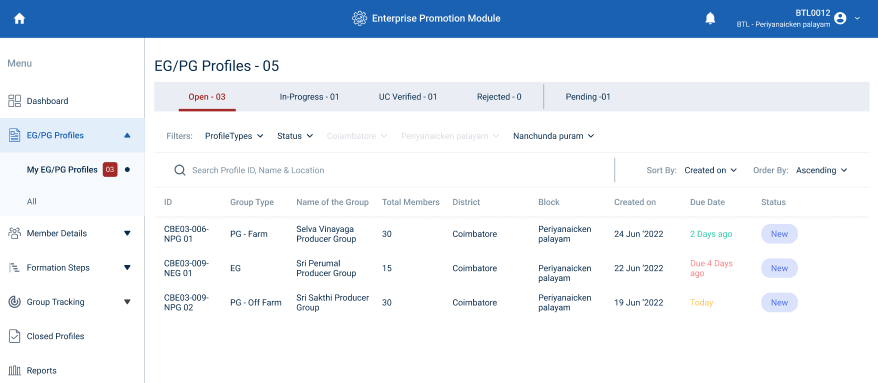
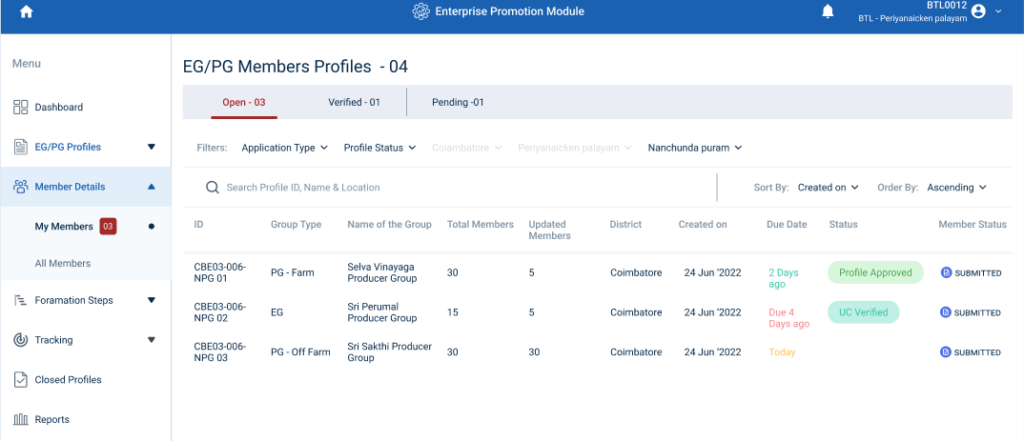
Step 4 : When logged in, click on the ‘EG/PG Profile’ on the left side menu
Step 5 : On the ‘EG/PG Profile’ tab, click the ‘My EG/PG Profile’ tab to view the list of profiles submitted by the ECP
Step 6 : You can view the list of profile by clicking the ‘Open’ tab
Step 7 : Upon the profile submitted by ECPs, the list of profiles will appear under the ‘Open’ tab and the status of the applicant will be displayed as ‘New’
Step 8 : The BTL staff can view the Profile ID, Group Type, Group Name, Total Members, District Name, Block Name, Created Date, Due Date, and current status of the profile in the home page
2. How to Verify the Profile :

Step 1 : Log in with their respective BTL username and password and click Login

Step 2 : After logging in to the VKP staff portal, select the Enterprise Promotion Module name
Step 3 : After selecting the EPM module, the user will be redirected to the respective home page

Step 4 : When logged in, click on the ‘EG/PG Profile’ on the left side menu
Step 5 : On the ‘EG/PG Profile’ tab, click the ‘My EG/PG Profile’ tab to view the list of profiles submitted by the ECP
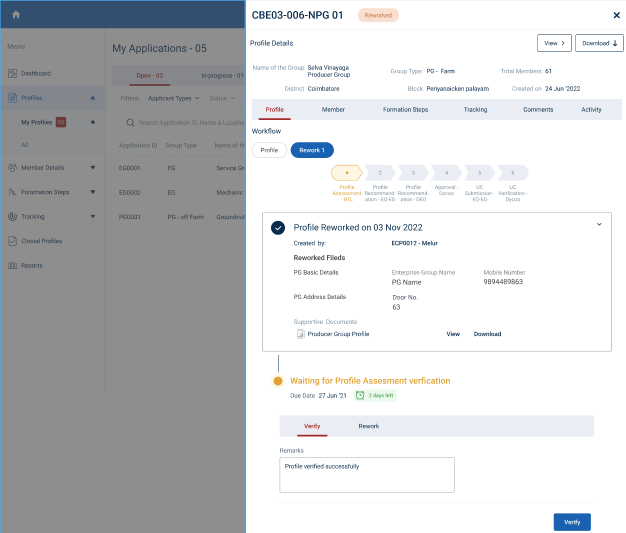
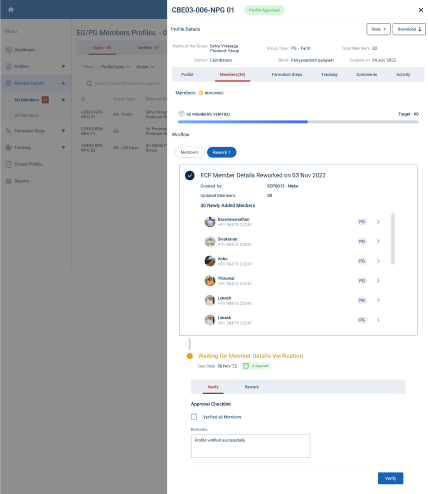
Step 6 : To verify the profile, Select the profile and for a detailed view, select the profile and the BTL can view the profile details, workflow tracker details
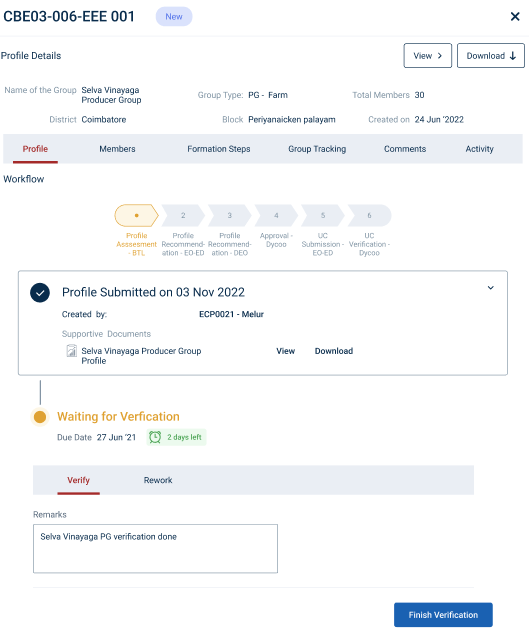
Step 7 : Once the profile has submitted by ECP, the profile will be verified by the BTL click ‘View’ to view the profile and click ‘Download’ to download the profile as PDF
Step 8 : To verify the profile click ‘Verify’
Step 9 : Remarks : Enter the remarks in the section and click ‘Finish Verification’
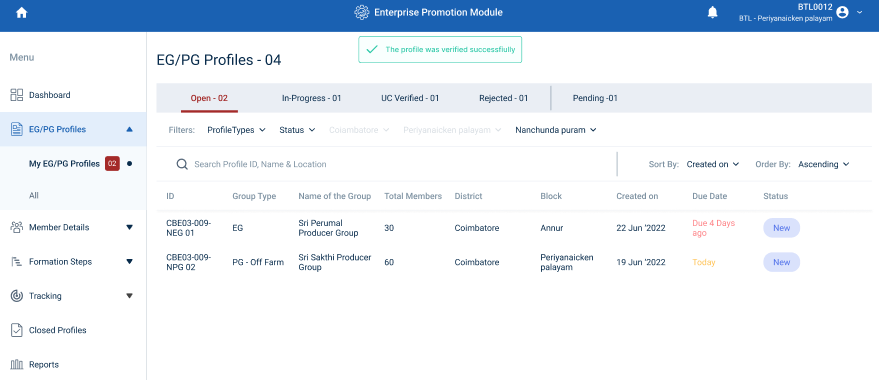
Step 9 : Once the BTL click finish verification the profile was verified successfully and the the toast message like ‘The Profile Was Verified Successfully’
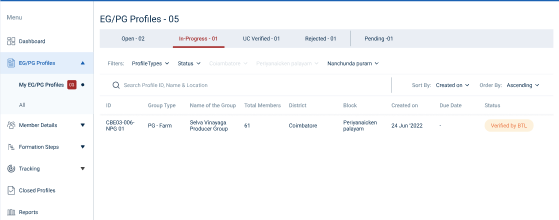
Step 10 : Once the profile is verified by the BTL the status of the application changes from “New” to “Verified” and the profile will be moved to Open to Inprogress.
3. How to Check the Verified the Profile :

Step 1 : Log in with their respective BTL username and password and click Login

Step 2 : After logging in to the VKP staff portal, select the Enterprise Promotion Module name
Step 3 : After selecting the EPM module, the user will be redirected to the respective home page
Step 4 : When logged in, click on the ‘EG/PG Profile’ on the left side menu
Step 5 : On the ‘My EG/PG Profile’ tab, click the ‘In-Progress’ tab to view the list of profiles verified by the BTL
Step 6 : Select the profile to view the profile details more
Step 7 : Once the profile has verified by BTL, the BTL can view the profile details and updated workflow tracker
4. How to Send Rework the Profile :

Step 1 : Log in with their respective BTL username and password and click Login

Step 2 : After logging in to the VKP staff portal, select the Enterprise Promotion Module name
Step 3 : After selecting the EPM module, the user will be redirected to the respective home page

Step 4 : When logged in, click on the ‘EG/PG Profile’ on the left side menu
Step 5 : On the ‘EG/PG Profile’ tab, click the ‘My EG/PG Profile’ tab to view the list of profiles submitted by the ECP
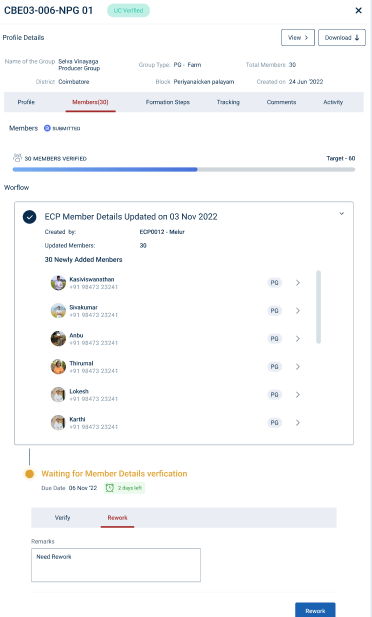
Step 6 : To rework the profile, Select the profile and for a detailed view, select the profile and the BTL can view the profile details, workflow tracker details
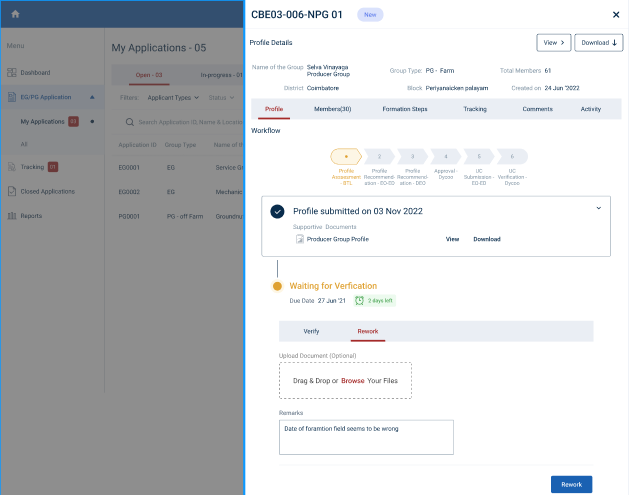
Step 8 : To rework the profile click ‘Rework’
Step 9 : Upload Document : Click ‘Browse’ to upload the document
Step 10 : Remarks : Enter the remarks in the section and click ‘Rework’
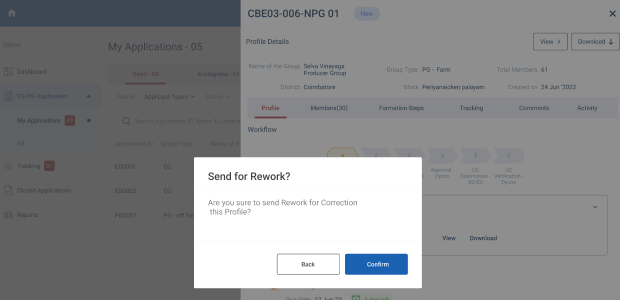
Step 11 : Once the BTL click ‘Rework’ an confirmation popup will appear on the screen and click ‘Confirm’
Step 12 : Once the BTL confirms the profile will send to rework to the ECP
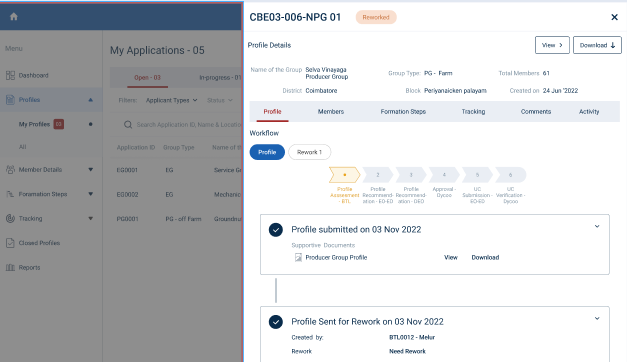
5. How BTL Verify/Rework the Reworked Profile :

Step 1 : Log in with their respective BTL username and password and click Login

Step 2 : After logging in to the VKP staff portal, select the Enterprise Promotion Module name
Step 3 : After selecting the EPM module, the user will be redirected to the respective home page
Step 4 : When logged in, click on the ‘EG/PG Profile’ on the left side menu
Step 5 : On the ‘EG/PG Profile’ tab, click the ‘My EG/PG Profile’ tab to view the list of profiles submitted/reworked by the ECP
Step 6 : To view the reworked profile, select the profile that has been reworked by the ECP
Step 7 : Once the profile has been reworked by the ECP, click the Rework menu under the profile tracker the BTL can view the list of profile reworked by the ECP and the BTL can view the reworked fields in detail
Step 8 : If the rework profile can verify the BTL click ‘Verify’ to verify the reworked profile or if the BTL wish to rework the profile click ‘Rework’ and send the profile for the rework
6. How BTL Verify the Updated Enterprise/Member Details :

Step 1 : Log in with their respective BTL username and password and click Login

Step 2 : After logging in to the VKP staff portal, select the Enterprise Promotion Module name
Step 3 : After selecting the EPM module, the user will be redirected to the respective home page
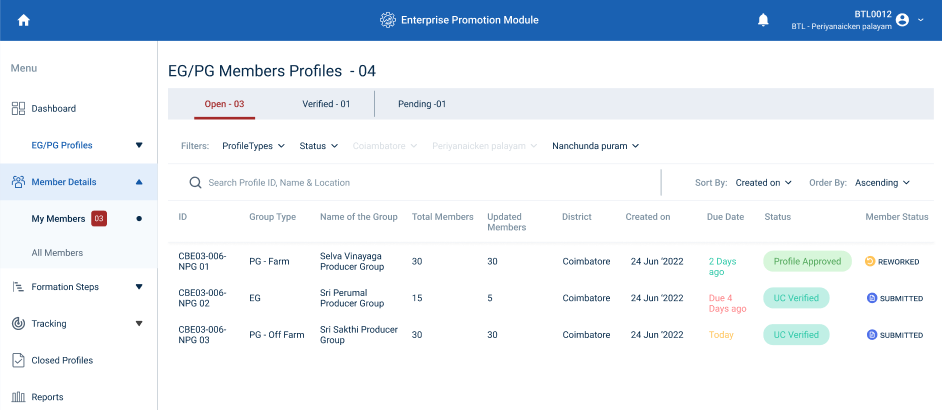
Step 4 : When logged in, click on the ‘Member Details’ on the left side menu
Step 5 : On the ‘Open’ tab, click the ‘My Members’ tab to view the list of updated Enterprise/ Member details submitted by the ECP
Step 6 : Select the profile that has been updated with enterprise /member details submitted by the ECP. Once the BTL has chosen the profile it will get redirect to the updated member details verification flow
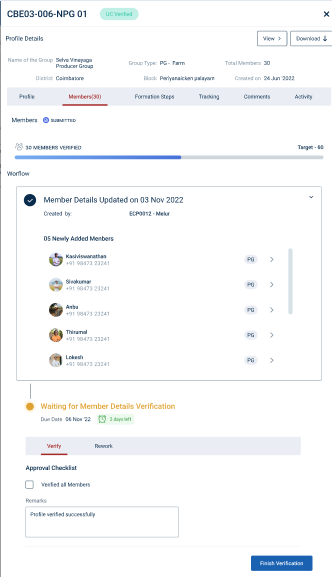
Step 7 : Click the ‘Member’ tab and list of member details will get displayed in the below
Step 8 : To Verify the members click ‘Verify’ and click the checkbox under the approval checklist
Step 9 : Remarks : Enter the remarks in the remarks section
Step 10 : Click ‘Finish Verification’ so the member profile is verified
Step 11 : Once the member details has verified by the BTL, the status of the member details has changed from ‘Submitted’ to ‘Verified’
7. How BTL Send Rework to the Updated Enterprise/Member Details :

Step 1 : Log in with their respective BTL username and password and click Login

Step 2 : After logging in to the VKP staff portal, select the Enterprise Promotion Module name
Step 3 : After selecting the EPM module, the user will be redirected to the respective home page

Step 4 : When logged in, click on the ‘Member Details’ on the left side menu
Step 5 : On the ‘Open’ tab, click the ‘My Members’ tab to view the list of updated Enterprise/ Member details submitted by the ECP
Step 6 : Select the profile that has been updated with enterprise /member details submitted by the ECP. Once the BTL has chosen the profile it will get redirect to the updated member details verification flow
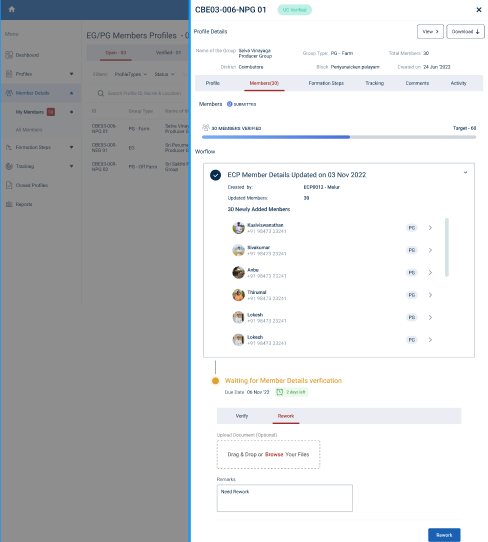
Step 7 : Click the ‘Member’ tab and list of member details will get displayed in the below
Step 8 : To rework the members details click ‘Rework’
Step 9 : Upload Document Required : Click ‘Browse’ to upload the documents.
Step 10 : Remarks : Enter the remarks in the remarks section and click ‘Rework’ the updated member profile details will sent rework to the ECP
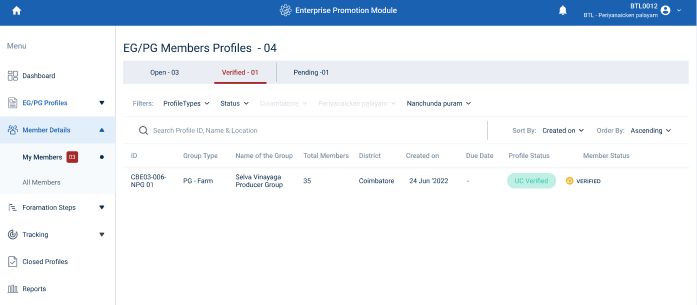
8. How to View the Verified Updated Enterprise/Member Details :

Step 1 : Log in with their respective BTL username and password and click Login

Step 2 : After logging in to the VKP staff portal, select the Enterprise Promotion Module name
Step 3 : After selecting the EPM module, the user will be redirected to the respective home page
Step 4 : When logged in, click on the ‘Member Details’ on the left side menu
Step 5 : On the ‘Verified’ tab, click the ‘My Members’ tab to view the list of verified updated Enterprise/ Member details submitted by the ECP
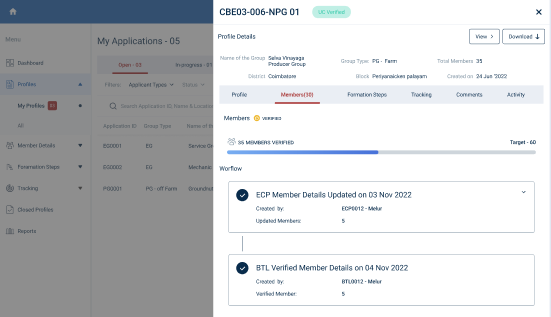
Step 6 : Select the profile that has been verified by the BTL. Once the BTL has verified the member select the profile to view the updated member/enterprise details more
9. How to Check the Pending Updated Enterprise/Member Details :

Step 1 : Log in with their respective BTL username and password and click Login

Step 2 : After logging in to the VKP staff portal, select the Enterprise Promotion Module name
Step 3 : After selecting the EPM module, the user will be redirected to the respective home page

Step 4 : When logged in, click on the ‘Member Details’ on the left side menu
Step 5 : On the ‘Pending’ tab, click the ‘My Members’ tab to view the list of pending updated Enterprise/ Member details submitted by the ECP
Step 6 : If the BTL has beyond the SLA time period the list of updated member/enterprise details will moved to ‘Pending’ tab
10. How to Check the Reworked Updated Enterprise/Member Details :

Step 1 : Log in with their respective BTL username and password and click Login

Step 2 : After logging in to the VKP staff portal, select the Enterprise Promotion Module name
Step 3 : After selecting the EPM module, the user will be redirected to the respective home page
Step 4 : When logged in, click on the ‘Member Details’ on the left side menu
Step 5 : On the ‘Open’ tab, click the ‘My Members’ tab to view the list of reworked updated Enterprise/ Member details reworked and submitted by the ECP
Step 6 : Select the profile that has been updated with enterprise /member details submitted by the ECP. Once the BTL has chosen the profile it will get redirect to the updated member details verification flow
Step 7 : Click the ‘Rework’ tab to check the reworked updated member/enterprise details. The BTL has either verified or reworked the member details.
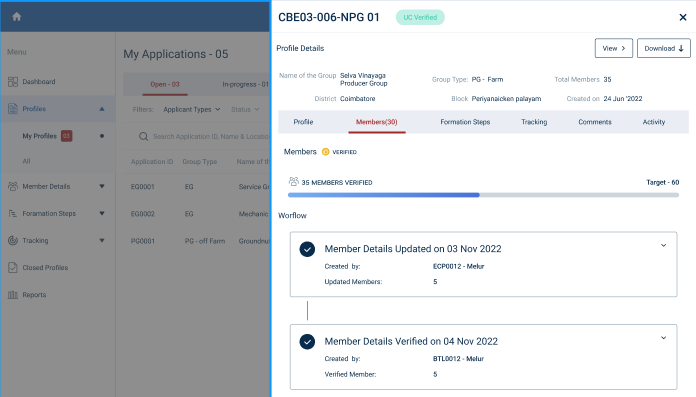
11. How to View the Updated Enterprise/Member Details :

Step 1 : Log in with their respective BTL username and password and click Login

Step 2 : After logging in to the VKP staff portal, select the Enterprise Promotion Module name
Step 3 : After selecting the EPM module, the user will be redirected to the respective home page

Step 4 : When logged in, click on the ‘Member Details’ on the left side menu
Step 5 : On the ‘Open’ tab, click the ‘My Members’ tab to view the list of reworked updated Enterprise/ Member details reworked or submitted by the ECP
Step 6 : Select the profile that has been updated with enterprise /member details submitted by the ECP.
Step 7 : Under the ‘Member’ section the BTL can view the list of updated member/enterprise details
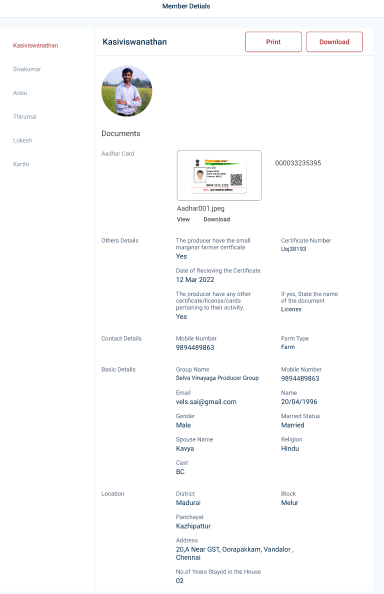
Step 8 : Select the member to view the member details more
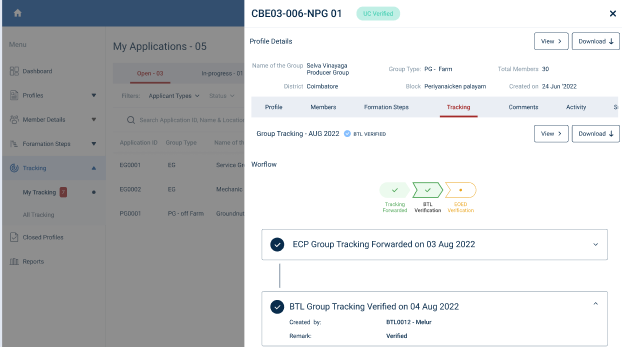
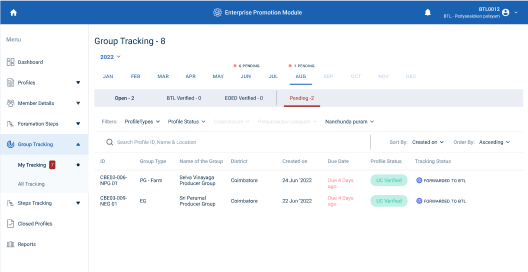
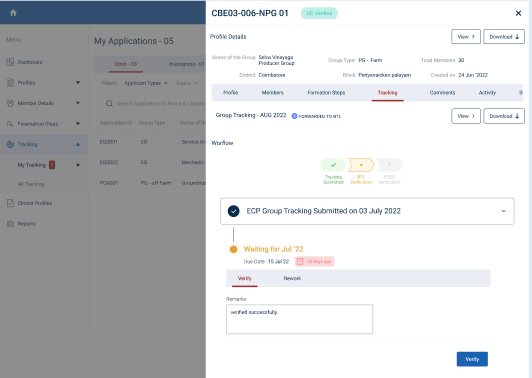
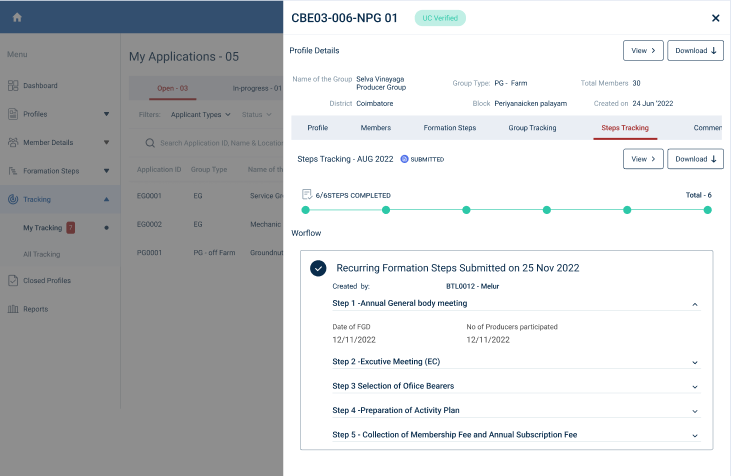
12. How to Verify the Monthly Tracking Capturing Details :

Step 1 : Log in with their respective BTL username and password and click Login

Step 2 : After logging in to the VKP staff portal, select the Enterprise Promotion Module name
Step 3 : After selecting the EPM module, the user will be redirected to the respective home page
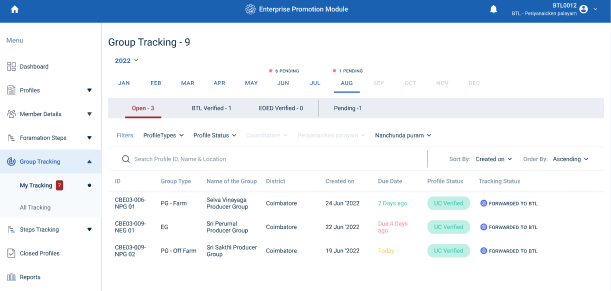
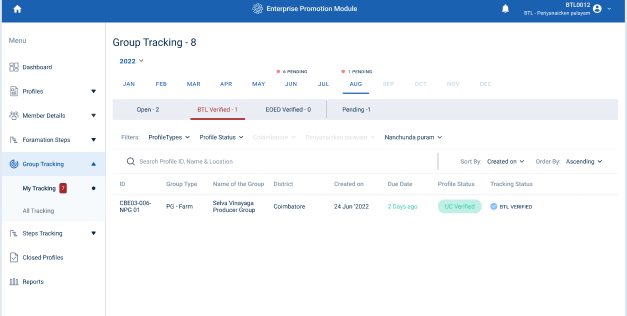
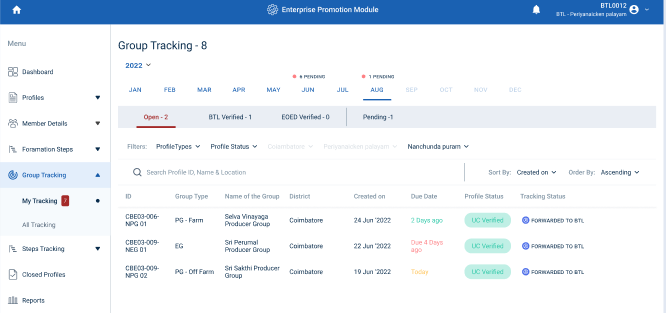
Step 4 : When logged in, click on the ‘Group Tracking’ on the left side menu
Step 5 : On the ‘Open’ tab, click the ‘My Tracking’ tab to view the list of monthly tracking details reworked or forwarded by the ECP and view the status of the tracking details as ‘Forwarded to BTL’
Step 6 : Select the profile that has been updated with monthly capture details submitted by the ECP.
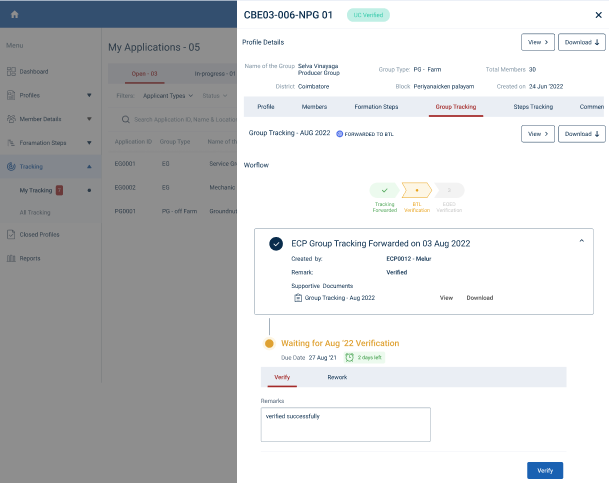
Step 7 : To verify the tracking details click ‘Verify’
Step 8 : Remarks : Enter the remarks in the remarks section and click ‘Verify’ and status of the profile has changed from ‘Forwarded to BTL’ to ‘BTL Verified’
Step 9 : The status of the profile has changed from ‘Open’ to ‘BTL Verified’
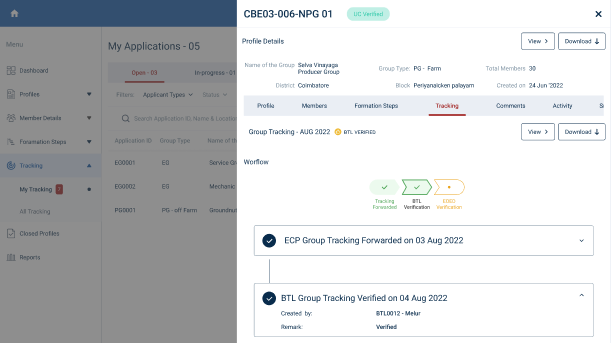
13. How to View the Verified Monthly Tracking Capture Details :
Step 1 : Log in with their respective BTL username and password and click Login

Step 2 : After logging in to the VKP staff portal, select the Enterprise Promotion Module name
Step 3 : After selecting the EPM module, the user will be redirected to the respective home page
Step 4 : When logged in, click on the ‘Group Tracking’ on the left side menu
Step 5 : On the ‘BTL Verified’ tab, to view the status of the tracking details as ‘BTL Verified’
Step 6 : Select the profile to view the profile details more.
14. How to Send Rework to the Monthly Tracking Capturing Details :

Step 1 : Log in with their respective BTL username and password and click Login

Step 2 : After logging in to the VKP staff portal, select the Enterprise Promotion Module name
Step 3 : After selecting the EPM module, the user will be redirected to the respective home page

Step 4 : When logged in, click on the ‘Group Tracking’ on the left side menu
Step 5 : On the ‘Open’ tab, click the ‘My Tracking’ tab to view the list of monthly tracking details reworked or forwarded by the ECP and view the status of the tracking details as ‘Forwarded to BTL’
Step 6 : Select the profile that has been updated with monthly capture details verified by the ECP.
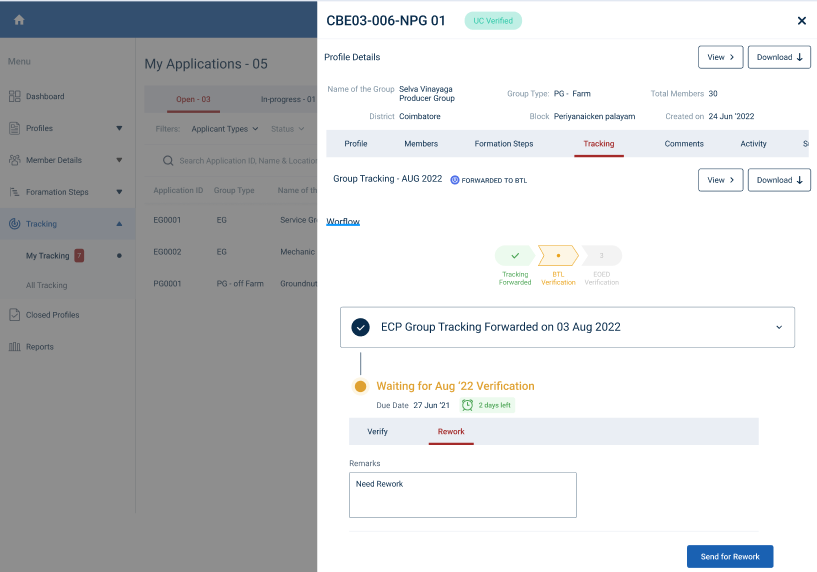
Step 7 : To rework the monthly tracking, click ‘Rework’ and enter the remarks in the remarks section
Step 8 : Once the remarks entered by the BTL, click ‘Send for Rework’ and the reworked profile will be sent to ECP.
Step 9 : Once the BTL send rework the status of the profile has changed from ‘Forwarded to BTL’ to ‘Rework’
15. How BTL Verify/Reworked the Monthly Tracking Details:

Step 1 : Log in with their respective BTL username and password and click Login

Step 2 : After logging in to the VKP staff portal, select the Enterprise Promotion Module name
Step 3 : After selecting the EPM module, the user will be redirected to the respective home page
Step 4 : When logged in, click on the ‘Group Tracking’ on the left side menu
Step 5 : On the ‘Open’ tab, click the ‘My Tracking’ tab to view the list of monthly tracking details reworked or forwarded by the ECP and view the status of the tracking details as ‘Forwarded to BTL’
Step 6 : To view the reworked profile, select the profile that has been reworked by the ECP
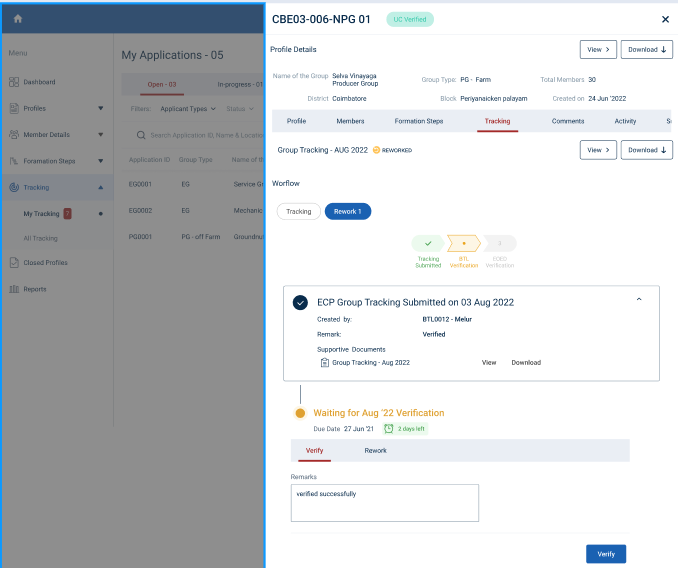
Step 7 : Once the profile has been reworked by the ECP, click the Tracking menu under the profile tracker the BTL can view the list of profile reworked by the ECP and the BTL can view the reworked fields in detail
Step 8 : If the rework profile can verify the BTL click ‘Verify’ to verify the reworked profile or if the BTL wish to rework the profile click ‘Rework’ and send the profile for the rework
16. How BTL Check the Pending Monthly Tracking Details:

Step 1 : Log in with their respective BTL username and password and click Login

Step 2 : After logging in to the VKP staff portal, select the Enterprise Promotion Module name
Step 3 : After selecting the EPM module, the user will be redirected to the respective home page
Step 4 : When logged in, click on the ‘Group Tracking’ on the left side menu
Step 5 : On the ‘Pending’ tab, click the ‘My Tracking’ tab to view the list of pending monthly tracking details reworked or forwarded by the ECP and view the status of the tracking details as ‘Forwarded to BTL’
Step 6 : To view the pending profile, select the profile that has been reworked by the ECP
Step 7 : Once the profile has been forwarded by the ECP, click the Tracking menu under the profile tracker the BTL can view the list of profile forwarded by the ECP
Step 8 : If the forwarded profile can verify the BTL click ‘Verify’ to verify the reworked profile or if the BTL wish to rework the profile click ‘Rework’ and send the profile for the rework
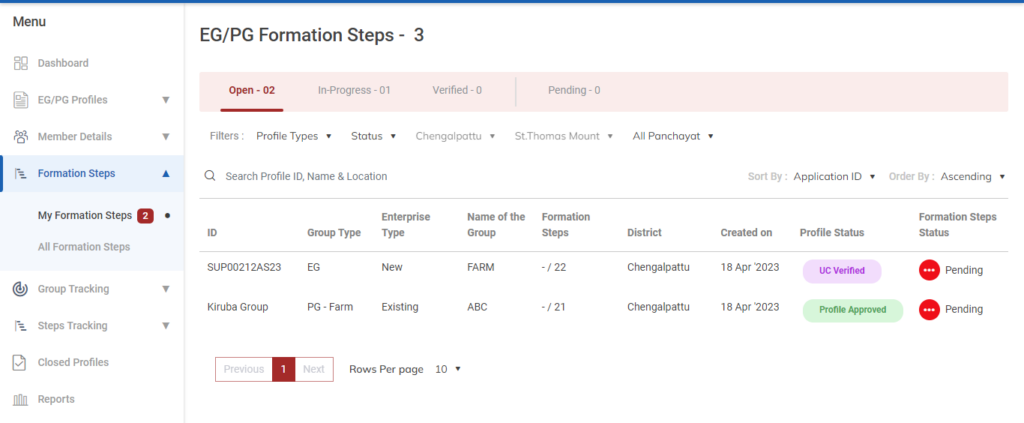
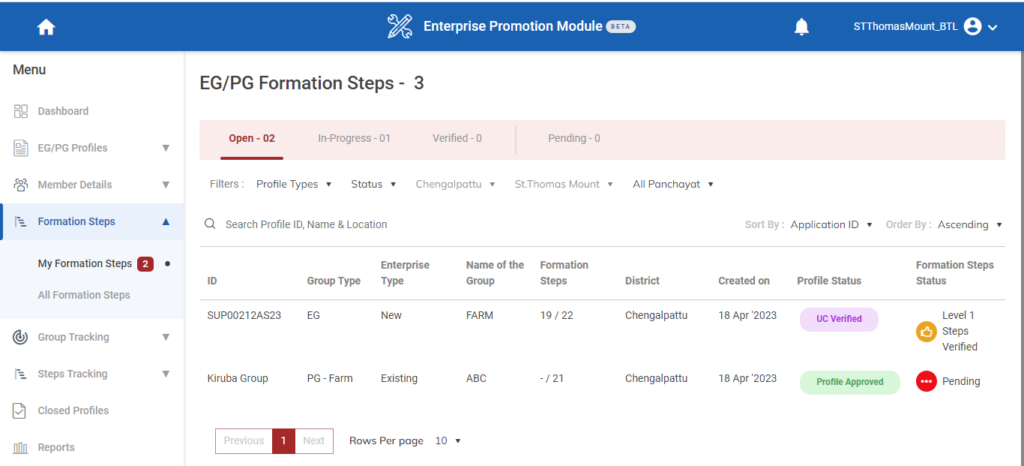
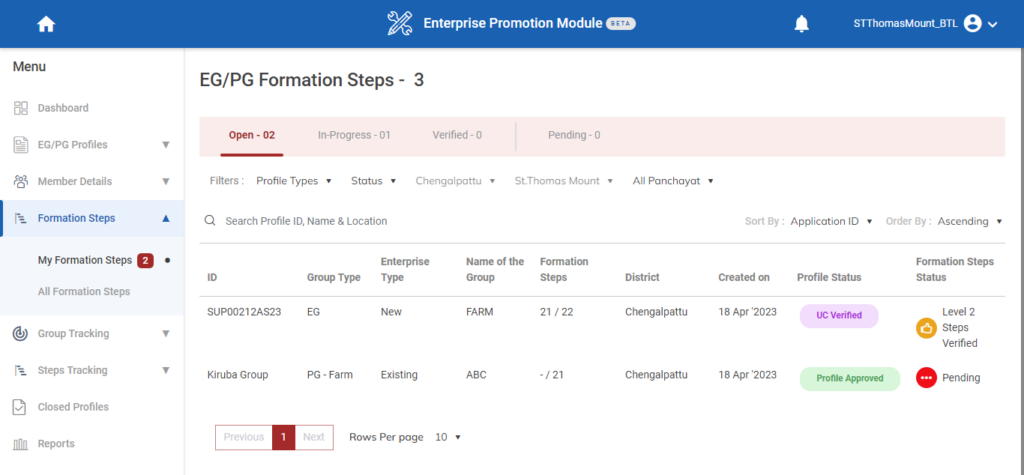
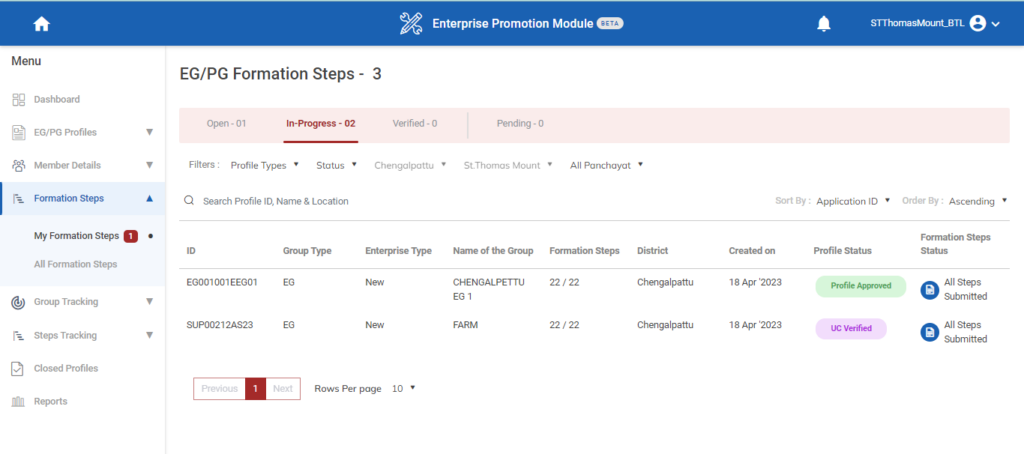
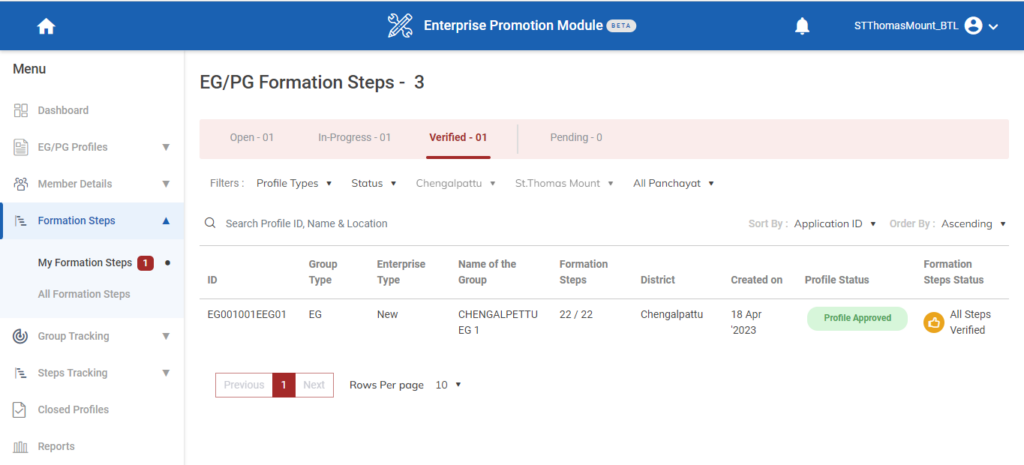
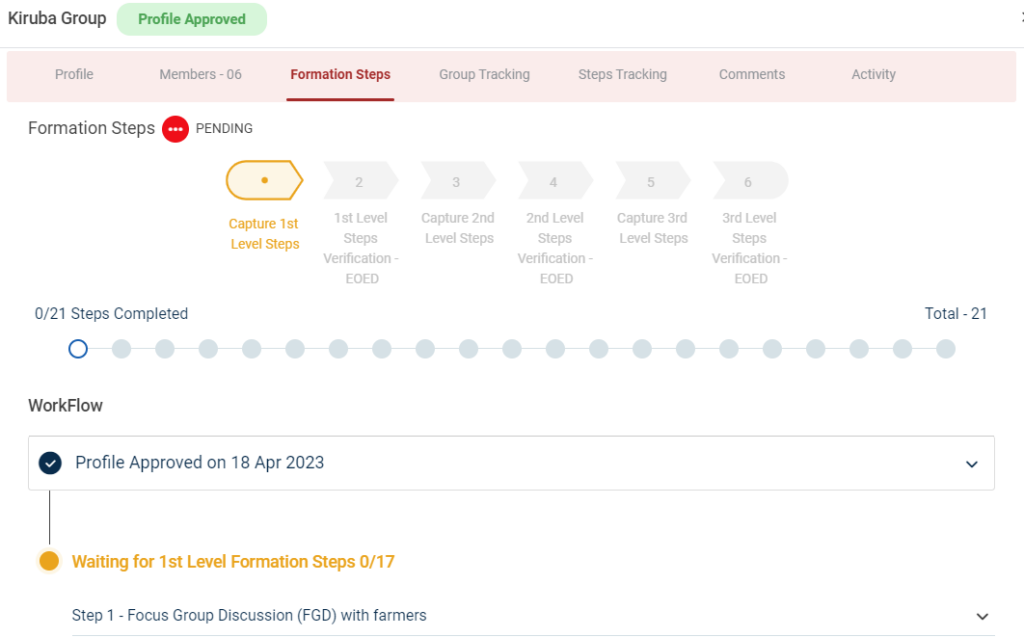
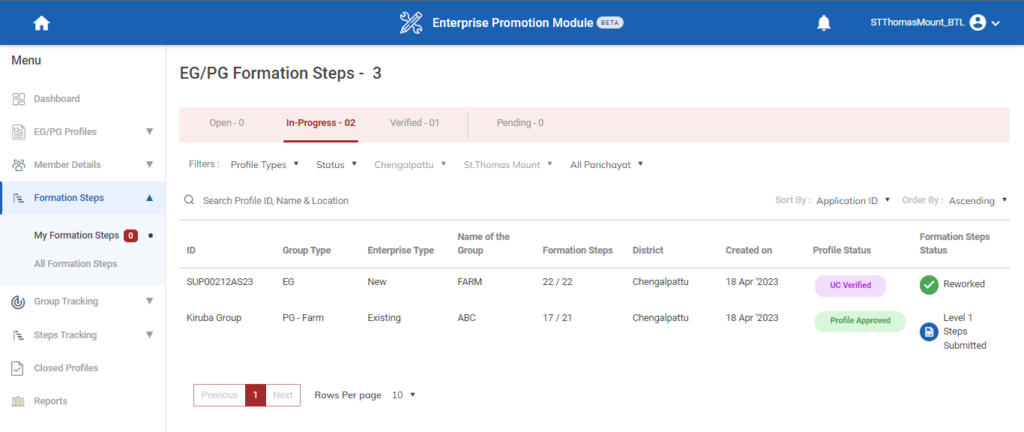
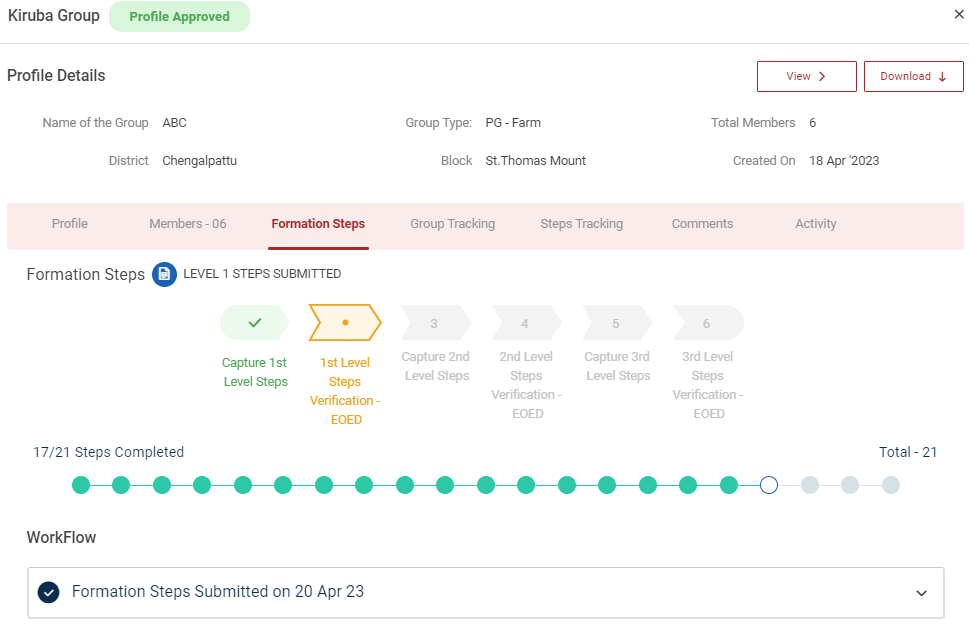
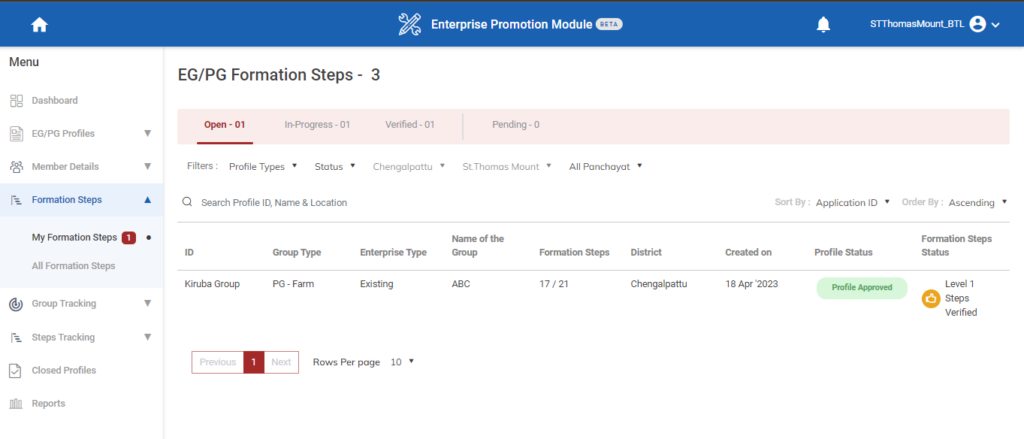
17. How to Create the Formation Steps:

Step 1 : Log in with their respective BTL username and password and click Login

Step 2 : After logging in to the VKP staff portal, select the Enterprise Promotion Module name
Step 3 : After selecting the EPM module, the user will be redirected to the respective home page

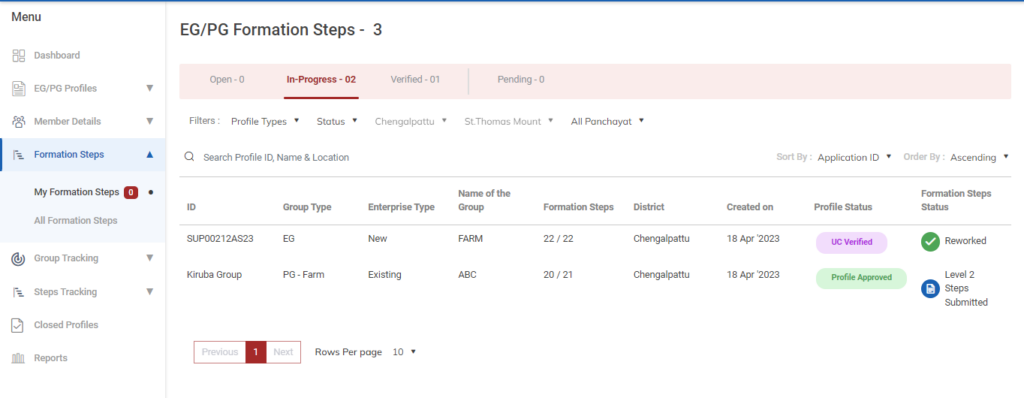
Step 4 : When logged in, click on the ‘Formation Steps’ on the left side menu
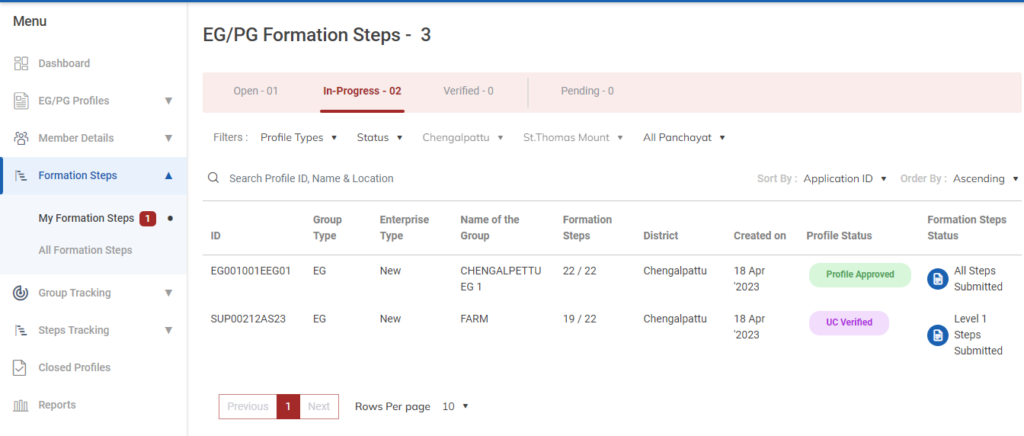
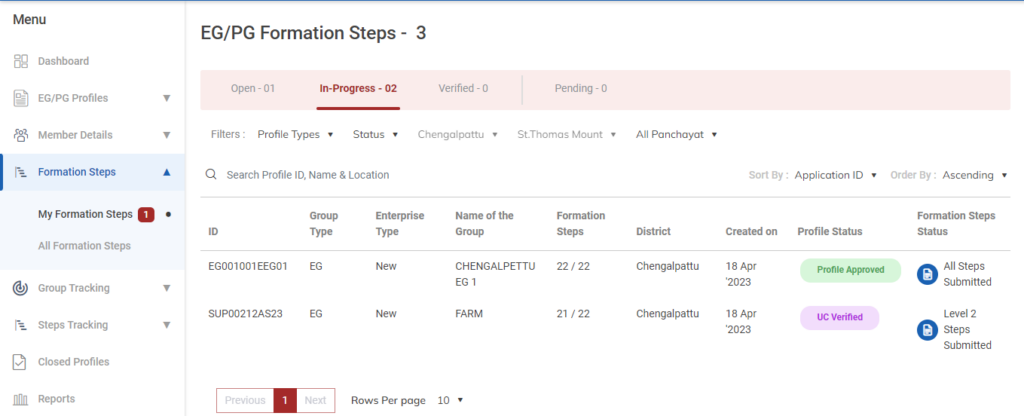
Step 5 : On the ‘Open’ tab, click the ‘My Formation Steps’ tab to view the list of profiles approved by the DCOO.
Step 6 : Select the profile to view the application details more
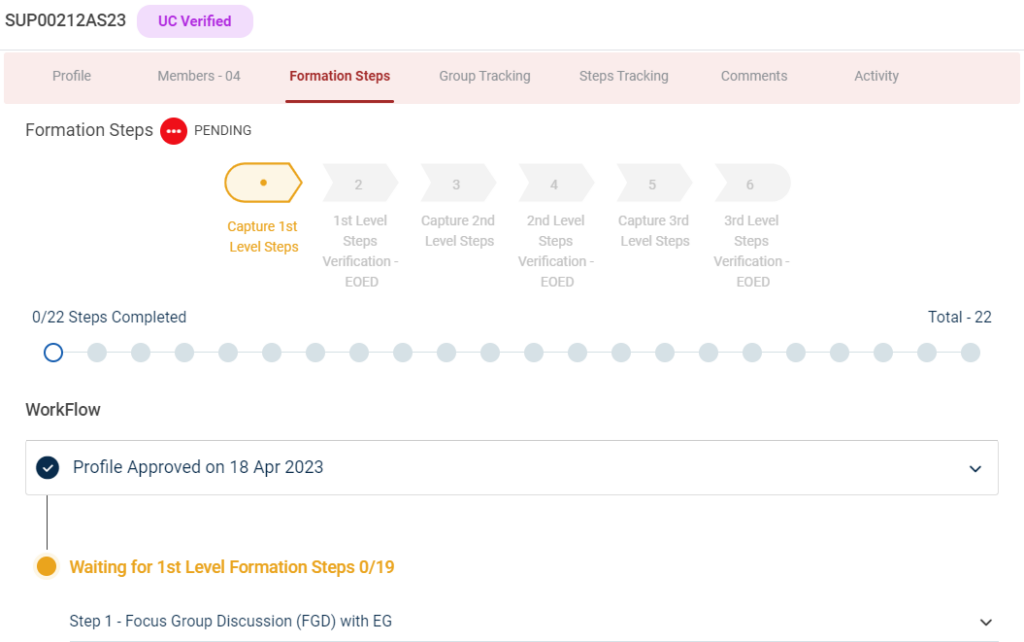
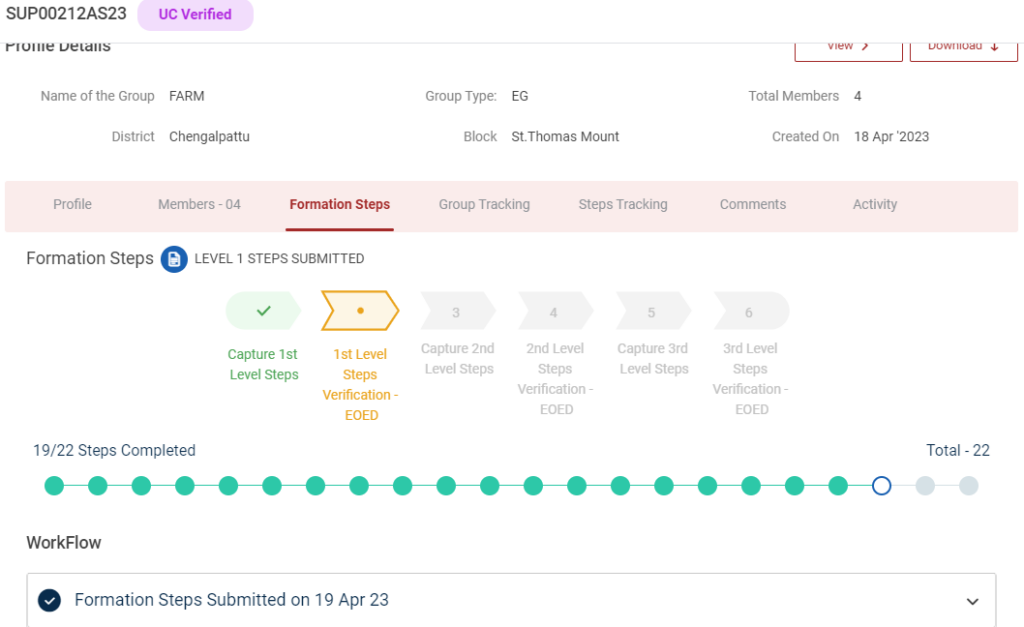
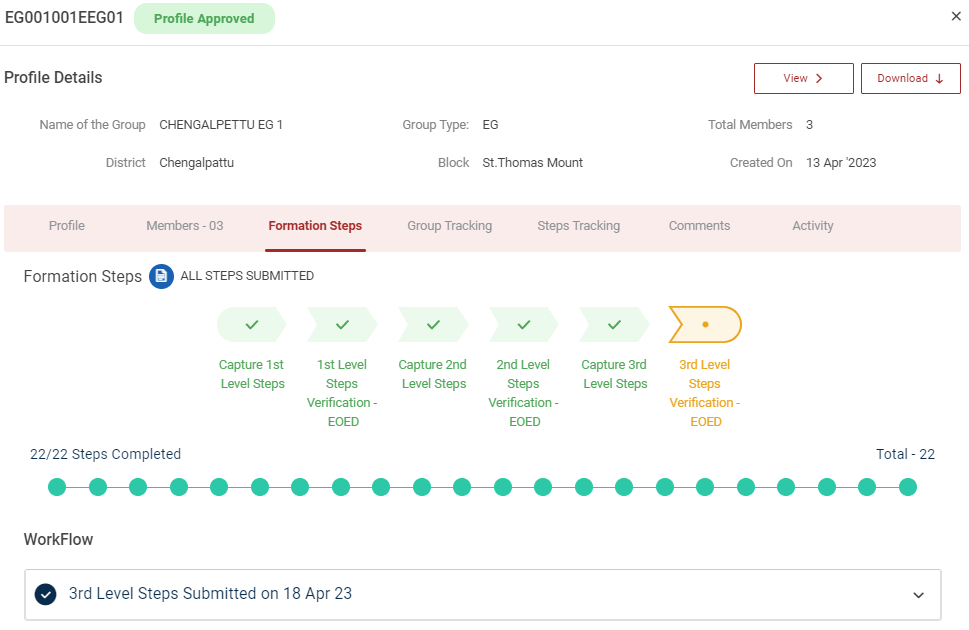
Step 7 : Under the ‘Formation Steps’ the BTL has created the 1st Level Formation Steps
18. How to Create the Level 1 Formation Steps (EG):

Step 1 : Log in with their respective BTL username and password and click Login

Step 2 : After logging in to the VKP staff portal, select the Enterprise Promotion Module name
Step 3 : After selecting the EPM module, the user will be redirected to the respective home page
Step 4 : When logged in, click on the ‘Formation Steps’ on the left side menu
Step 5 : On the ‘Open’ tab, click the ‘My Formation Steps’ tab to view the list of profiles approved by the DCOO.
Step 6 : Select the profile to view the application details more
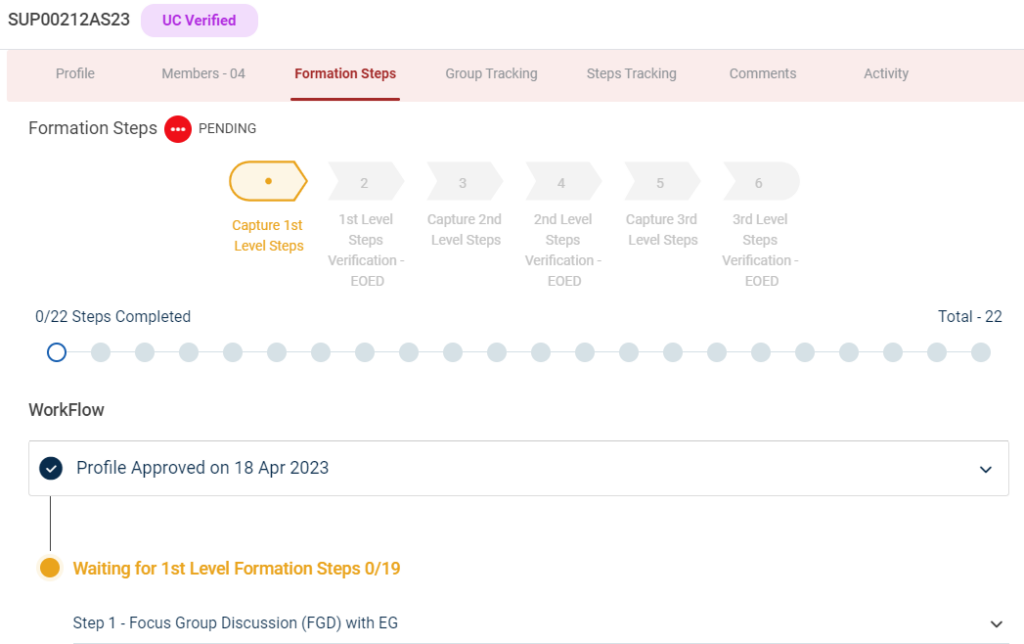
Step 7 : Waiting for 1st Level Formation Steps :
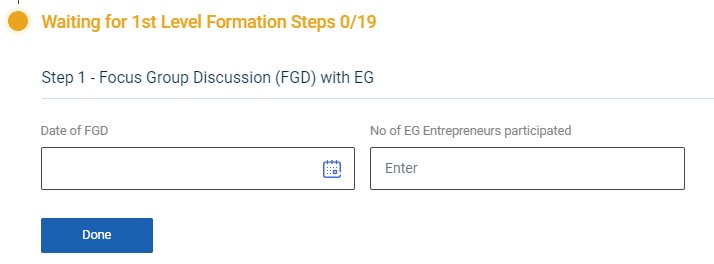
Step 7.1 : Focus Group Discussion (FDG) with EG :
Step 7.1.1 Date of FGD : By clicking the calendar, to choose the focus group discussion date
Step 7.1.2 No of EG Entrepreneurs Participated : Enter the number of EG entrepreneur has participated
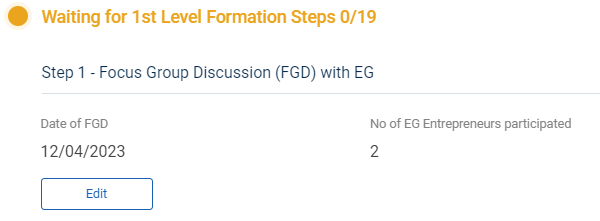
Step 7.1.3 Once entered the data, click ‘Done’
Step 7.1.4 Once the BTL click done the data saved successfully, Click ‘Edit’ to edit the data
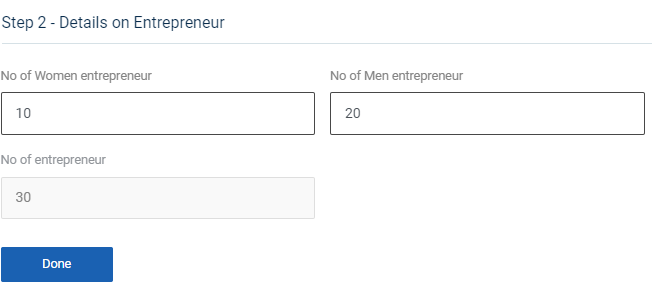
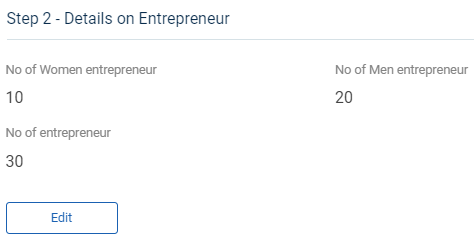
Step 7.2 : Details of the Entrepreneur :
Step 7.2.1 Number of Women Entrepreneur : Enter the number of women entrepreneur
Step 7.2.2 Number of Men Entrepreneur : Enter the number of men entrepreneur
Step 7.2.3 Number of Entrepreneur : The total number of entrepreneur has auto populated based on total number of men & women entrepreneur count
Step 7.2.4 Once entered the data, click ‘Done’
Step 7.2.5 Once the BTL click done the data saved successfully, Click ‘Edit’ to edit the data

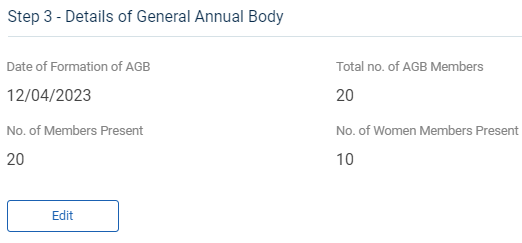
Step 7.3 : Details of General Annual Body :
Step 7.3.1 Date of Formation of AGB : By clicking the calendar to choose the formation steps of annual general body
Step 7.3.2 Total number of AGB members : Enter the total number of AGB members
Step 7.3.3 Number of Members Present : Enter the total number of members present
Step 7.3.4 Number of Women Members Present : Enter the total number of women members present
Step 7.3.5 Once entered the data, click ‘Done’
Step 7.3.6 Once the BTL click done the data saved successfully, Click ‘Edit’ to edit the data

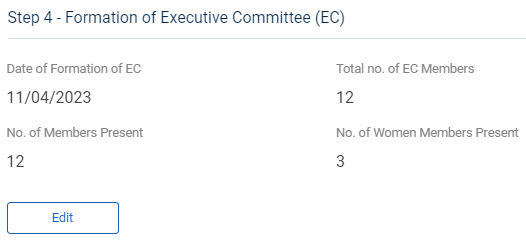
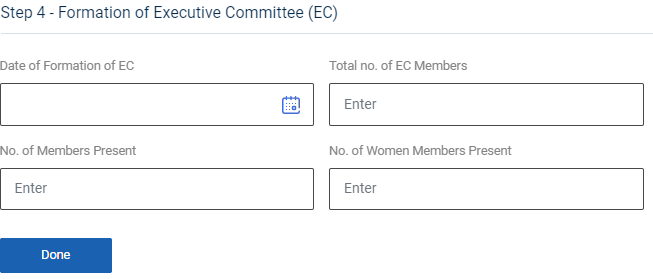
Step 7.4 : Formation of Executive Committee (EC) :
Step 7.4.1 Date of Formation of EC : By clicking the calendar to choose the formation date of EC
Step 7.4.2 Total number of EC members : Enter the total number of EC members
Step 7.4.3 Number of Members Present : Enter the total number of members present
Step 7.4.4 Number of Women Members Present : Enter the total number of women members present
Step 7.4.5 Once entered the data, click ‘Done’
Step 7.4.6 Once the BTL click done the data saved successfully, Click ‘Edit’ to edit the data
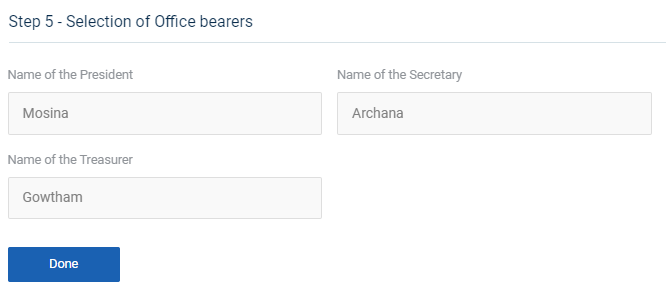

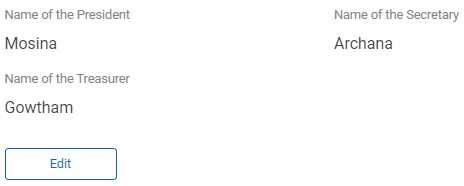
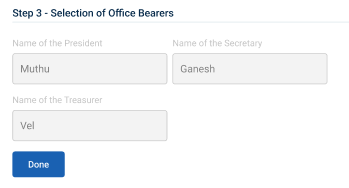
Step 7.5 : Selection of Office Bearer :
Step 7.5.1 Name of the President : The president details will auto populate based on the previous data
Step 7.5.2 Name of the Secretary : The secretary details will auto populate based on the previous data
Step 7.5.3 Name of the Treasurer : The treasurer details will auto populate based on the previous data
Step 7.5.4 Once entered the data, click ‘Done’
Step 7.5.5 Once the BTL click done the data saved successfully, Click ‘Edit’ to edit the data
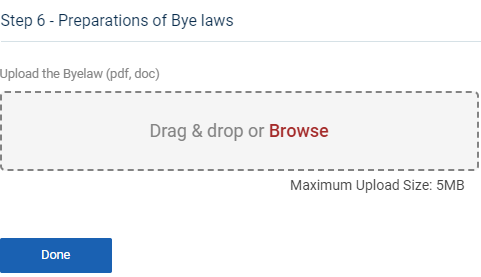
Step 7.6 : Preparation of Byelaw :
Step 7.6.1 Upload the Byelaw : Click ‘Browse’ to upload the byelaw document
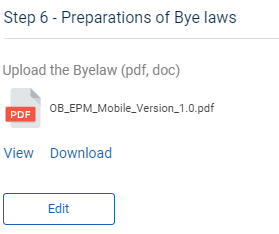
Step 7.6.2 Once entered the data, click ‘Done’
Step 7.6.3 Once the BTL click done the data saved successfully, Click ‘Edit’ to edit the data
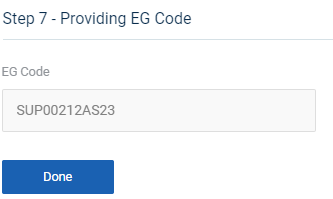
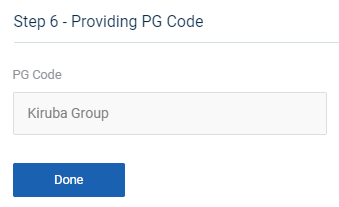
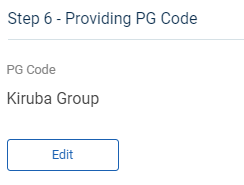
Step 7.7 : Providing EG Code :
Step 7.7.1 EG Code : The EG Code will auto populate based on the previous data
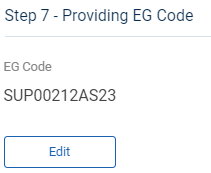
Step 7.7.2 Once entered the data, click ‘Done’
Step 7.7.3 Once the BTL click done the data saved successfully, Click ‘Edit’ to edit the data
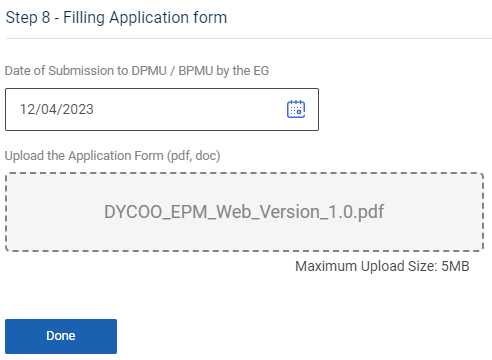
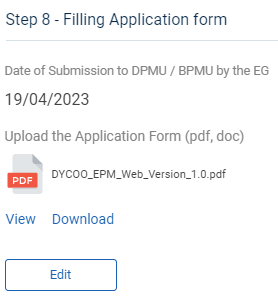
Step 7.8 : Filling Application Form :
Step 7.8.1 Date of Submission to DPMU/BPMU by the EG : By clicking the calendar to choose the submission date to DPMU/BPMU by the EG
Step 7.8.2 Upload the Application Form : Click ‘Browse’ to upload the application form
Step 7.8.3 Once entered the data, click ‘Done’
Step 7.8.4 Once the BTL click done the data saved successfully, Click ‘Edit’ to edit the data
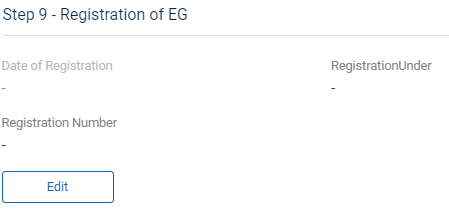
Step 7.9 : Registration of EG :
Step 7.9.1 The date of registration, Registration under and registration number will auto populate based on the previous data
Step 7.9.2 Once entered the data, click ‘Done’
Step 7.9.3 Once the BTL click done the data saved successfully, Click ‘Edit’ to edit the data
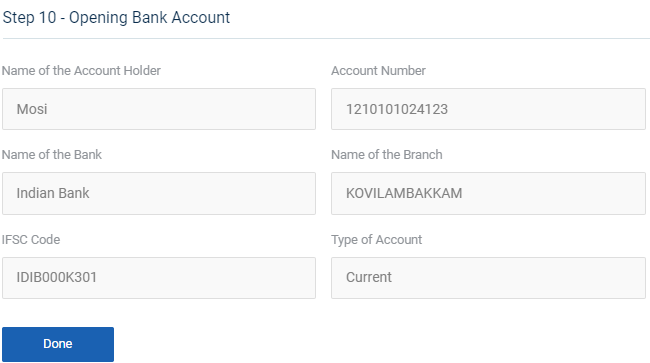
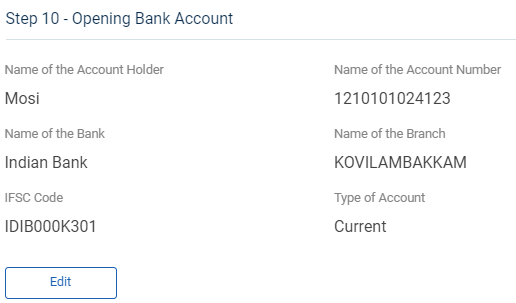
Step 7.10 : Opening Bank Account :
Step 7.10.1 The account holder name, account number, bank name, branch name, IFSC code and account type will auto populate based on the previous data
Step 7.10.2 Once entered the data, click ‘Done’
Step 7.10.3 Once the BTL click done the data saved successfully, Click ‘Edit’ to edit the data
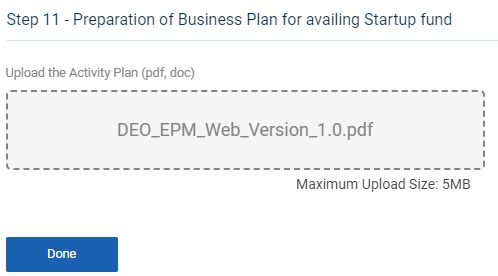
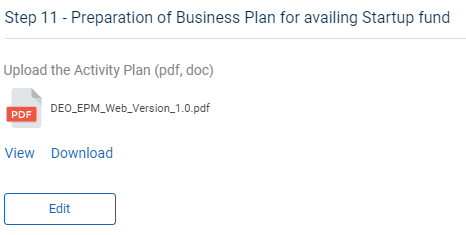
Step 7.11 : Preparation of Business Plan for Availing Startup Fund :
Step 7.11.1 Upload the Activity Plan : Click ‘Browse’ to upload the activity plan document
Step 7.11.2 Once entered the data, click ‘Done’
Step 7.11.3 Once the BTL click done the data saved successfully, Click ‘Edit’ to edit the data
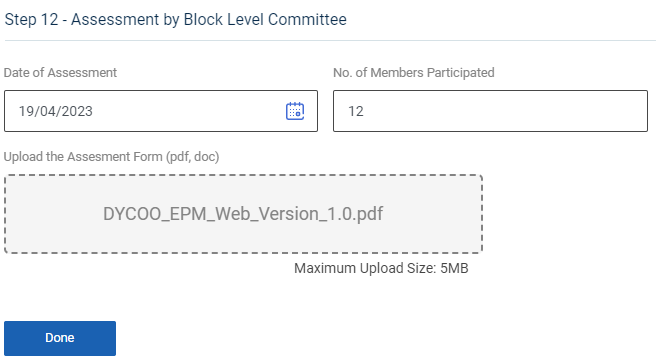
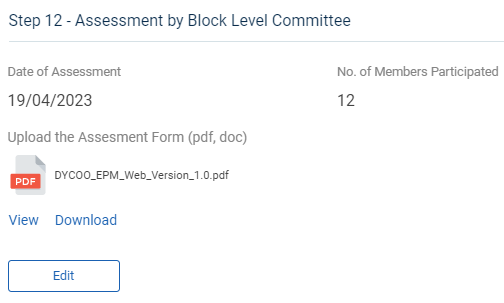
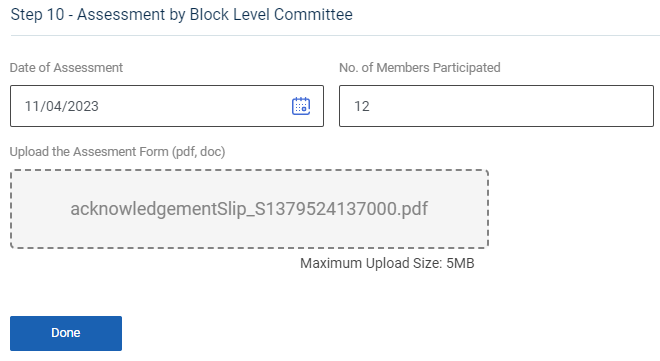
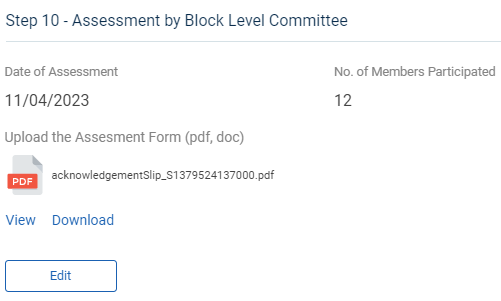
Step 7.12 : Assessment by Block Level Committee :
Step 7.12.1 Date of Assessment : By clicking the calendar to choose the assessment date
Step 7.12.2 : Upload the Assessment Form : Click ‘Browse’ to upload the assessment form
Step 7.12.2 Once entered the data, click ‘Done’
Step 7.12.3 Once the BTL click done the data saved successfully, Click ‘Edit’ to edit the data
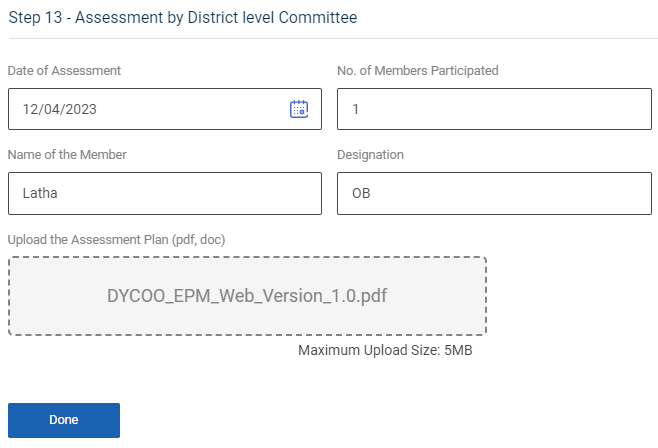
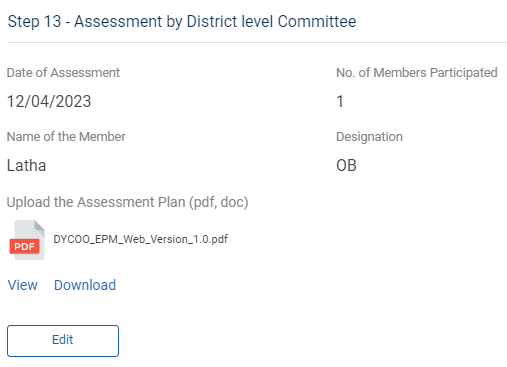
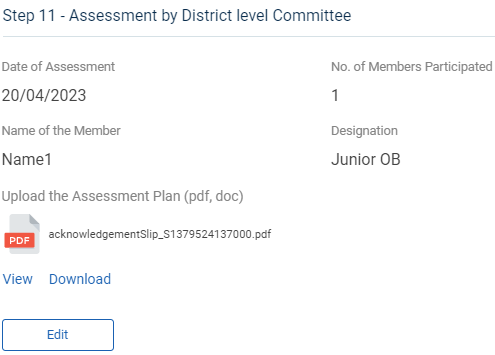
Step 7.13 : Assessment by District Level Committee :
Step 7.13.1 Date of Assessment : By clicking the calendar to choose the assessment date
Step 7.13.2 No of Members Participated : Enter the total number of members participated and enter the member name and designation
Step 7.13.3 : Upload the Assessment Form : Click ‘Browse’ to upload the assessment form
Step 7.13.4 Once entered the data, click ‘Done’
Step 7.13.5 Once the BTL click done the data saved successfully, Click ‘Edit’ to edit the data
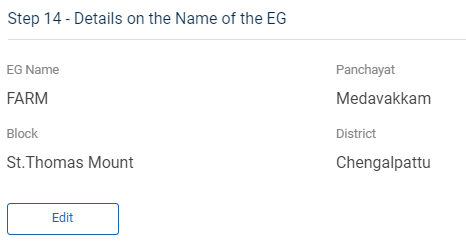
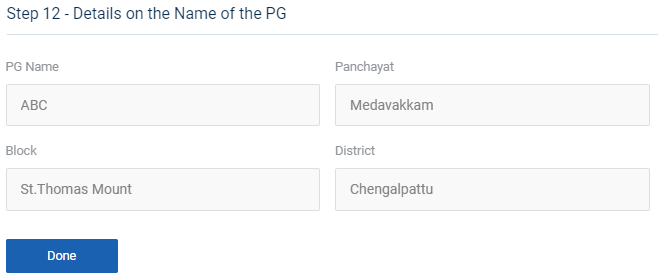
Step 7.14 : Details on the Name of the EG :
Step 7.14.1 The EG name,panchayat,block and district will auto populate based on the previous data
Step 7.14.2 Once entered the data, click ‘Done’
Step 7.14.3 Once the BTL click done the data saved successfully, Click ‘Edit’ to edit the data
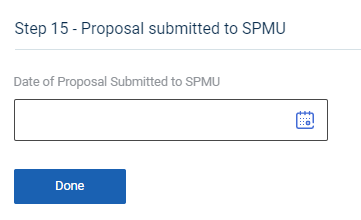
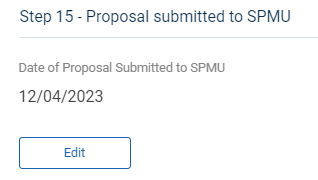
Step 7.15 : Proposal Submitted to SPMU :
Step 7.15.1 Date of Proposal submitted to SPMU : By clicking the calendar to choose the proposal date submitted by SPMU
Step 7.15.2 Once entered the data, click ‘Done’
Step 7.15.3 Once the BTL click done the data saved successfully, Click ‘Edit’ to edit the data
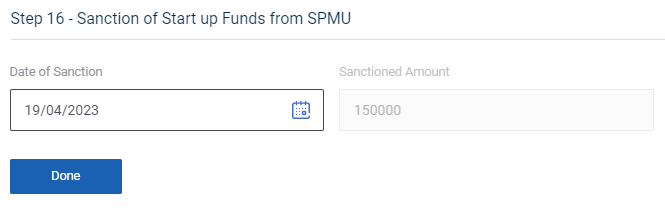
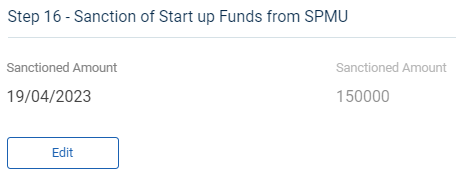
Step 7.16 : Sanction of Start Up Funds from SPMU :
Step 7.16.1 Sanction Amount : By clicking the calendar to choose the sanctioned amount date submitted by SPMU
Step 7.16.2 Once entered the data, click ‘Done’
Step 7.16.3 Once the BTL click done the data saved successfully, Click ‘Edit’ to edit the data
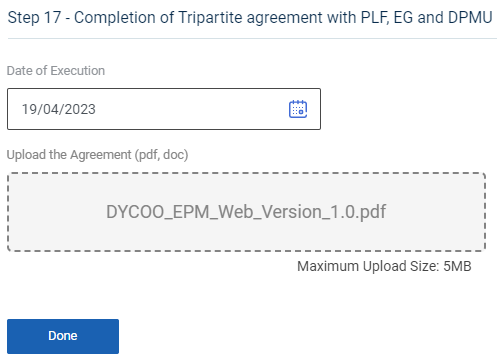
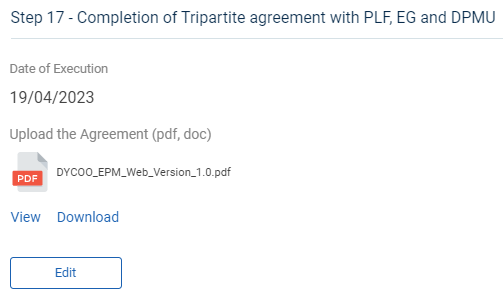
Step 7.17 : Completion of Tripartite agreement with PLF, EG & DPMU :
Step 7.17.1 Date of Execution : By clicking the calendar to choose the execution date
Step 7.17.2 : Upload the Agreement : Click ‘Browse’ to upload the agreement
Step 7.17.3 Once entered the data, click ‘Done’
Step 7.17.4 Once the BTL click done the data saved successfully, Click ‘Edit’ to edit the data

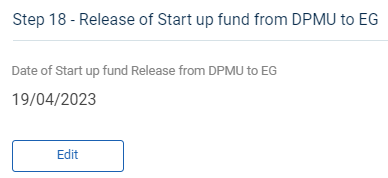
Step 7.18 : Release of Start up fund from DPMU to EG :
Step 7.18.1 Date of Start up fund from DPMU to EG : By clicking the calendar to choose the release of start up fund from DPMU to EG
Step 7.18.2 Once entered the data, click ‘Done’
Step 7.18.3 Once the BTL click done the data saved successfully, Click ‘Edit’ to edit the data
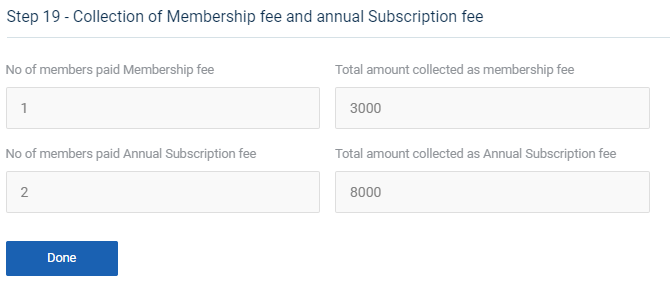
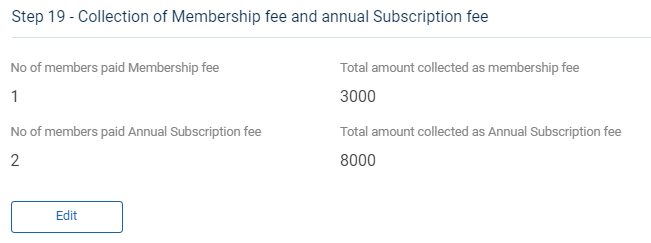
Step 7.19 : Collection of Membership Fee & Annual Subscription Fee :
Step 7.19.1 The total number of members paid membership fee, total amount collected as membership fee, total number of members paid annual subscription fee and total amount collected as annual subscription fee as auto populated based on the previous data
Step 7.19.2 Once entered the data, click ‘Done’
Step 7.19.3 Once the BTL click done the data saved successfully, Click ‘Edit’ to edit the data
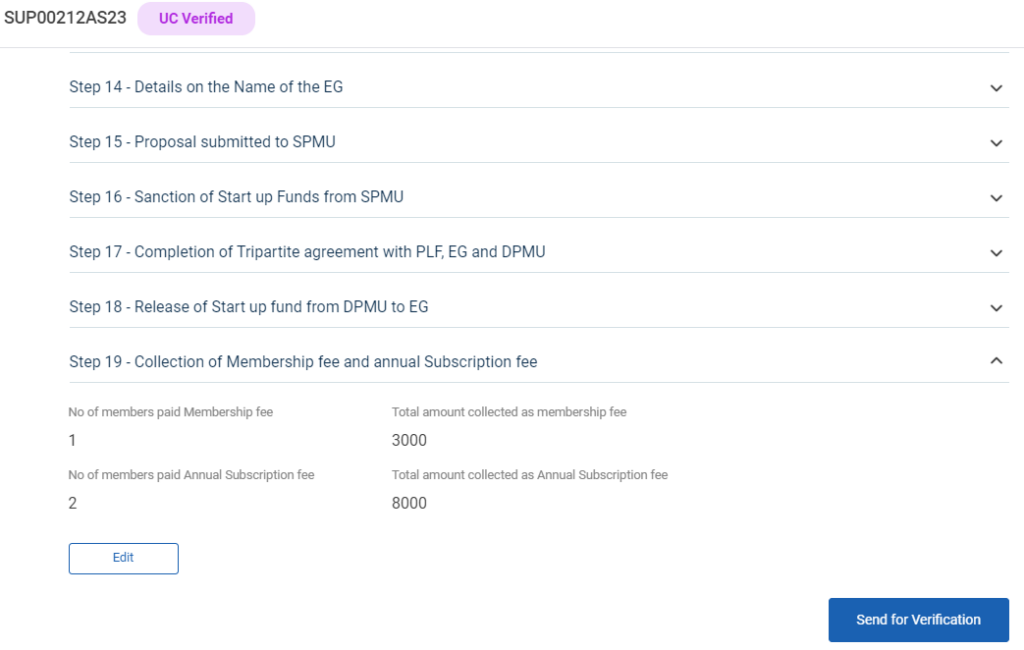
Step 8 : Once the steps has completed click ‘Send for Verification’ and the status of the steps has changed from ‘Level 1 Steps Submitted’
19. How to View the Level 1 Formation Steps (EG):

Step 1 : Log in with their respective BTL username and password and click Login

Step 2 : After logging in to the VKP staff portal, select the Enterprise Promotion Module name
Step 3 : After selecting the EPM module, the user will be redirected to the respective home page
Step 4 : When logged in, click on the ‘Formation Steps’ on the left side menu
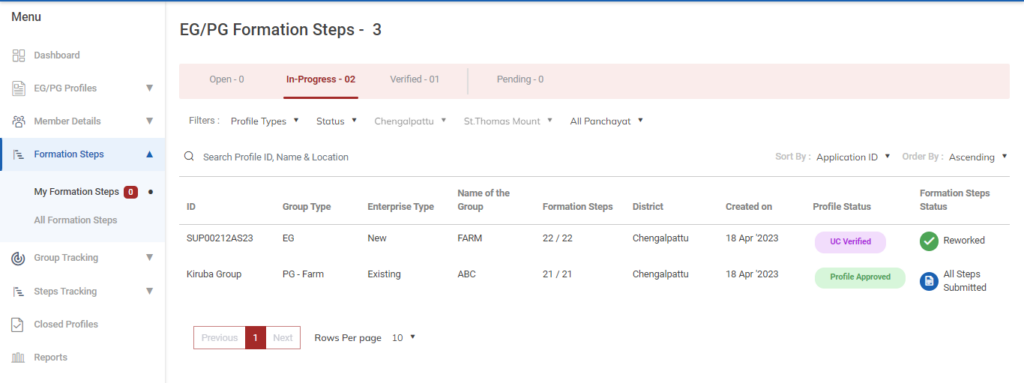
Step 5 : On the ‘Inprogress’ tab, click the ‘My Formation Steps’ tab to view the list of formation steps profile completed by the BTL.
Step 6 : Select the profile to view the application details more
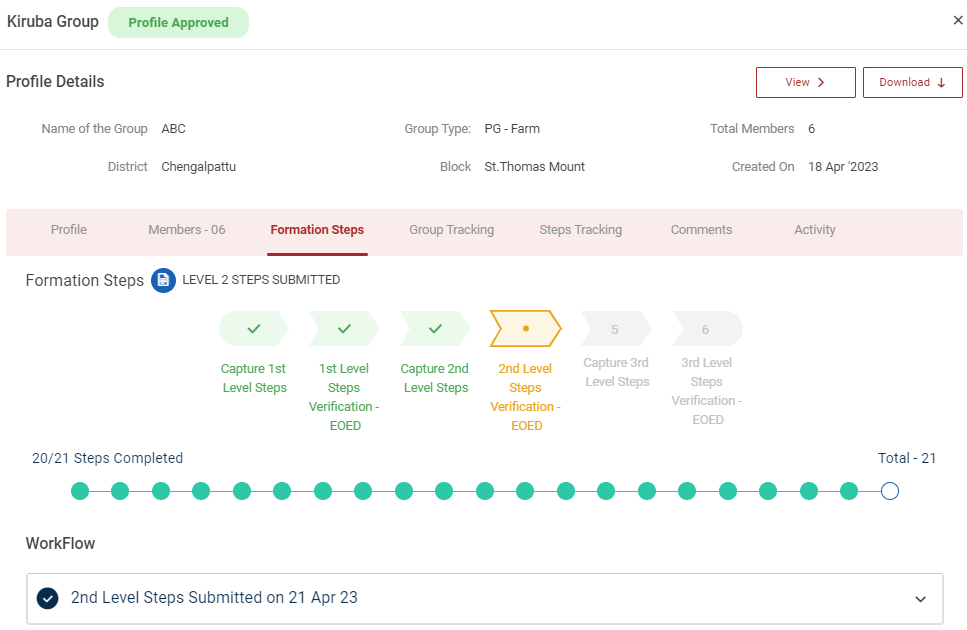
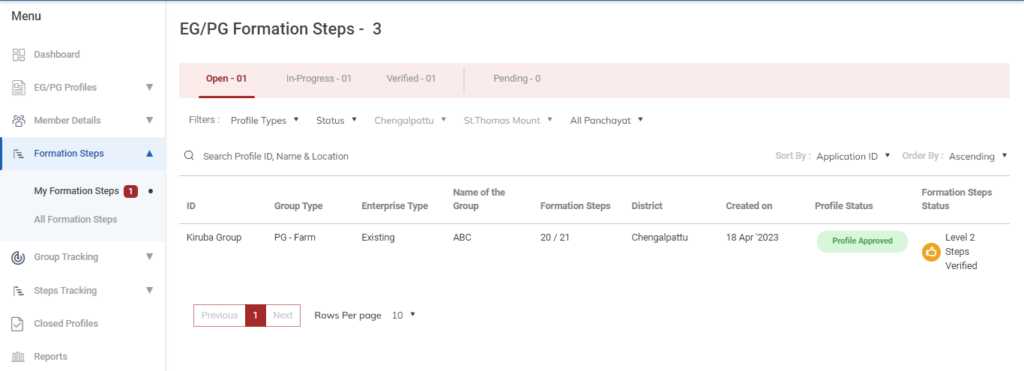
20. How to Create the Level 2 Formation Steps (EG):

Step 1 : Log in with their respective BTL username and password and click Login

Step 2 : After logging in to the VKP staff portal, select the Enterprise Promotion Module name
Step 3 : After selecting the EPM module, the user will be redirected to the respective home page
Step 4 : When logged in, click on the ‘Formation Steps’ on the left side menu
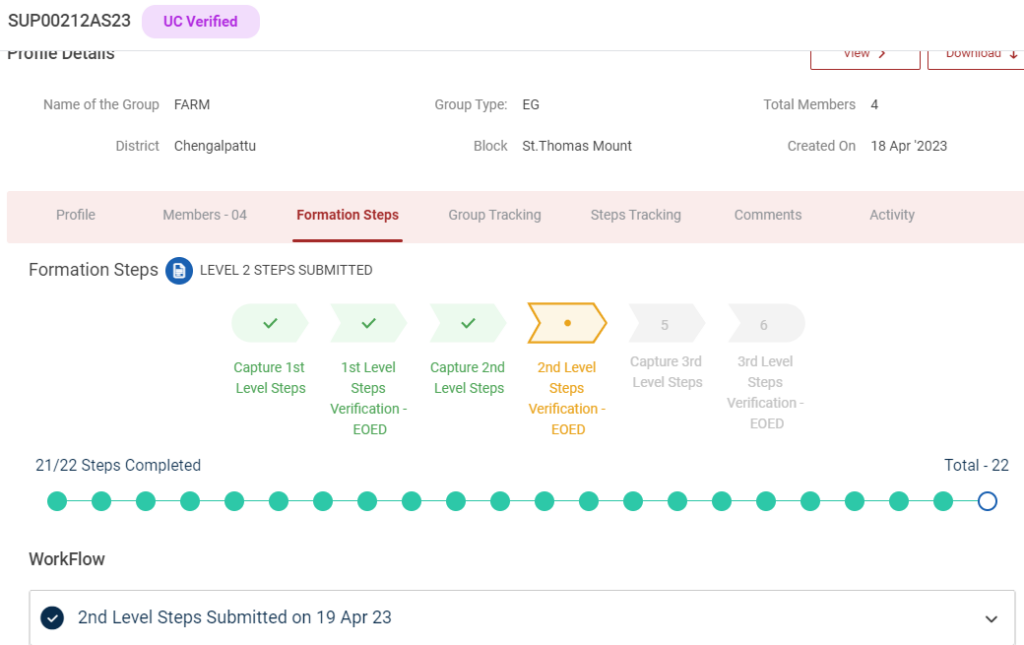
Step 5 : On the ‘Open’ tab, click the ‘My Formation Steps’ tab to view the list of formation steps verified by the EO-ED.
Step 6 : Select the profile to view the application details more
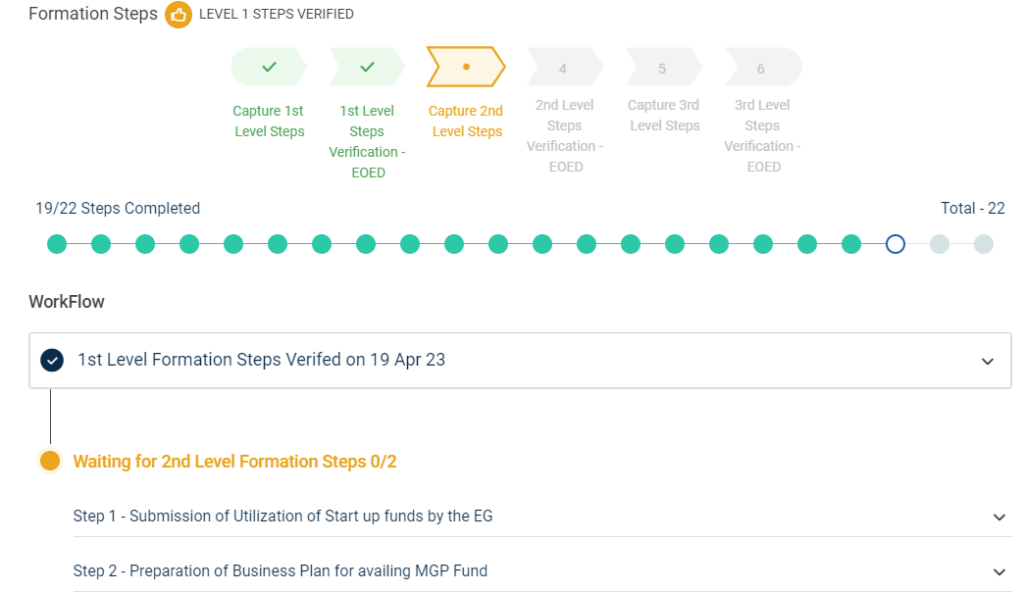
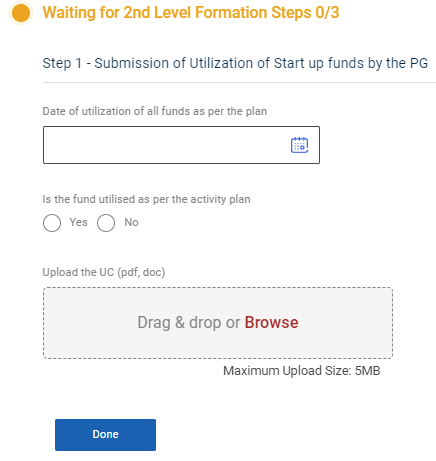
Step 7 : Waiting for 2nd Level Formation Steps :
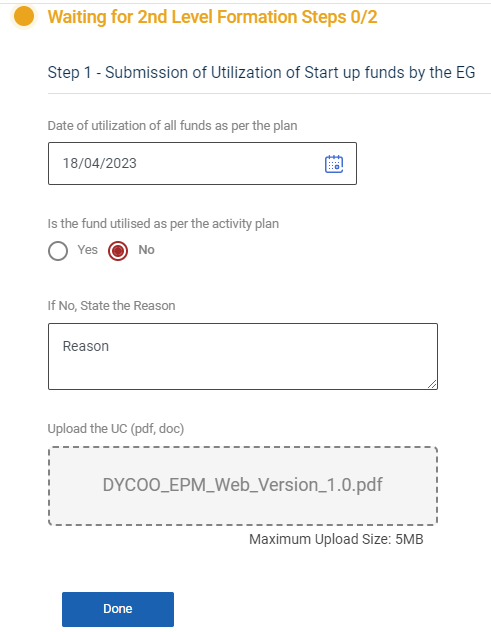
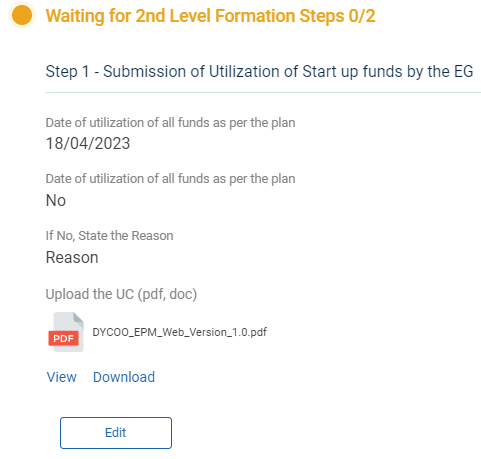
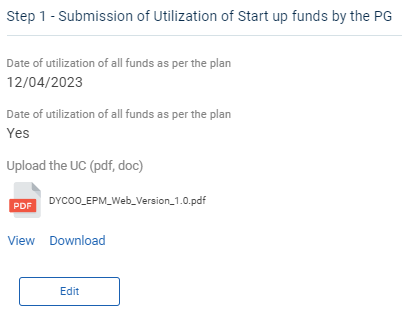
Step 7.1 : Submission of Utilisation of startup funds by EG :
Step 7.1.1 Date of Utilisation of all funds as per the plan : By clicking the calendar to choose the utilisation date
Step 7.1.2 : Date of Utilisation of all funds as per the plan : If all funds are utilised as per the plan click ‘Yes’ or choose ‘No’ , Enter the reason when we click ‘No’ option
Step 7.1.3 : Upload the UC : Click ‘Browse’ to upload the UC
Step 7.1.4 Once entered the data, click ‘Done’
Step 7.1.5 Once the BTL click done the data saved successfully, Click ‘Edit’ to edit the data
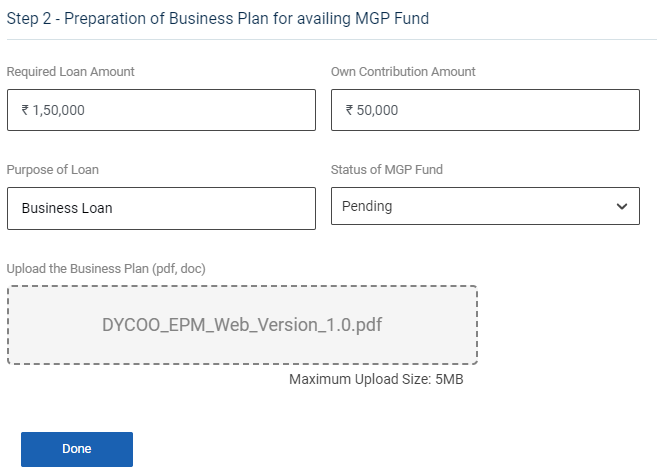
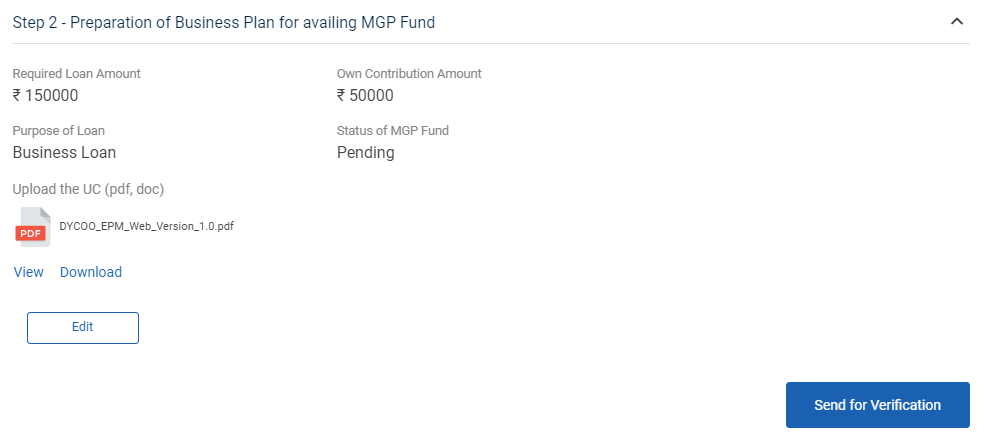
Step 7.2 : Preparation of Business Plan for availing MGP Fund:
Step 7.2.1 Required Loan Amount : Entered the required loan amount
Step 7.2.2 Own Contribution Amount : Entered the Own Contribution amount
Step 7.2.3 : Purpose of Loan : Enter the purpose of the loan
Step 7.2.4 : State of MGP Fund : By clicking the dropdown to choose the MGP fund
Step 7.2.5 : Upload the UC : Click ‘Browse’ to upload the UC document
Step 7.2.6 Once entered the data, click ‘Done’
Step 7.2.7 Once the BTL click done the data saved successfully, Click ‘Edit’ to edit the data
Step 8 : Once the steps has completed click ‘Send for Verification’ and the status of the steps has changed from ‘Level 2 Steps Submitted’
21. How to View the Level 2 Formation Steps (EG):

Step 1 : Log in with their respective BTL username and password and click Login

Step 2 : After logging in to the VKP staff portal, select the Enterprise Promotion Module name
Step 3 : After selecting the EPM module, the user will be redirected to the respective home page
Step 4 : When logged in, click on the ‘Formation Steps’ on the left side menu
Step 5 : On the ‘Inprogress’ tab, click the ‘My Formation Steps’ tab to view the list of formation steps profile completed by the BTL.
Step 6 : Select the profile to view the application details more.
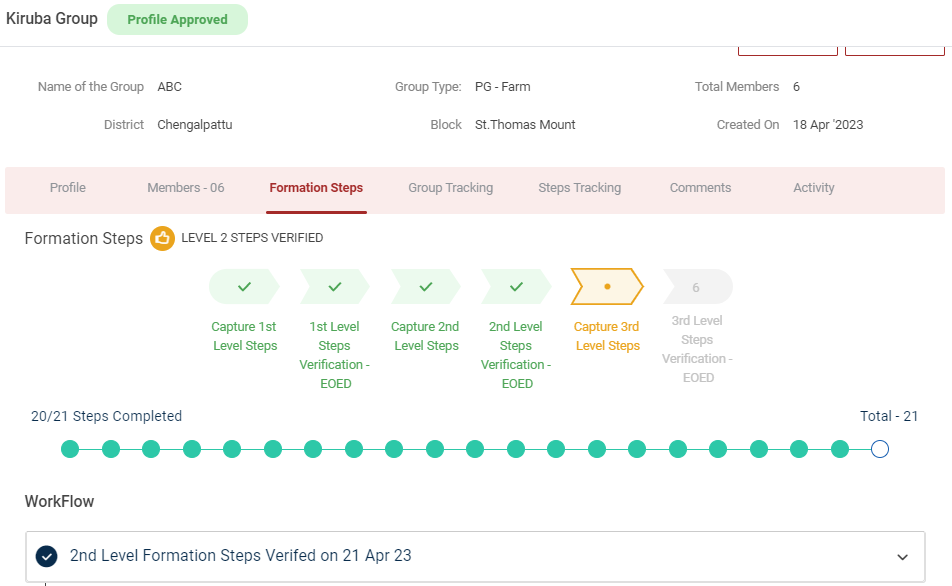
22. How to Create the Level 3 Formation Steps (EG):

Step 1 : Log in with their respective BTL username and password and click Login

Step 2 : After logging in to the VKP staff portal, select the Enterprise Promotion Module name
Step 3 : After selecting the EPM module, the user will be redirected to the respective home page
Step 4 : When logged in, click on the ‘Formation Steps’ on the left side menu
Step 5 : On the ‘Open’ tab, click the ‘My Formation Steps’ tab to view the list of formation steps verified by the EO-ED.
Step 6 : Select the profile to view the application details more
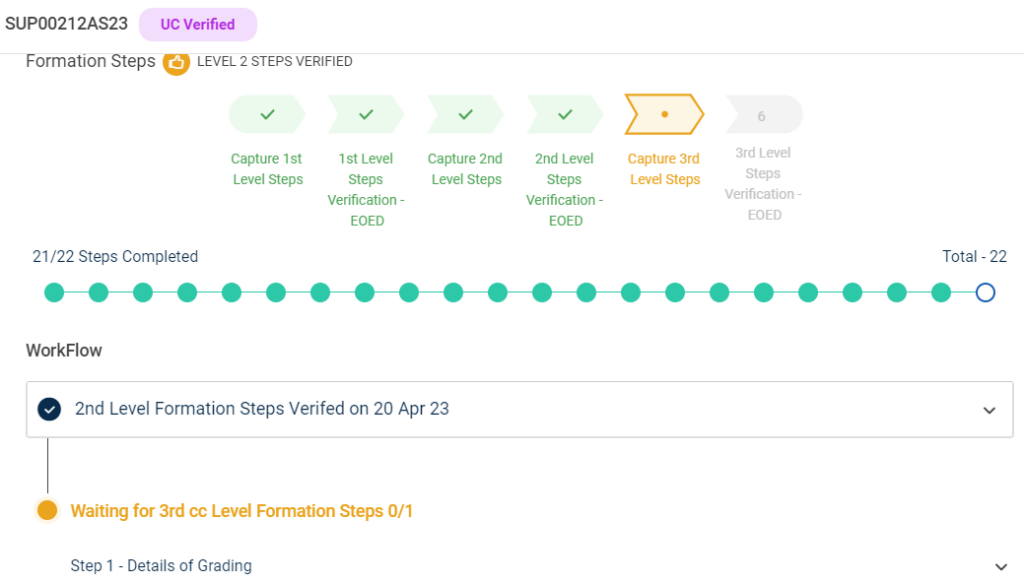
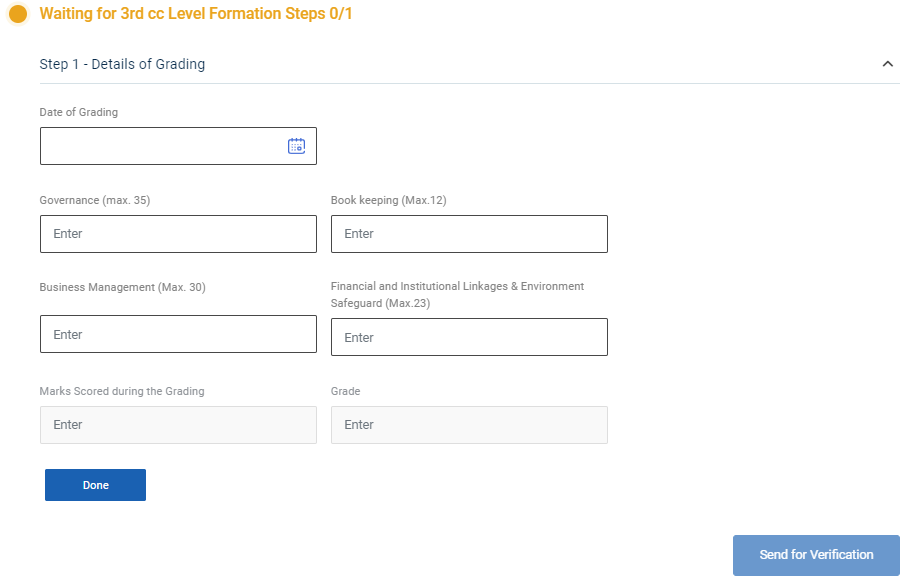
Step 7 : Waiting for 3rd Level Formation Steps :
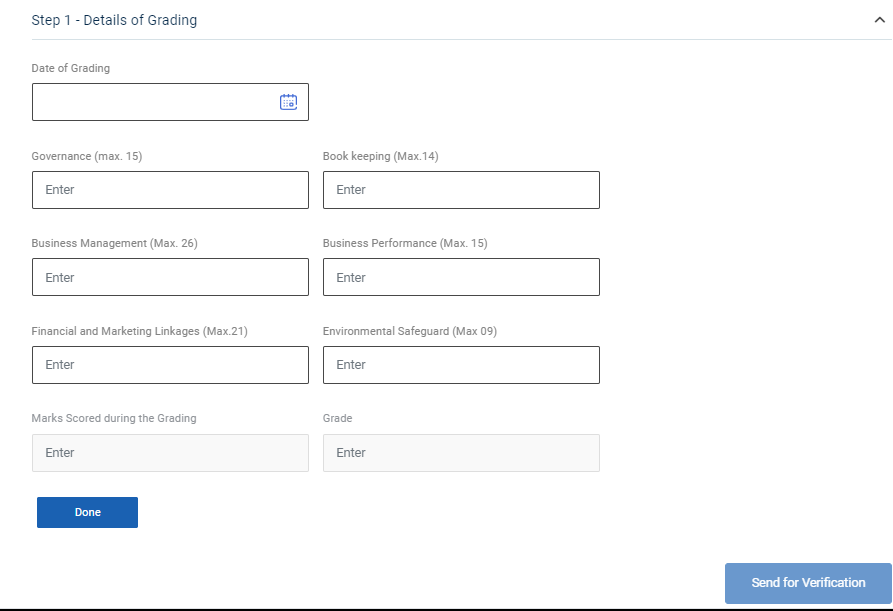
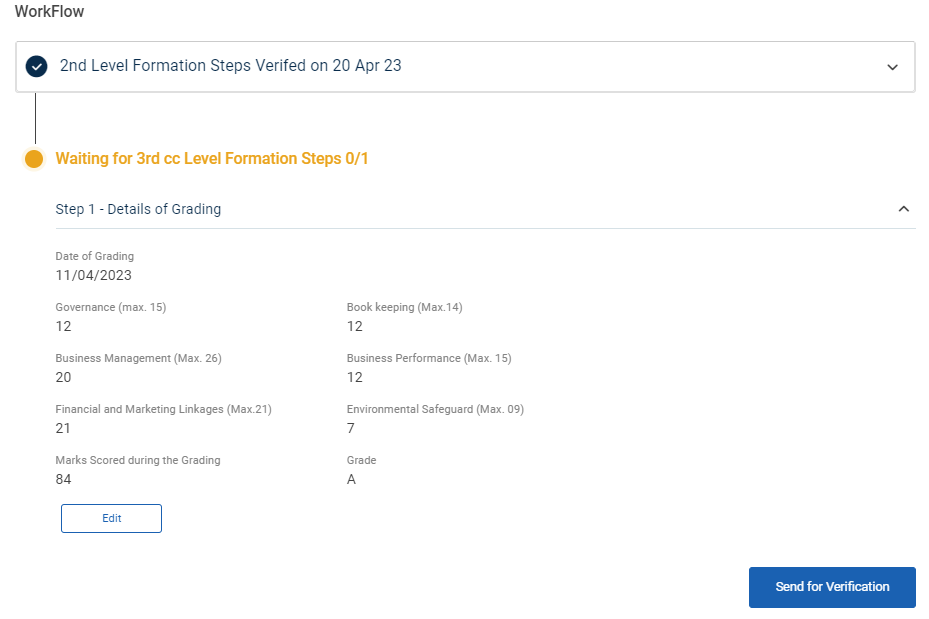
Step 7.1 : Details of Grading :
Step 7.1.1 Date of Grading : By clicking the calendar to choose the grading date
Step 7.1.2 : Book Keeping : Enter the total number of book keeping person and maximum count is not greater than 14
Step 7.1.3 : Business Management : Enter the total number of business management person and maximum count is not greater than 26
Step 7.1.4 : Business Performance : Enter the total number of business performance person and maximum count is not greater than 15
Step 7.1.5 : Financial & Market Linkages : Enter the total number of financial and market linkages person and maximum count is not greater than 21
Step 7.1.6 : Environmental Safeguard : Enter the total number of environmental safeguard person and maximum count is not greater than 09
Step 7.1.7 : Mark Scoring During Grading : The total number of marks scoring during grading will auto calculated based on the previous values
Step 7.1.8 Once entered the data, click ‘Done’
Step 7.1.9 Once the BTL click done the data saved successfully, Click ‘Edit’ to edit the data
Step 8 : Once the steps has completed click ‘Send for Verification’ and the status of the steps has changed from ‘Level 3 Steps Submitted’
23. How to View the Level 3 Formation Steps (EG):

Step 1 : Log in with their respective BTL username and password and click Login

Step 2 : After logging in to the VKP staff portal, select the Enterprise Promotion Module name
Step 3 : After selecting the EPM module, the user will be redirected to the respective home page
Step 4 : When logged in, click on the ‘Formation Steps’ on the left side menu
Step 5 : On the ‘Inprogress’ tab, click the ‘My Formation Steps’ tab to view the list of formation steps profile completed by the BTL.
Step 6 : Select the profile to view the application details more.
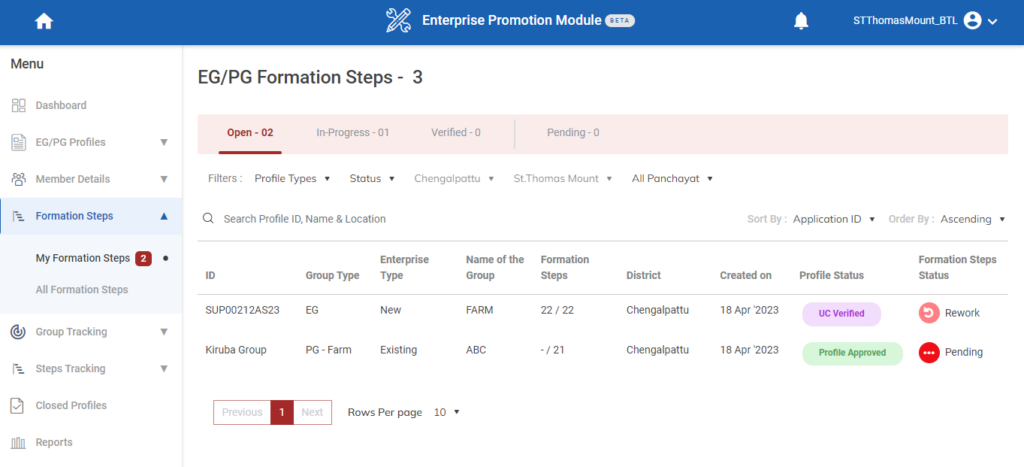
24. How to Rework the Level 3 Formation Steps (EG):

Step 1 : Log in with their respective BTL username and password and click Login

Step 2 : After logging in to the VKP staff portal, select the Enterprise Promotion Module name
Step 3 : After selecting the EPM module, the user will be redirected to the respective home page
Step 4 : When logged in, click on the ‘Formation Steps’ on the left side menu
Step 5 : On the ‘Open’ tab, click the ‘My Formation Steps’ tab to view the list of formation steps verified/reworked by the EO-ED.
Step 6 : Select the profile to view the application details more
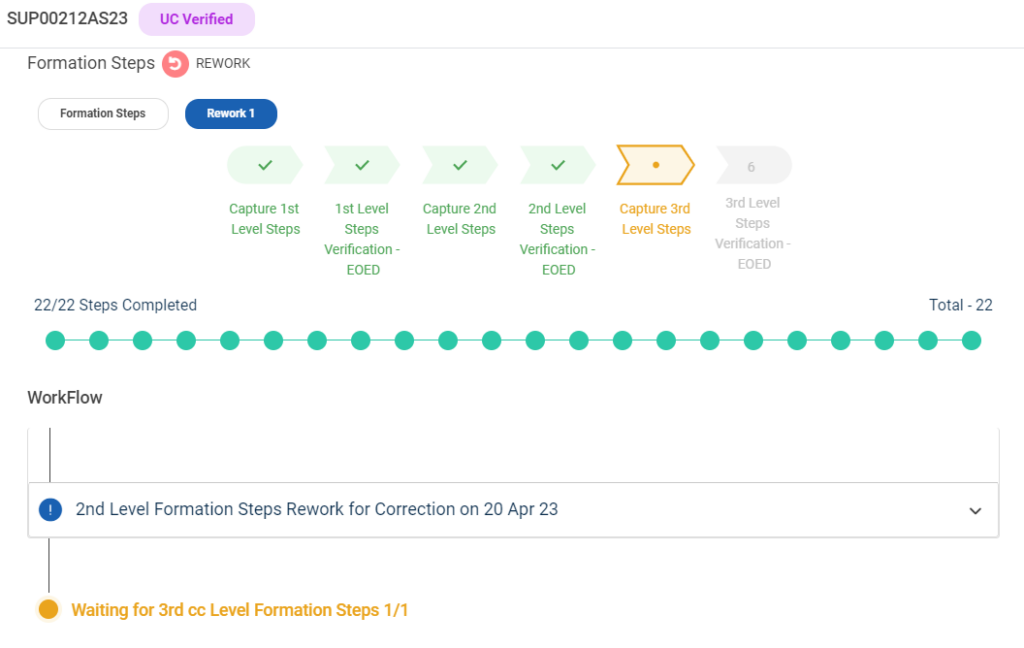
Step 7 : Waiting for 3rd Level Formation Steps :

Step 7.1.9 Once the BTL click done the rework data saved successfully, Click ‘Save’ to save the data
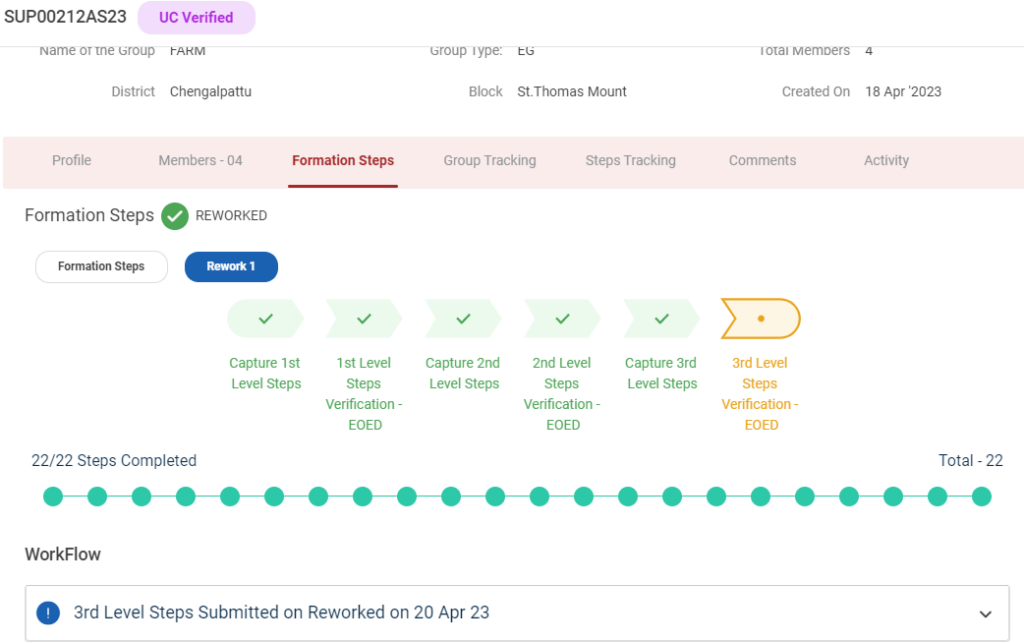
Step 8 : Once the steps has completed click ‘Send for Verification’ and we received the toast message like ‘Formation Steps Reworked Successfully’ and the status of the steps has changed from ‘Reworked’
25. How to View the Verified Formation Steps (EG):

Step 1 : Log in with their respective BTL username and password and click Login
Step 2 : After logging in to the VKP staff portal, select the Enterprise Promotion Module name
Step 3 : After selecting the EPM module, the user will be redirected to the respective home page
Step 4 : When logged in, click on the ‘Formation Steps’ on the left side menu
Step 5 : On the ‘Verified’ tab, click the ‘My Formation Steps’ tab to view the list of formation steps profile verified by the EO-ED.
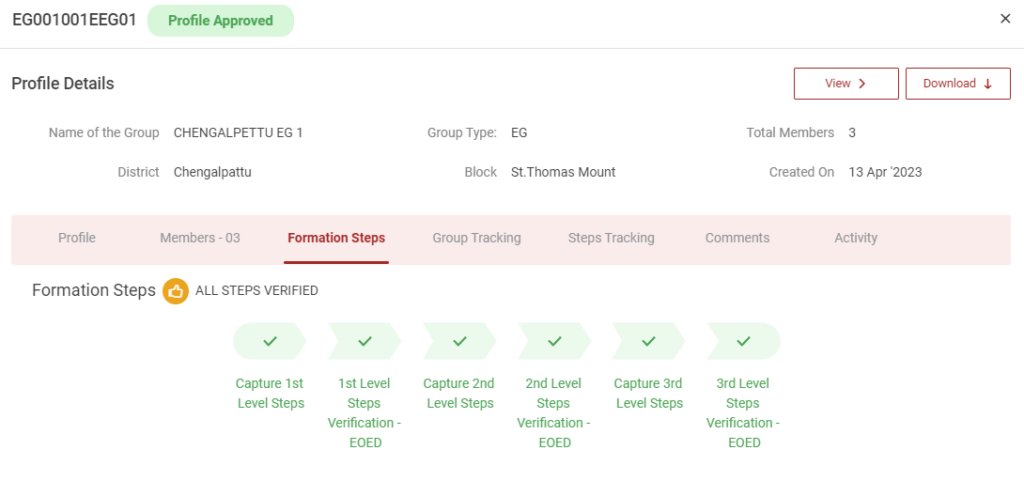
Step 6 : Select the profile to view the application details more.
26. How to Create the Level 1 Formation Steps (PG):

Step 1 : Log in with their respective BTL username and password and click Login

Step 2 : After logging in to the VKP staff portal, select the Enterprise Promotion Module name
Step 3 : After selecting the EPM module, the user will be redirected to the respective home page

Step 4 : When logged in, click on the ‘Formation Steps’ on the left side menu
Step 5 : On the ‘Open’ tab, click the ‘My Formation Steps’ tab to view the list of profiles approved by the DCOO.
Step 6 : Select the profile to view the application details more
Step 7 : Waiting for 1st Level Formation Steps :
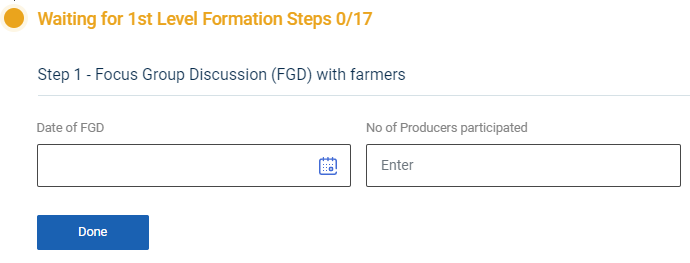
Step 7.1 : Focus Group Discussion (FDG) with Farmers :
Step 7.1.1 Date of FGD : By clicking the calendar, to choose the focus group discussion date
Step 7.1.2 No of Producers Participated : Enter the number of producers has participated
Step 7.1.3 Once entered the data, click ‘Done’
Step 7.1.4 Once the BTL click done the data saved successfully, Click ‘Edit’ to edit the data
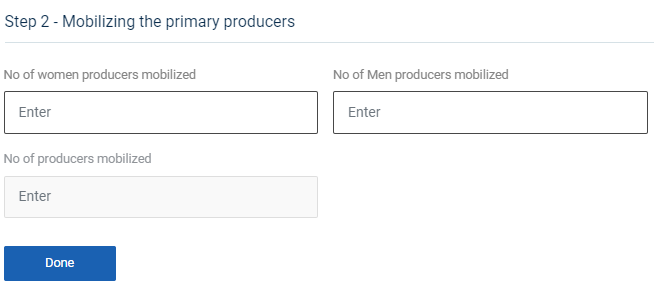
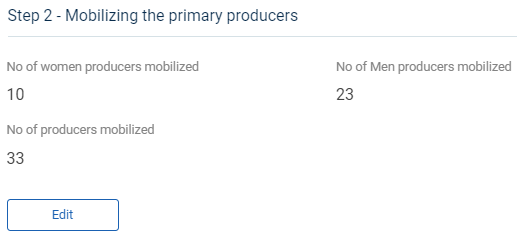
Step 7.2 : Mobilising the Primary Producers :
Step 7.2.1 Number of Women Producer Mobilised : Enter the number of women producer mobilised
Step 7.2.2 Number of Men Producer Mobilised : Enter the number of men producer mobilised
Step 7.2.3 Number of Producer Mobilised : The total number of producer mobilised has auto populated based on total number of men & women producer mobilised count
Step 7.2.4 Once entered the data, click ‘Done’
Step 7.2.5 Once the BTL click done the data saved successfully, Click ‘Edit’ to edit the data
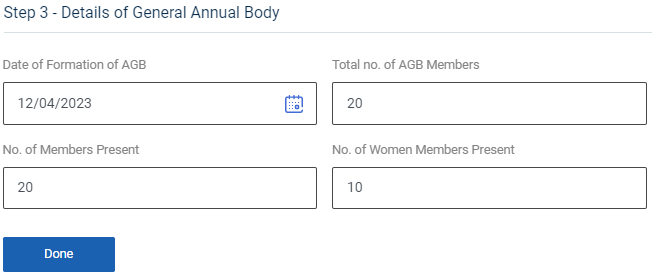

Step 7.3 : Details of General Annual Body :
Step 7.3.1 Date of Formation of AGB : By clicking the calendar to choose the formation steps of annual general body
Step 7.3.2 Total number of AGB members : Enter the total number of AGB members
Step 7.3.3 Number of Members Present : Enter the total number of members present
Step 7.3.4 Number of Women Members Present : Enter the total number of women members present
Step 7.3.5 Once entered the data, click ‘Done’
Step 7.3.6 Once the BTL click done the data saved successfully, Click ‘Edit’ to edit the data

Step 7.4 : Formation of Executive Committee (EC) :
Step 7.4.1 Date of Formation of EC : By clicking the calendar to choose the formation date of EC
Step 7.4.2 Total number of EC members : Enter the total number of EC members
Step 7.4.3 Number of Members Present : Enter the total number of members present
Step 7.4.4 Number of Women Members Present : Enter the total number of women members present
Step 7.4.5 Once entered the data, click ‘Done’
Step 7.4.6 Once the BTL click done the data saved successfully, Click ‘Edit’ to edit the data

Step 7.5 : Selection of Office Bearer :
Step 7.5.1 Name of the President : The president details will auto populate based on the previous data
Step 7.5.2 Name of the Secretary : The secretary details will auto populate based on the previous data
Step 7.5.3 Name of the Treasurer : The treasurer details will auto populate based on the previous data
Step 7.5.4 Once entered the data, click ‘Done’
Step 7.5.5 Once the BTL click done the data saved successfully, Click ‘Edit’ to edit the data
Step 7.6 : Providing EG Code :
Step 7.6.1 EG Code : The EG Code will auto populate based on the previous data
Step 7.6.2 Once entered the data, click ‘Done’
Step 7.6.3 Once the BTL click done the data saved successfully, Click ‘Edit’ to edit the data
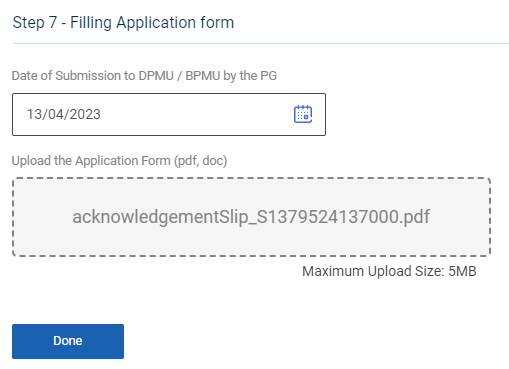
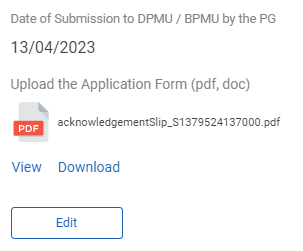
Step 7.7 : Filling Application Form :
Step 7.7.1 Date of Submission to DPMU/BPMU by the PG : By clicking the calendar to choose the submission date to DPMU/BPMU by the EG
Step 7.7.2 Upload the Application Form : Click ‘Browse’ to upload the application form
Step 7.7.3 Once entered the data, click ‘Done’
Step 7.7.4 Once the BTL click done the data saved successfully, Click ‘Edit’ to edit the data
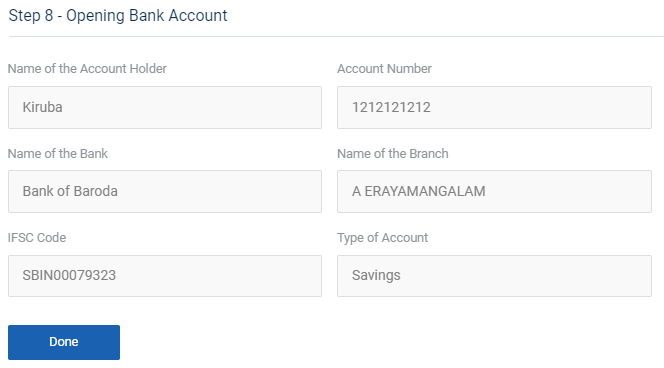

Step 7.8 : Opening Bank Account :
Step 7.8.1 The account holder name, account number, bank name, branch name, IFSC code and account type will auto populate based on the previous data
Step 7.8.2 Once entered the data, click ‘Done’
Step 7.8.3 Once the BTL click done the data saved successfully, Click ‘Edit’ to edit the data
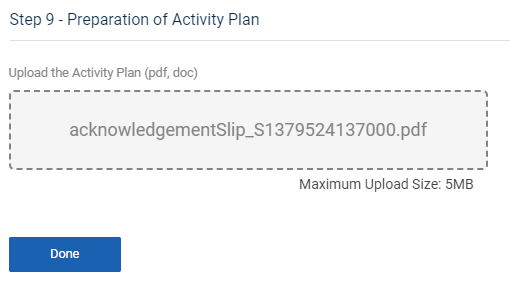

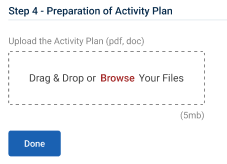
Step 7.9 : Preparation of Activity Plan :
Step 7.9.1 Upload the Activity Plan : Click ‘Browse’ to upload the activity plan document
Step 7.9.2 Once entered the data, click ‘Done’
Step 7.9.3 Once the BTL click done the data saved successfully, Click ‘Edit’ to edit the data
Step 7.10 : Assessment by Block Level Committee :
Step 7.10.1 Date of Assessment : By clicking the calendar to choose the assessment date
Step 7.10.2 : Upload the Assessment Form : Click ‘Browse’ to upload the assessment form
Step 7.10.3 Once entered the data, click ‘Done’
Step 7.10.4 Once the BTL click done the data saved successfully, Click ‘Edit’ to edit the data

Step 7.11 : Assessment by District Level Committee :
Step 7.11.1 Date of Assessment : By clicking the calendar to choose the assessment date
Step 7.11.2 No of Members Participated : Enter the total number of members participated and enter the member name and designation
Step 7.11.3 : Upload the Assessment Form : Click ‘Browse’ to upload the assessment form
Step 7.11.4 Once entered the data, click ‘Done’
Step 7.11.5 Once the BTL click done the data saved successfully, Click ‘Edit’ to edit the data
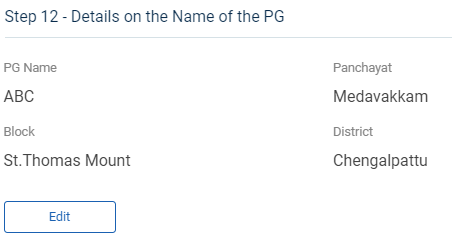
Step 7.12 : Details on the Name of the PG :
Step 7.12.1 The EG name,panchayat,block and district will auto populate based on the previous data
Step 7.12.2 Once entered the data, click ‘Done’
Step 7.12.3 Once the BTL click done the data saved successfully, Click ‘Edit’ to edit the data
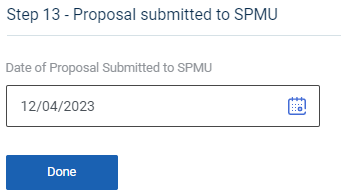
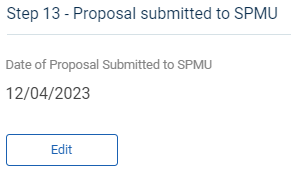
Step 7.13 : Proposal Submitted to SPMU :
Step 7.13.1 Date of Proposal submitted to SPMU : By clicking the calendar to choose the proposal date submitted by SPMU
Step 7.13.2 Once entered the data, click ‘Done’
Step 7.13.3 Once the BTL click done the data saved successfully, Click ‘Edit’ to edit the data
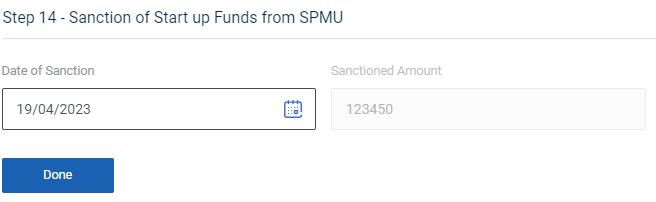
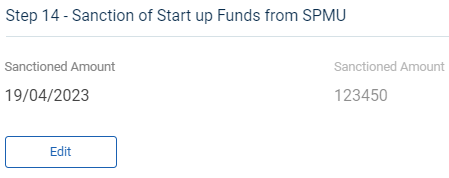
Step 7.14 : Sanction of Start Up Funds from SPMU :
Step 7.14.1 Sanction Amount : By clicking the calendar to choose the sanctioned amount date submitted by SPMU
Step 7.14.2 Once entered the data, click ‘Done’
Step 7.14.3 Once the BTL click done the data saved successfully, Click ‘Edit’ to edit the data
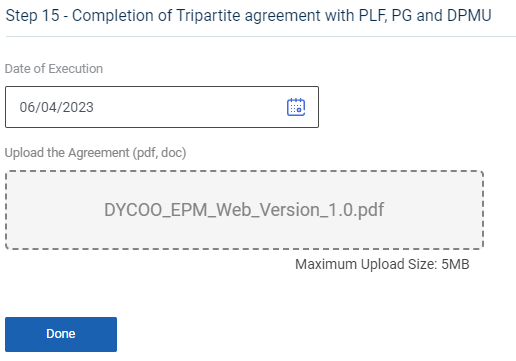
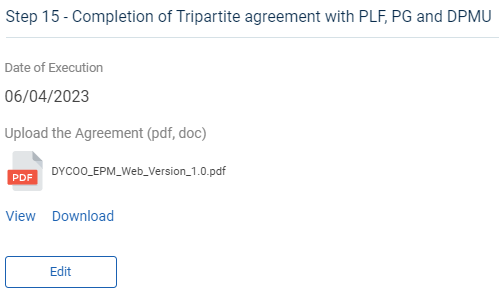
Step 7.15 : Completion of Tripartite agreement with PLF, PG & DPMU :
Step 7.15.1 Date of Execution : By clicking the calendar to choose the execution date
Step 7.15.2 : Upload the Agreement : Click ‘Browse’ to upload the agreement
Step 7.15.3 Once entered the data, click ‘Done’
Step 7.15.4 Once the BTL click done the data saved successfully, Click ‘Edit’ to edit the data
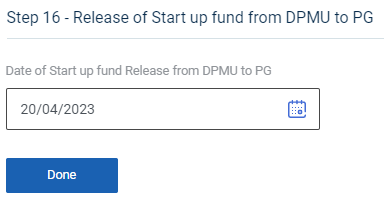
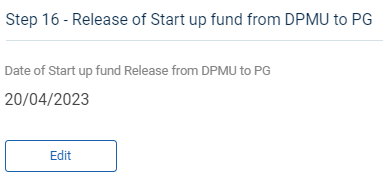
Step 7.16 : Release of Start up fund from DPMU to PG :
Step 7.16.1 Date of Start up fund from DPMU to PG : By clicking the calendar to choose the release of start up fund from DPMU to EG
Step 7.16.2 Once entered the data, click ‘Done’
Step 7.16.3 Once the BTL click done the data saved successfully, Click ‘Edit’ to edit the data
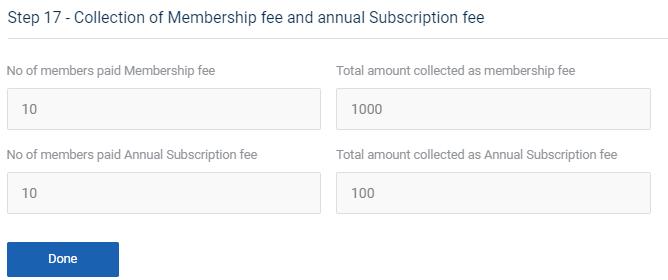
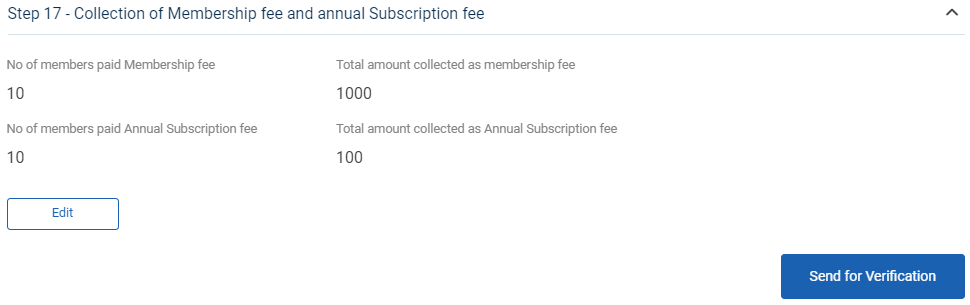
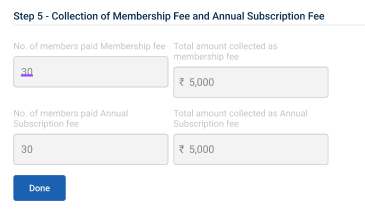
Step 7.17 : Collection of Membership Fee & Annual Subscription Fee :
Step 7.17.1 The total number of members paid membership fee, total amount collected as membership fee, total number of members paid annual subscription fee and total amount collected as annual subscription fee as auto populated based on the previous data
Step 7.17.2 Once entered the data, click ‘Done’
Step 7.17.3 Once the BTL click done the data saved successfully, Click ‘Edit’ to edit the data
Step 8 : Once the steps has completed click ‘Send for Verification’ and the status of the steps has changed from ‘Level 1 Steps Submitted’
27. How to View the Level 1 Formation Steps (PG):

Step 1 : Log in with their respective BTL username and password and click Login

Step 2 : After logging in to the VKP staff portal, select the Enterprise Promotion Module name
Step 3 : After selecting the EPM module, the user will be redirected to the respective home page
Step 4 : When logged in, click on the ‘Formation Steps’ on the left side menu
Step 5 : On the ‘Inprogress’ tab, click the ‘My Formation Steps’ tab to view the list of formation steps profile completed by the BTL.
Step 6 : Select the profile to view the application details more
28. How to Create the Level 2 Formation Steps (PG):

Step 1 : Log in with their respective BTL username and password and click Login

Step 2 : After logging in to the VKP staff portal, select the Enterprise Promotion Module name
Step 3 : After selecting the EPM module, the user will be redirected to the respective home page
Step 4 : When logged in, click on the ‘Formation Steps’ on the left side menu
Step 5 : On the ‘Open’ tab, click the ‘My Formation Steps’ tab to view the list of formation steps verified by the EO-ED.
Step 6 : Select the profile to view the application details more

Step 7 : Waiting for 2nd Level Formation Steps :
Step 7.1 : Submission of Utilisation of startup funds by PG :
Step 7.1.1 Date of Utilisation of all funds as per the plan : By clicking the calendar to choose the utilisation date
Step 7.1.2 : Date of Utilisation of all funds as per the plan : If all funds are utilised as per the plan click ‘Yes’ or choose ‘No’ , Enter the reason when we click ‘No’ option
Step 7.1.3 : Upload the UC : Click ‘Browse’ to upload the UC
Step 7.1.4 Once entered the data, click ‘Done’
Step 7.1.5 Once the BTL click done the data saved successfully, Click ‘Edit’ to edit the data
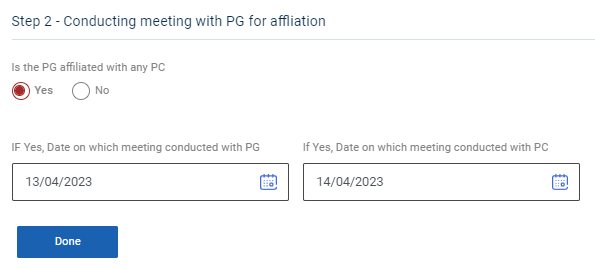
Step 7.2 : Conducting Meeting With PG for Affiliation:
Step 7.2.1 Date of Utilisation of all funds as per the plan : By clicking calendar to choose utilisation date for all the funds.
Step 7.2.2 If Yes Date on which meeting conducted with PG : By clicking the calendar to choose the meeting conducted date with PG
Step 7.2.3 If Yes Date on which meeting conducted with PC : By clicking the calendar to choose the meeting conducted date with PC
Step 7.2.4 Once entered the data, click ‘Done’
Step 7.2.5 Once the BTL click done the data saved successfully, Click ‘Edit’ to edit the data
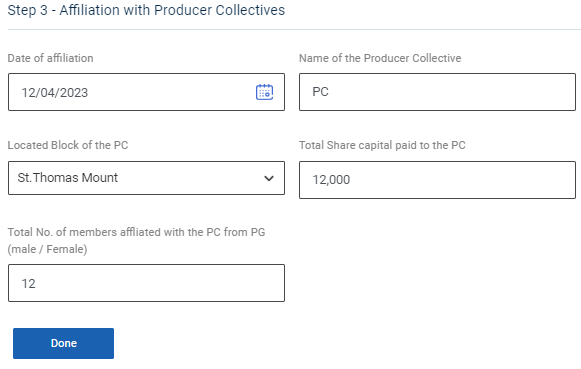
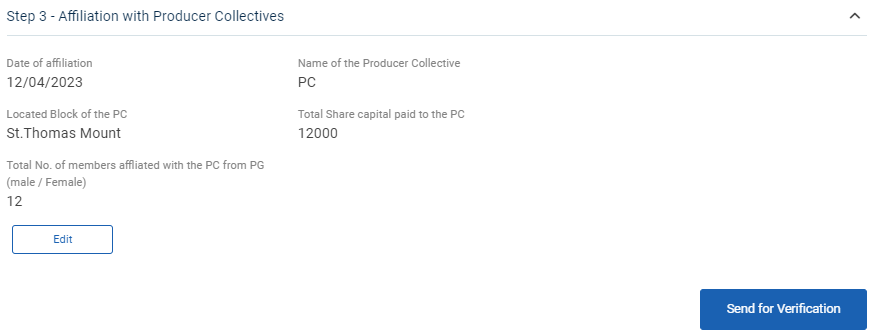
Step 7.3 : Affiliation With Producer Collectives:
Step 7.3.1 Date of Utilisation : By clicking calendar to choose utilisation date
Step 7.3.2 Name of the Producer Collective: Enter the name of the producer collective
Step 7.3.3 Located Block of the PC : By clicking the dropdown to choose the located block of the PC
Step 7.3.4 Total Share Capital Paid to the PC: Enter the total share capital paid to the PC
Step 7.3.5 Total No of Members Affiliated with the PC from PG: Enter the total number of male and female members affiliated with the PC from PG
Step 7.2.4 Once entered the data, click ‘Done’
Step 7.2.5 Once the BTL click done the data saved successfully, Click ‘Edit’ to edit the data
Step 8 : Once the steps has completed click ‘Send for Verification’ and the status of the steps has changed from ‘Level 2 Steps Submitted’
29. How to View the Level 2 Formation Steps (PG):

Step 1 : Log in with their respective BTL username and password and click Login

Step 2 : After logging in to the VKP staff portal, select the Enterprise Promotion Module name
Step 3 : After selecting the EPM module, the user will be redirected to the respective home page
Step 4 : When logged in, click on the ‘Formation Steps’ on the left side menu
Step 5 : On the ‘Inprogress’ tab, click the ‘My Formation Steps’ tab to view the list of formation steps profile completed by the BTL.
Step 6 : Select the profile to view the application details more.
30. How to Create the Level 3 Formation Steps (PG):

Step 1 : Log in with their respective BTL username and password and click Login

Step 2 : After logging in to the VKP staff portal, select the Enterprise Promotion Module name
Step 3 : After selecting the EPM module, the user will be redirected to the respective home page
Step 4 : When logged in, click on the ‘Formation Steps’ on the left side menu
Step 5 : On the ‘Open’ tab, click the ‘My Formation Steps’ tab to view the list of formation steps verified by the EO-ED.
Step 6 : Select the profile to view the application details more
Step 7 : Waiting for 3rd Level Formation Steps :
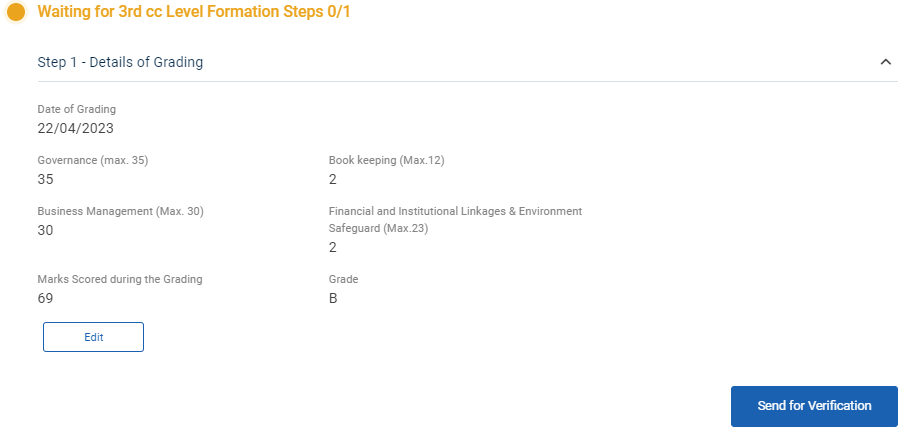
Step 7.1 : Details of Grading :
Step 7.1.1 Date of Grading : By clicking the calendar to choose the grading date
Step 7.1.2 : Book Keeping : Enter the total number of book keeping person and maximum count is not greater than 12
Step 7.1.3 : Business Management : Enter the total number of business management person and maximum count is not greater than 30
Step 7.1.4 : Governance : Enter the total number of governance and maximum count is not greater than 35
Step 7.1.5 : Financial & Market Linkages : Enter the total number of financial and market linkages person and maximum count is not greater than 21
Step 7.1.6 : Mark Scoring During Grading : The total number of marks scoring during grading will auto calculated based on the previous values
Step 7.1.7 Once entered the data, click ‘Done’
Step 7.1.8 Once the BTL click done the data saved successfully, Click ‘Edit’ to edit the data
Step 8 : Once the steps has completed click ‘Send for Verification’ and the status of the steps has changed from ‘Level 3 Steps Submitted’
31. How to View the Level 3 Formation Steps (PG):

Step 1 : Log in with their respective BTL username and password and click Login

Step 2 : After logging in to the VKP staff portal, select the Enterprise Promotion Module name
Step 3 : After selecting the EPM module, the user will be redirected to the respective home page
Step 4 : When logged in, click on the ‘Formation Steps’ on the left side menu
Step 5 : On the ‘Inprogress’ tab, click the ‘My Formation Steps’ tab to view the list of formation steps profile completed by the BTL.

Step 6 : Select the profile to view the application details more.
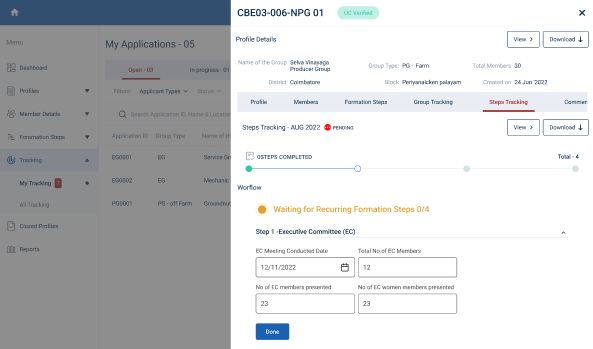
32. How to Create the Recurring Steps Tracking (Monthly) (PG):

Step 1 : Log in with their respective BTL username and password and click Login

Step 2 : After logging in to the VKP staff portal, select the Enterprise Promotion Module name
Step 3 : After selecting the EPM module, the user will be redirected to the respective home page

Step 4 : When logged in, click on the ‘Steps Tracking’ on the left side menu
Step 5 : On the ‘Open’ tab, click the ‘My Tracking’ tab to view the list of formation steps verified by the EO-ED.
Step 6 : Select the profile to view the application details more
Step 7 : Waiting for 3rd Level Formation Steps :

Step 7.1 : Executive Committee (EC) :
Step 7.1.1 EC Meeting Conducted Date : By clicking the calendar to choose the EC meeting conducted date
Step 7.1.2 Total number of EC members : Enter the total number of EC members
Step 7.1.3 Number of EC Members Presented : Enter the total number of EC members presented
Step 7.1.4 Number of EC Women Members Presented : Enter the total number of EC women members presented
Step 7.4.5 Once entered the data, click ‘Done’
Step 7.4.6 Once the BTL click done the data saved successfully, Click ‘Edit’ to edit the data

Step 7.2 : Selection of Office Bearer :
Step 7.2.1 Name of the President : The president details will auto populate based on the previous data
Step 7.2.2 Name of the Secretary : The secretary details will auto populate based on the previous data
Step 7.2.3 Name of the Treasurer : The treasurer details will auto populate based on the previous data
Step 7.2.4 Once entered the data, click ‘Done’
Step 7.2.5 Once the BTL click done the data saved successfully, Click ‘Edit’ to edit the data

Step 7.3 : Preparation of Activity Plan :
Step 7.3.1 Upload the Activity Plan : Click ‘Browse’ to upload the activity plan document
Step 7.3.2 Once entered the data, click ‘Done’
Step 7.3.3 Once the BTL click done the data saved successfully, Click ‘Edit’ to edit the data
Step 7.4 : Collection of Membership Fee & Annual Subscription Fee:
Step 7.4.1 The total number of members paid membership fee, total amount collected as membership fee, total number of members paid annual subscription fee and total amount collected as annual subscription fee as auto populated based on the previous data
Step 7.4.2 Once entered the data, click ‘Done’
Step 7.4.3 Once the BTL click done the data saved successfully, Click ‘Edit’ to edit the data

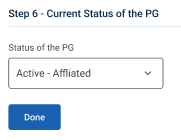
Step 7.5 : Current Status of the PG :
Step 7.5.1 Current Status of the PG : By clicking the dropdown to choose the current status of the PG.
Step 7.3.2 Once entered the data, click ‘Done’
Step 7.3.3 Once the BTL click done the data saved successfully, Click ‘Edit’ to edit the data
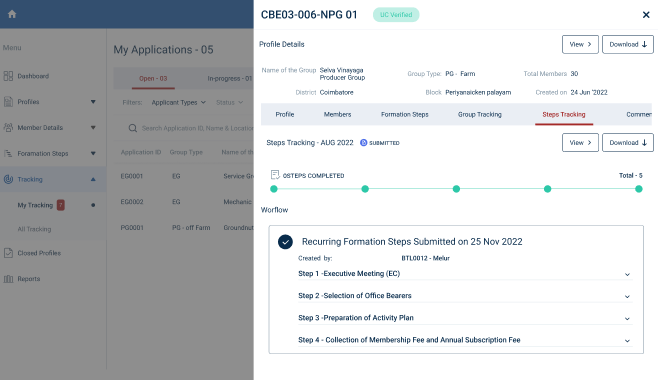
Step 8 : Once the steps has completed click ‘Send for Verification’ and the status of the steps has changed from ‘Recurring Steps Submitted’
33. How to View the Recurring Steps Tracking Monthly (PG):

Step 1 : Log in with their respective BTL username and password and click Login

Step 2 : After logging in to the VKP staff portal, select the Enterprise Promotion Module name
Step 3 : After selecting the EPM module, the user will be redirected to the respective home page

Step 4 : When logged in, click on the ‘Steps Tracking’ on the left side menu
Step 5 : On the ‘Inprogress’ tab, click the ‘My Tracking’ tab to view the list of formation steps profile completed by the BTL.
Step 6 : Select the profile to view the application details more
34. How to Create the Recurring Steps Tracking (6 Months) (PG):

Step 1 : Log in with their respective BTL username and password and click Login

Step 2 : After logging in to the VKP staff portal, select the Enterprise Promotion Module name
Step 3 : After selecting the EPM module, the user will be redirected to the respective home page

Step 4 : When logged in, click on the ‘Steps Tracking’ on the left side menu
Step 5 : On the ‘Open’ tab, click the ‘My Tracking’ tab to view the list of formation steps verified by the EO-ED.
Step 6 : Select the profile to view the application details more
Step 7 : Waiting for 3rd Level Formation Steps :

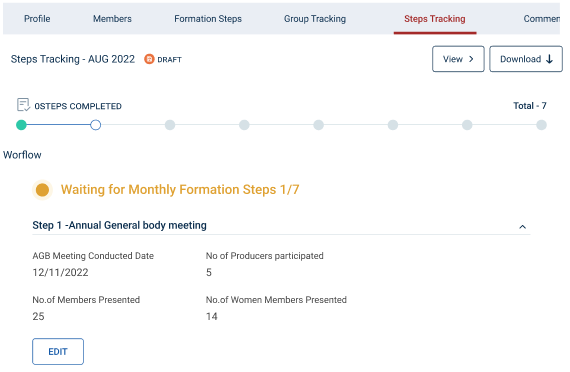
Step 7.1 : Annual General Body Meeting :
Step 7.1.1 AGB Meeting Conducted Date : By clicking the calendar to choose the AGB meeting conducted date
Step 7.1.2 No of Producers Participated : Enter the total number of producers participated
Step 7.1.3 Number of Members Presented : Enter the total number of members presented
Step 7.1.4 Number of Women Members Presented : Enter the total number of women members presented
Step 7.1.5 Once entered the data, click ‘Done’
Step 7.1.6 Once the BTL click done the data saved successfully, Click ‘Edit’ to edit the data
Step 7.2 : Executive Committee (EC) :
Step 7.2.1 EC Meeting Conducted Date : By clicking the calendar to choose the EC meeting conducted date
Step 7.2.2 Total number of EC members : Enter the total number of EC members
Step 7.2.3 Number of EC Members Presented : Enter the total number of EC members presented
Step 7.2.4 Number of EC Women Members Presented : Enter the total number of EC women members presented
Step 7.2.5 Once entered the data, click ‘Done’
Step 7.2.6 Once the BTL click done the data saved successfully, Click ‘Edit’ to edit the data

Step 7.3 : Selection of Office Bearer :
Step 7.3.1 Name of the President : The president details will auto populate based on the previous data
Step 7.3.2 Name of the Secretary : The secretary details will auto populate based on the previous data
Step 7.3.3 Name of the Treasurer : The treasurer details will auto populate based on the previous data
Step 7.3.4 Once entered the data, click ‘Done’
Step 7.3.5 Once the BTL click done the data saved successfully, Click ‘Edit’ to edit the data

Step 7.4 : Preparation of Activity Plan :
Step 7.4.1 Upload the Activity Plan : Click ‘Browse’ to upload the activity plan document
Step 7.4.2 Once entered the data, click ‘Done’
Step 7.4.3 Once the BTL click done the data saved successfully, Click ‘Edit’ to edit the data

Step 7.5 : Collection of Membership Fee & Annual Subscription Fee:
Step 7.4.1 The total number of members paid membership fee, total amount collected as membership fee, total number of members paid annual subscription fee and total amount collected as annual subscription fee as auto populated based on the previous data
Step 7.5.2 Once entered the data, click ‘Done’
Step 7.5.3 Once the BTL click done the data saved successfully, Click ‘Edit’ to edit the data
Step 7.6 : Current Status of the PG :
Step 7.6.1 Current Status of the PG : By clicking the dropdown to choose the current status of the PG.
Step 7.6.2 Once entered the data, click ‘Done’
Step 7.6.3 Once the BTL click done the data saved successfully, Click ‘Edit’ to edit the data
Step 8 : Once the steps has completed click ‘Send for Verification’ and the status of the steps has changed from ‘Recurring Steps Submitted’
35. How to View the Recurring Steps Tracking 6 Months (PG):

Step 1 : Log in with their respective BTL username and password and click Login

Step 2 : After logging in to the VKP staff portal, select the Enterprise Promotion Module name
Step 3 : After selecting the EPM module, the user will be redirected to the respective home page

Step 4 : When logged in, click on the ‘Steps Tracking’ on the left side menu
Step 5 : On the ‘Inprogress’ tab, click the ‘My Tracking’ tab to view the list of formation steps profile completed by the BTL.
Step 6 : Select the profile to view the application details more
36.How to Create the Recurring Steps Tracking (Yearly) (PG):

Step 1 : Log in with their respective BTL username and password and click Login

Step 2 : After logging in to the VKP staff portal, select the Enterprise Promotion Module name
Step 3 : After selecting the EPM module, the user will be redirected to the respective home page

Step 4 : When logged in, click on the ‘Steps Tracking’ on the left side menu
Step 5 : On the ‘Open’ tab, click the ‘My Tracking’ tab to view the list of formation steps verified by the EO-ED.
Step 6 : Select the profile to view the application details more
Step 7 : Waiting for 3rd Level Formation Steps :

Step 7.1 : Annual General Body Meeting :
Step 7.1.1 AGB Meeting Conducted Date : By clicking the calendar to choose the AGB meeting conducted date
Step 7.1.2 No of Producers Participated : Enter the total number of producers participated
Step 7.1.3 Number of Members Presented : Enter the total number of members presented
Step 7.1.4 Number of Women Members Presented : Enter the total number of women members presented
Step 7.1.5 Once entered the data, click ‘Done’
Step 7.1.6 Once the BTL click done the data saved successfully, Click ‘Edit’ to edit the data
Step 7.2 : Executive Committee (EC) :
Step 7.2.1 EC Meeting Conducted Date : By clicking the calendar to choose the EC meeting conducted date
Step 7.2.2 Total number of EC members : Enter the total number of EC members
Step 7.2.3 Number of EC Members Presented : Enter the total number of EC members presented
Step 7.2.4 Number of EC Women Members Presented : Enter the total number of EC women members presented
Step 7.2.5 Once entered the data, click ‘Done’
Step 7.2.6 Once the BTL click done the data saved successfully, Click ‘Edit’ to edit the data
Step 7.3 : Selection of Office Bearer :
Step 7.3.1 Name of the President : The president details will auto populate based on the previous data
Step 7.3.2 Name of the Secretary : The secretary details will auto populate based on the previous data
Step 7.3.3 Name of the Treasurer : The treasurer details will auto populate based on the previous data
Step 7.3.4 Once entered the data, click ‘Done’
Step 7.3.5 Once the BTL click done the data saved successfully, Click ‘Edit’ to edit the data

Step 7.4 : Preparation of Activity Plan :
Step 7.4.1 Upload the Activity Plan : Click ‘Browse’ to upload the activity plan document
Step 7.4.2 Once entered the data, click ‘Done’
Step 7.4.3 Once the BTL click done the data saved successfully, Click ‘Edit’ to edit the data

Step 7.5 : Collection of Membership Fee & Annual Subscription Fee:
Step 7.4.1 The total number of members paid membership fee, total amount collected as membership fee, total number of members paid annual subscription fee and total amount collected as annual subscription fee as auto populated based on the previous data
Step 7.5.2 Once entered the data, click ‘Done’
Step 7.5.3 Once the BTL click done the data saved successfully, Click ‘Edit’ to edit the data
Step 7.6 : Current Status of the PG :
Step 7.6.1 Current Status of the PG : By clicking the dropdown to choose the current status of the PG.
Step 7.6.2 Once entered the data, click ‘Done’
Step 7.6.3 Once the BTL click done the data saved successfully, Click ‘Edit’ to edit the data

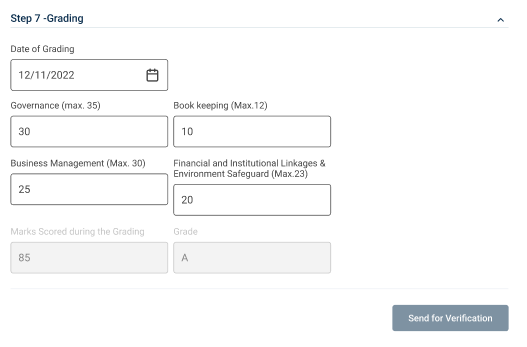
Step 7.7 : Grading :
Step 7.7.1 Date of Grading : By clicking the calendar to choose the grading date
Step 7.7.2 : Book Keeping : Enter the total number of book keeping person and maximum count is not greater than 12
Step 7.7.3 : Business Management : Enter the total number of business management person and maximum count is not greater than 30
Step 7.7.4 : Financial & Market Linkages & Environmental Safeguard : Enter the total number of financial and market linkages & environmental safeguard person and maximum count is not greater than 23
Step 7.7.5 : Mark Scoring During Grading : The total number of marks scoring during grading will auto calculated based on the previous values
Step 7.7.6 Once entered the data, click ‘Done’
Step 7.7.7 Once the BTL click done the data saved successfully, Click ‘Edit’ to edit the data
Step 8 : Once the steps has completed click ‘Send for Verification’ and the status of the steps has changed from ‘Recurring Steps Submitted’
37. How to Continue the Recurring Steps Tracking from the Draft (PG):

Step 1 : Log in with their respective BTL username and password and click Login

Step 2 : After logging in to the VKP staff portal, select the Enterprise Promotion Module name
Step 3 : After selecting the EPM module, the user will be redirected to the respective home page

Step 4 : When logged in, click on the ‘Steps Tracking’ on the left side menu
Step 5 : On the ‘Open’ tab, click the ‘My Tracking’ tab to view the list of formation steps verified by the EO-ED.
Step 6 : Select the profile to view the application details more and continue the steps tracking from the draft
38. How to Create the Recurring Steps Tracking (Monthly) (EG):

Step 1 : Log in with their respective BTL username and password and click Login
Step 2 : After logging in to the VKP staff portal, select the Enterprise Promotion Module name
Step 3 : After selecting the EPM module, the user will be redirected to the respective home page

Step 4 : When logged in, click on the ‘Steps Tracking’ on the left side menu
Step 5 : On the ‘Open’ tab, click the ‘My Tracking’ tab to view the list of formation steps verified by the EO-ED.
Step 6 : Select the profile to view the application details more
Step 7 : Waiting for 3rd Level Formation Steps :
Step 7.1 : Executive Committee (EC) :
Step 7.1.1 EC Meeting Conducted Date : By clicking the calendar to choose the EC meeting conducted date
Step 7.1.2 Total number of EC members : Enter the total number of EC members
Step 7.1.3 Number of EC Members Presented : Enter the total number of EC members presented
Step 7.1.4 Number of EC Women Members Presented : Enter the total number of EC women members presented
Step 7.4.5 Once entered the data, click ‘Done’
Step 7.4.6 Once the BTL click done the data saved successfully, Click ‘Edit’ to edit the data

Step 7.2 : Selection of Office Bearer :
Step 7.2.1 Name of the President : The president details will auto populate based on the previous data
Step 7.2.2 Name of the Secretary : The secretary details will auto populate based on the previous data
Step 7.2.3 Name of the Treasurer : The treasurer details will auto populate based on the previous data
Step 7.2.4 Once entered the data, click ‘Done’
Step 7.2.5 Once the BTL click done the data saved successfully, Click ‘Edit’ to edit the data

Step 7.3 : Preparation of Activity Plan :
Step 7.3.1 Upload the Activity Plan : Click ‘Browse’ to upload the activity plan document
Step 7.3.2 Once entered the data, click ‘Done’
Step 7.3.3 Once the BTL click done the data saved successfully, Click ‘Edit’ to edit the data

Step 7.4 : Collection of Membership Fee & Annual Subscription Fee:
Step 7.4.1 The total number of members paid membership fee, total amount collected as membership fee, total number of members paid annual subscription fee and total amount collected as annual subscription fee as auto populated based on the previous data
Step 7.4.2 Once entered the data, click ‘Done’
Step 7.4.3 Once the BTL click done the data saved successfully, Click ‘Edit’ to edit the data
Step 8 : Once the steps has completed click ‘Send for Verification’ and the status of the steps has changed from ‘Recurring Steps Submitted’
39. How to View the Recurring Steps Tracking Monthly (EG):

Step 1 : Log in with their respective BTL username and password and click Login

Step 2 : After logging in to the VKP staff portal, select the Enterprise Promotion Module name
Step 3 : After selecting the EPM module, the user will be redirected to the respective home page

Step 4 : When logged in, click on the ‘Steps Tracking’ on the left side menu
Step 5 : On the ‘Inprogress’ tab, click the ‘My Tracking’ tab to view the list of formation steps profile completed by the BTL.
Step 6 : Select the profile to view the application details more
40. How to Create the Recurring Steps Tracking (6 Months) (EG):

Step 1 : Log in with their respective BTL username and password and click Login

Step 2 : After logging in to the VKP staff portal, select the Enterprise Promotion Module name
Step 3 : After selecting the EPM module, the user will be redirected to the respective home page
Step 4 : When logged in, click on the ‘Steps Tracking’ on the left side menu
Step 5 : On the ‘Open’ tab, click the ‘My Tracking’ tab to view the list of formation steps verified by the EO-ED.
Step 6 : Select the profile to view the application details more
Step 7 : Waiting for 3rd Level Formation Steps :
Step 7.1 : Annual General Body Meeting :
Step 7.1.1 AGB Meeting Conducted Date : By clicking the calendar to choose the AGB meeting conducted date
Step 7.1.2 No of Producers Participated : Enter the total number of producers participated
Step 7.1.3 Number of Members Presented : Enter the total number of members presented
Step 7.1.4 Number of Women Members Presented : Enter the total number of women members presented
Step 7.1.5 Once entered the data, click ‘Done’
Step 7.1.6 Once the BTL click done the data saved successfully, Click ‘Edit’ to edit the data
Step 7.2 : Executive Committee (EC) :
Step 7.2.1 EC Meeting Conducted Date : By clicking the calendar to choose the EC meeting conducted date
Step 7.2.2 Total number of EC members : Enter the total number of EC members
Step 7.2.3 Number of EC Members Presented : Enter the total number of EC members presented
Step 7.2.4 Number of EC Women Members Presented : Enter the total number of EC women members presented
Step 7.2.5 Once entered the data, click ‘Done’
Step 7.2.6 Once the BTL click done the data saved successfully, Click ‘Edit’ to edit the data

Step 7.3 : Selection of Office Bearer :
Step 7.3.1 Name of the President : The president details will auto populate based on the previous data
Step 7.3.2 Name of the Secretary : The secretary details will auto populate based on the previous data
Step 7.3.3 Name of the Treasurer : The treasurer details will auto populate based on the previous data
Step 7.3.4 Once entered the data, click ‘Done’
Step 7.3.5 Once the BTL click done the data saved successfully, Click ‘Edit’ to edit the data
Step 7.4 : Preparation of Activity Plan :
Step 7.4.1 Upload the Activity Plan : Click ‘Browse’ to upload the activity plan document
Step 7.4.2 Once entered the data, click ‘Done’
Step 7.4.3 Once the BTL click done the data saved successfully, Click ‘Edit’ to edit the data

Step 7.5 : Collection of Membership Fee & Annual Subscription Fee:
Step 7.4.1 The total number of members paid membership fee, total amount collected as membership fee, total number of members paid annual subscription fee and total amount collected as annual subscription fee as auto populated based on the previous data
Step 7.5.2 Once entered the data, click ‘Done’
Step 7.5.3 Once the BTL click done the data saved successfully, Click ‘Edit’ to edit the data
Step 8 : Once the steps has completed click ‘Send for Verification’ and the status of the steps has changed from ‘Recurring Steps Submitted’
41. How to View the Recurring Steps Tracking Yearly (EG):

Step 1 : Log in with their respective BTL username and password and click Login

Step 2 : After logging in to the VKP staff portal, select the Enterprise Promotion Module name
Step 3 : After selecting the EPM module, the user will be redirected to the respective home page

Step 4 : When logged in, click on the ‘Steps Tracking’ on the left side menu
Step 5 : On the ‘Inprogress’ tab, click the ‘My Tracking’ tab to view the list of formation steps profile completed by the BTL.
Step 6 : Select the profile to view the application details more
42. How to Create the Recurring Steps Tracking (Yearly) (EG):

Step 1 : Log in with their respective BTL username and password and click Login

Step 2 : After logging in to the VKP staff portal, select the Enterprise Promotion Module name
Step 3 : After selecting the EPM module, the user will be redirected to the respective home page
Step 4 : When logged in, click on the ‘Steps Tracking’ on the left side menu
Step 5 : On the ‘Open’ tab, click the ‘My Tracking’ tab to view the list of formation steps verified by the EO-ED.
Step 6 : Select the profile to view the application details more
Step 7 : Waiting for 3rd Level Formation Steps :
Step 7.1 : Annual General Body Meeting :
Step 7.1.1 AGB Meeting Conducted Date : By clicking the calendar to choose the AGB meeting conducted date
Step 7.1.2 No of Producers Participated : Enter the total number of producers participated
Step 7.1.3 Number of Members Presented : Enter the total number of members presented
Step 7.1.4 Number of Women Members Presented : Enter the total number of women members presented
Step 7.1.5 Once entered the data, click ‘Done’
Step 7.1.6 Once the BTL click done the data saved successfully, Click ‘Edit’ to edit the data
Step 7.2 : Executive Committee (EC) :
Step 7.2.1 EC Meeting Conducted Date : By clicking the calendar to choose the EC meeting conducted date
Step 7.2.2 Total number of EC members : Enter the total number of EC members
Step 7.2.3 Number of EC Members Presented : Enter the total number of EC members presented
Step 7.2.4 Number of EC Women Members Presented : Enter the total number of EC women members presented
Step 7.2.5 Once entered the data, click ‘Done’
Step 7.2.6 Once the BTL click done the data saved successfully, Click ‘Edit’ to edit the data

Step 7.3 : Selection of Office Bearer :
Step 7.3.1 Name of the President : The president details will auto populate based on the previous data
Step 7.3.2 Name of the Secretary : The secretary details will auto populate based on the previous data
Step 7.3.3 Name of the Treasurer : The treasurer details will auto populate based on the previous data
Step 7.3.4 Once entered the data, click ‘Done’
Step 7.3.5 Once the BTL click done the data saved successfully, Click ‘Edit’ to edit the data

Step 7.4 : Preparation of Activity Plan :
Step 7.4.1 Upload the Activity Plan : Click ‘Browse’ to upload the activity plan document
Step 7.4.2 Once entered the data, click ‘Done’
Step 7.4.3 Once the BTL click done the data saved successfully, Click ‘Edit’ to edit the data

Step 7.5 : Collection of Membership Fee & Annual Subscription Fee:
Step 7.4.1 The total number of members paid membership fee, total amount collected as membership fee, total number of members paid annual subscription fee and total amount collected as annual subscription fee as auto populated based on the previous data
Step 7.5.2 Once entered the data, click ‘Done’
Step 7.5.3 Once the BTL click done the data saved successfully, Click ‘Edit’ to edit the data

Step 7.6 : Current Status of the PG :
Step 7.6.1 Current Status of the PG : By clicking the dropdown to choose the current status of the PG.
Step 7.6.2 Once entered the data, click ‘Done’
Step 7.6.3 Once the BTL click done the data saved successfully, Click ‘Edit’ to edit the data
Step 7.7 : Grading :
Step 7.7.1 Date of Grading : By clicking the calendar to choose the grading date
Step 7.7.2 : Book Keeping : Enter the total number of book keeping person and maximum count is not greater than 12
Step 7.7.3 : Business Management : Enter the total number of business management person and maximum count is not greater than 30
Step 7.7.4 : Financial & Market Linkages & Environmental Safeguard : Enter the total number of financial and market linkages & environmental safeguard person and maximum count is not greater than 23
Step 7.7.5 : Mark Scoring During Grading : The total number of marks scoring during grading will auto calculated based on the previous values
Step 7.7.6 Once entered the data, click ‘Done’
Step 7.7.7 Once the BTL click done the data saved successfully, Click ‘Edit’ to edit the data
Step 8 : Once the steps has completed click ‘Send for Verification’ and the status of the steps has changed from ‘Recurring Steps Submitted’