1. How to Login into the Application:

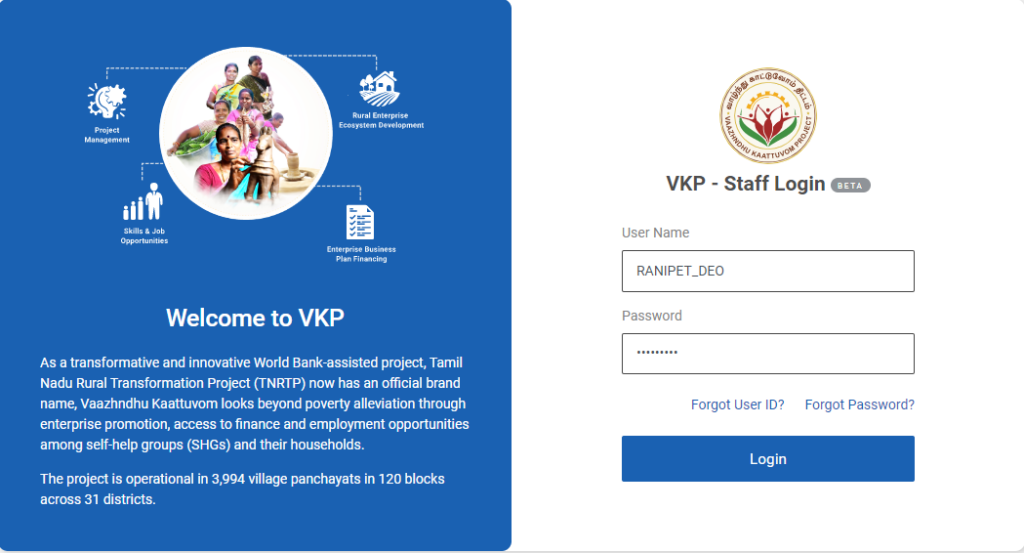
Step 1 : Log in with their respective DEO username and password and click ‘Login’

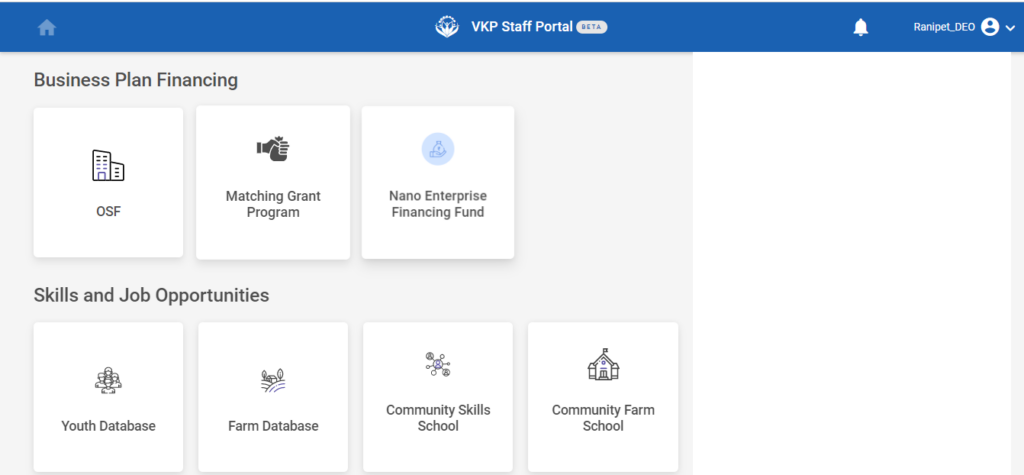
Step 2 : After logging in to the VKP staff portal, select the OSF module under the business plan financing component
Step 3 : After selecting the OSF module, the user will be redirected to the respective home page
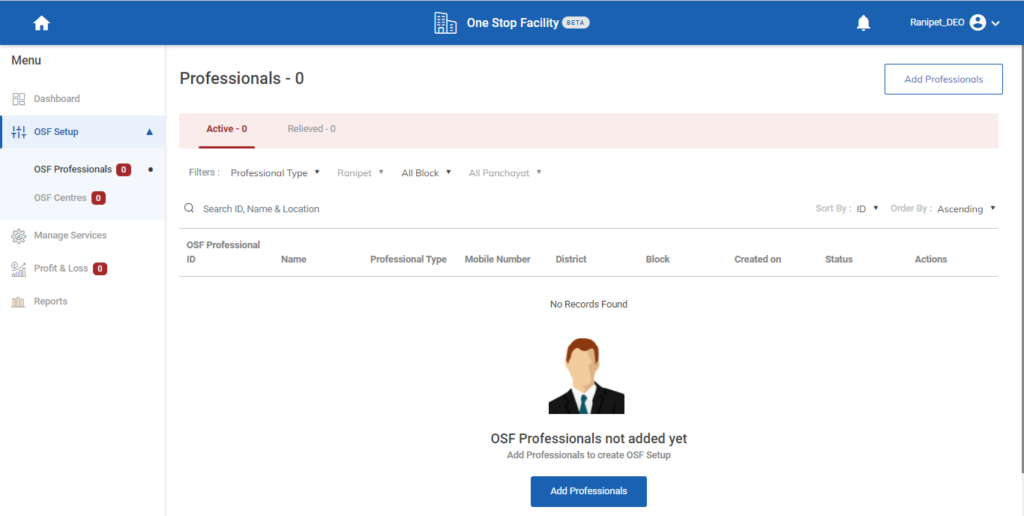
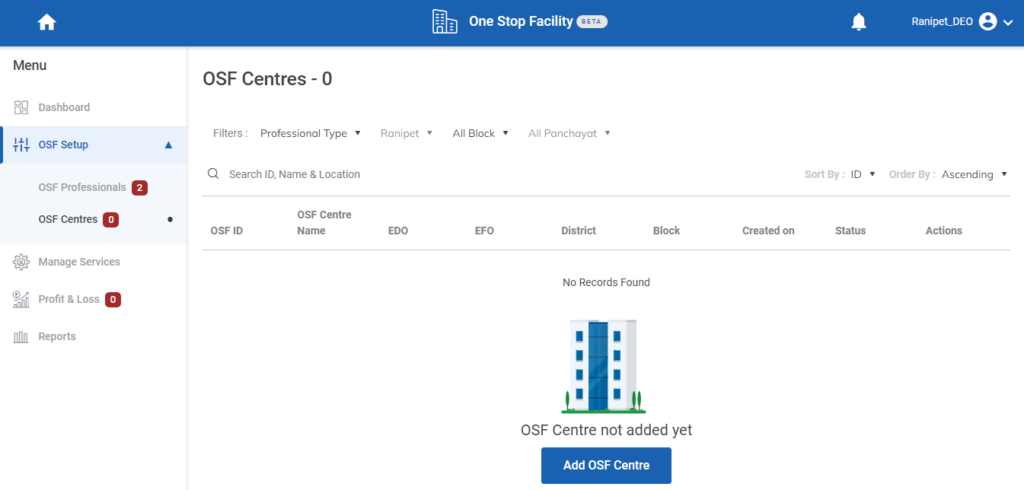
Step 4 : When logged in, click on the ‘OSF Setup’ on the left side menu
Step 5 : On the ‘OSF Setup’ tab, click the ‘OSF Professionals’ tab to view the list of professionals
Step 6 : To add the OSF professionals not added it shows the message like ‘OSF Professionals Not Added Yet’
Step 7 : Click ‘Add Professional’ to add the EFO/EDO professional
2. How to Add the EDO/EFO Professional:
Step 1 : Log in with their respective DEO username and password and click ‘Login’
Step 2 : After logging in to the VKP staff portal, select the OSF module under the business plan financing component
Step 3 : After selecting the OSF module, the user will be redirected to the respective home page

Step 4 : When logged in, click on the ‘OSF Setup’ on the left side menu
Step 5 : On the ‘OSF Setup’ tab, click the ‘OSF Professionals’ tab to view the list of professionals
Step 6 : Click ‘Add Professional’ to add the EFO/EDO professional

Step 7 : Select the OSF professional type and click ‘Continue’ and it will get redirect to the respective annexure page
2.1 How to Add the Contact Details OSF Professional (EDO):
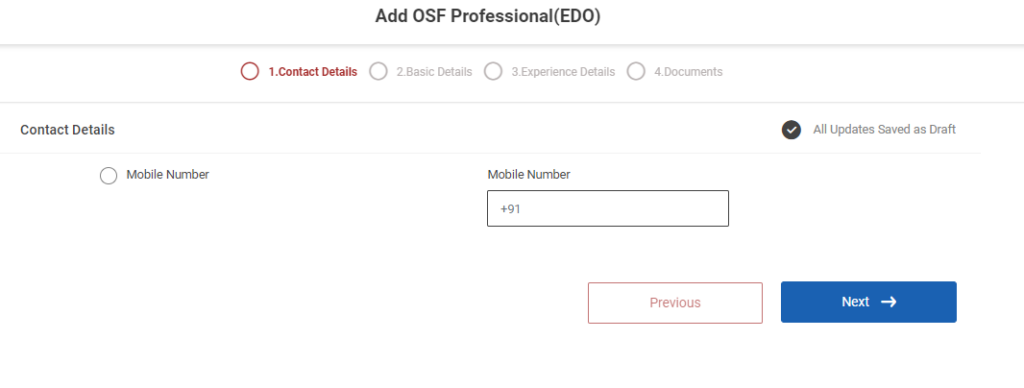
First Tab : Contact Details
Step 1 : Mobile Number : Enter the mobile number in the tab
Step 2 : Once the information is entered, click on the ‘Next’ option. The information will be saved as a draft
2.2 How to Add the Basic Details OSF Professional (EDO):
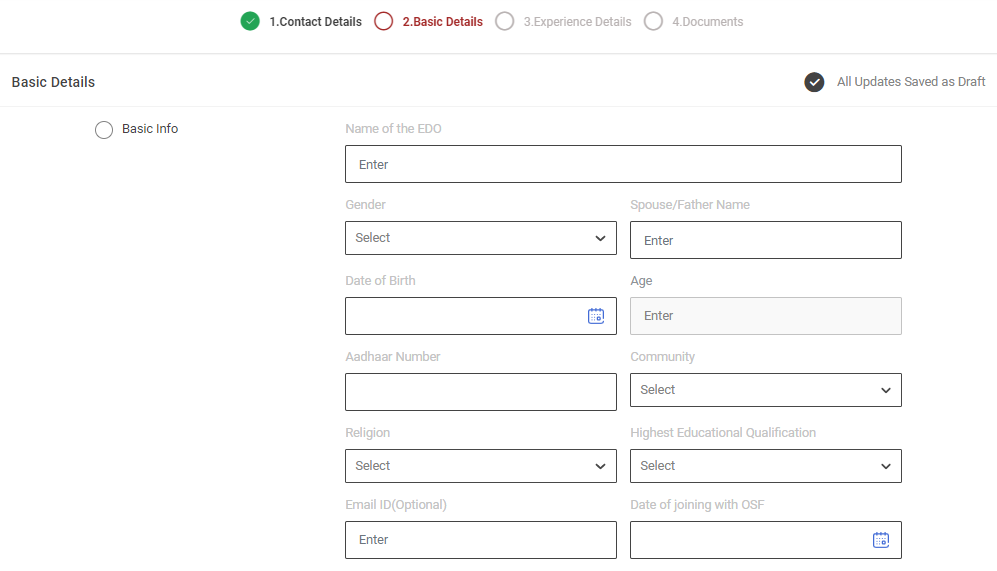
Second Tab : Basic Details
Step 1 : Complete the ‘Basic Details’ section of the add professionals
Step 2 : Basic Info
Step 2.1 Name of the EDO : Enter the name of the EDO
Step 2.2 Gender : By clicking the dropdown to choose the gender
Step 2.3 Spouse/Father Name : Enter the father or spouse name
Step 2.4 Date of Birth : By clicking the calendar, to select the date of the birth of the professionals
Step 2.5 Age : The age will get auto populated based on the data entered in the date of birth
Step 2.6 Aadhar Number : Enter the aadhar number
Step 2.7 Community : By clicking the dropdown to choose the community details
Step 2.8 Religion : By clicking the dropdown to choose the religion type
Step 2.9 Highest Qualification : By clicking the dropdown to choose the highest qualification
Step 2.10 E-mail Address : Enter the email address
Step 2.11 Date of Joining With OSF : By clicking the calendar to choose the OSF joining date

Step 3 : Address :
Step 3.1 Door No :Enter the door number
Step 3.2 Address Line 1 : Enter the address line 1 details
Step 3.3 Address Line 2 : Enter the address line 2 details
Step 3.4 Habitation : Enter the habitation details
Step 3.5 District, Block, Panchayat : The district, block and panchayat details will get auto populated based on the login
Step 3.6 Pincode : Enter the Pincode details
Step : 4 Once the information is entered, click on the ‘Next’ option. The information will be saved as a draft
2.3 How to Add the Experience Details OSF Professional (EDO):
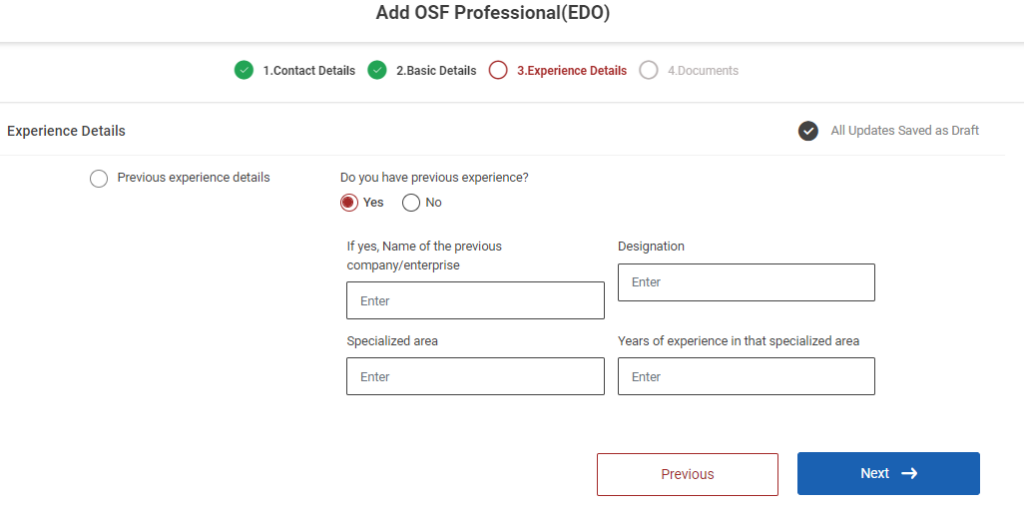
Third Tab : Experience Details
Step 1 : Complete the ‘Previous Experience Details’ section of the add professionals
Step 2 : Do you have previous experience? : If the professional has previous experience click ‘Yes’ or choose ‘No’
Step 2.1 : If yes, Name of the previous company/enterprise: Enter the name of the previous company or enterprise
Step 2.2 : Designation : Enter the name of the designation
Step 2.3 : Specialised Area : Enter the specialised area
Step 2.4 : Years of experience in that specialized area : Enter the years of experience in that specialized area
Step 3 : Once the information is entered, click on the ‘Next’ option. The information will be saved as a draft
2.4 How to Add the Document in OSF Professional (EDO):
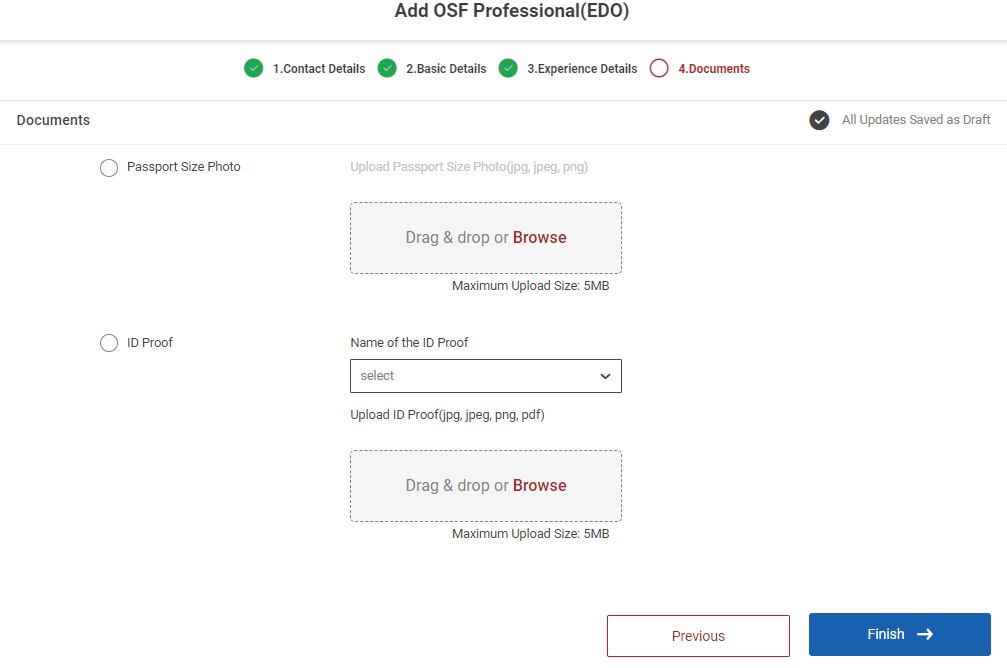
Fourth Tab : Documents
Step 1 : Complete the ‘Documents’ section of the add professionals
Step 2 : Passport Size Photo : Click ‘Browse’ to upload the passport size photo and the maximum file upload size is 5 MB
Step 3 : Name of the ID Proof : By clicking the dropdown to choose the name of the ID proof and Click ‘Browse’ to upload the name of the proof and the maximum file upload size is 5 MB
Step 4 : Once the information is entered, click on the ‘Finish’ option. The page will get redirect to the review and submit page
2.5 How to Review and Submit the Add Professional (EDO):
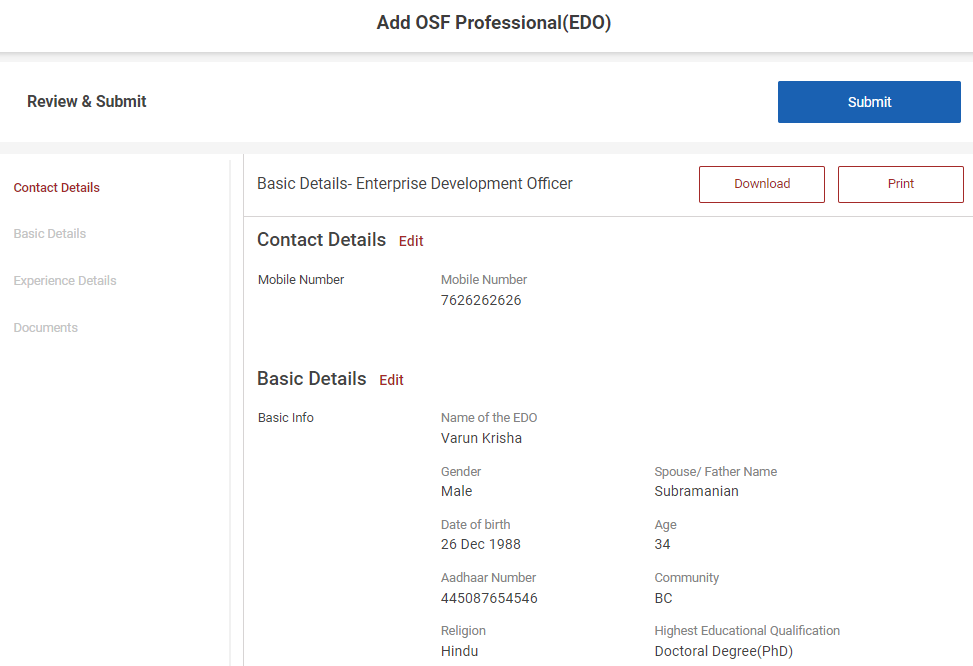
Step 1: Once the information is entered in the ‘Document’ section, click on the ‘Finish’ option. The information will be saved as a draft
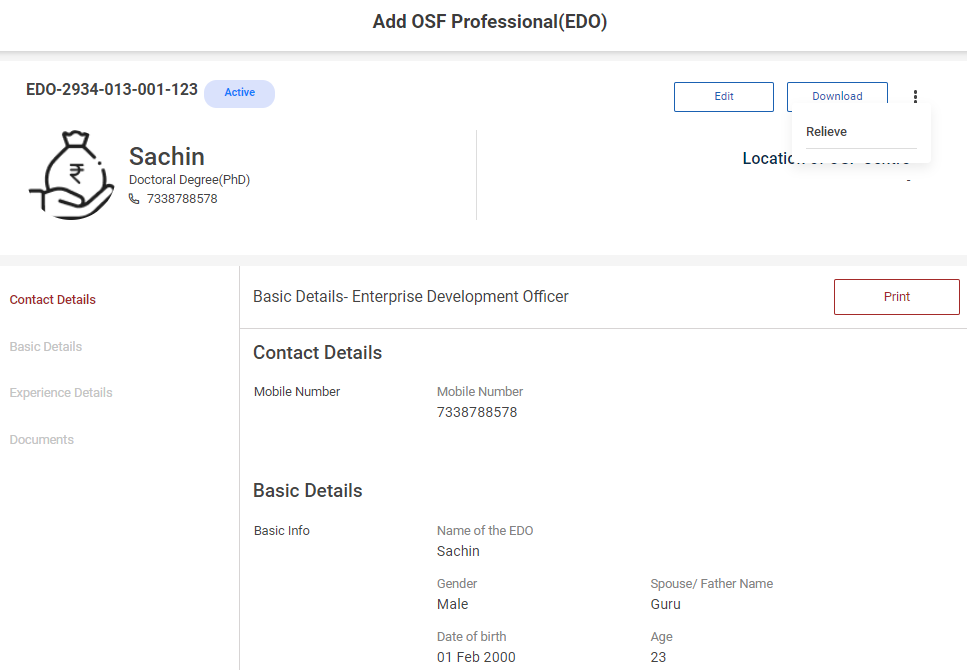
Step 2 : The DEO can able to print the professional details by clicking the ‘Print’ option
Step 3 : The DEO can able to download the professional details by clicking the ‘Download’ option
Step 4 : Review the add professional details, if there are any changes that need to be made in any of the fields, please select the field to Edit, and update the changes and Click ‘Submit’

Step 5 : Once the data has been verified by the DEO officer, select -> Submit option -> A upload confirmation popup will appear on the screen click ‘Yes’ to confirm or choose ‘No’

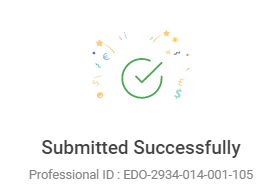
Step 6 : Once the DEO staff submitted, the popup will appear like ‘Professional Submitted Successfully’ and the professional ID also generated.
2.6 How to Add the Contact Details OSF Professional (EFO):
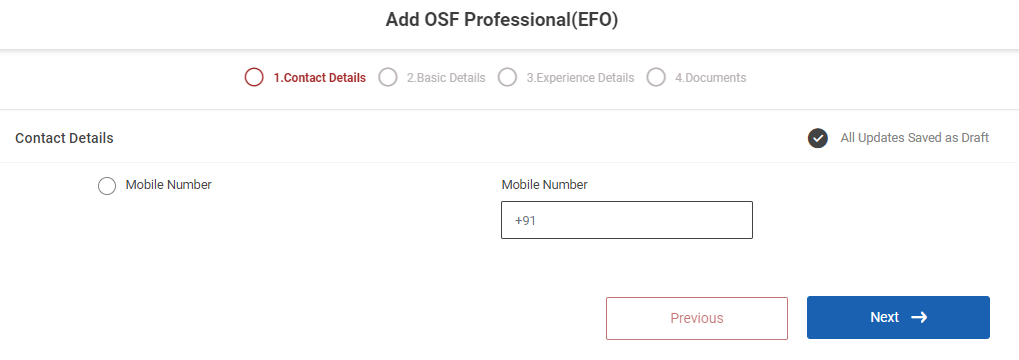
First Tab : Contact Details
Step 1 : Mobile Number : Enter the mobile number in the tab
Step 2 : Once the information is entered, click on the ‘Next’ option. The information will be saved as a draft
2.7 How to Add the Basic Details OSF Professional (EFO):
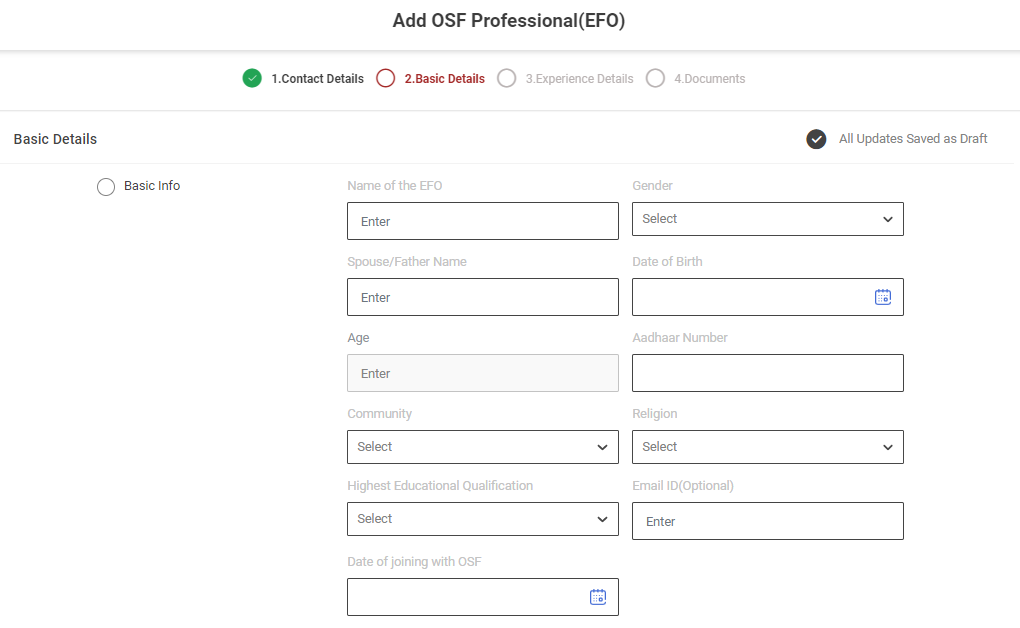
Second Tab : Basic Details
Step 1 : Complete the ‘Basic Details’ section of the add professionals
Step 2 : Basic Info
Step 2.1 Name of the EFO : Enter the name of the EFO
Step 2.2 Gender : By clicking the dropdown to choose the gender
Step 2.3 Spouse/Father Name : Enter the father or spouse name
Step 2.4 Date of Birth : By clicking the calendar, to select the date of the birth of the professionals
Step 2.5 Age : The age will get auto populated based on the data entered in the date of birth
Step 2.6 Aadhar Number : Enter the aadhar number
Step 2.7 Community : By clicking the dropdown to choose the community details
Step 2.8 Religion : By clicking the dropdown to choose the religion type
Step 2.9 Highest Qualification : By clicking the dropdown to choose the highest qualification
Step 2.10 E-mail Address : Enter the email address
Step 2.11 Date of Joining With OSF : By clicking the calendar to choose the OSF joining date
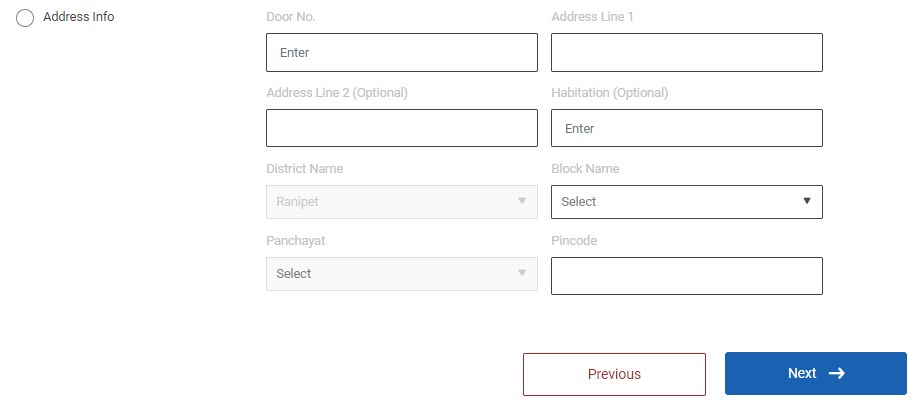
Step 3 : Address :
Step 3.1 Door No :Enter the door number
Step 3.2 Address Line 1 : Enter the address line 1 details
Step 3.3 Address Line 2 : Enter the address line 2 details
Step 3.4 Habitation : Enter the habitation details
Step 3.5 District, Block, Panchayat : The district, block and panchayat details will get auto populated based on the login
Step 3.6 Pincode : Enter the Pincode details
Step : 4 Once the information is entered, click on the ‘Next’ option. The information will be saved as a draft
2.8 How to Add the Experience Details OSF Professional (EFO):
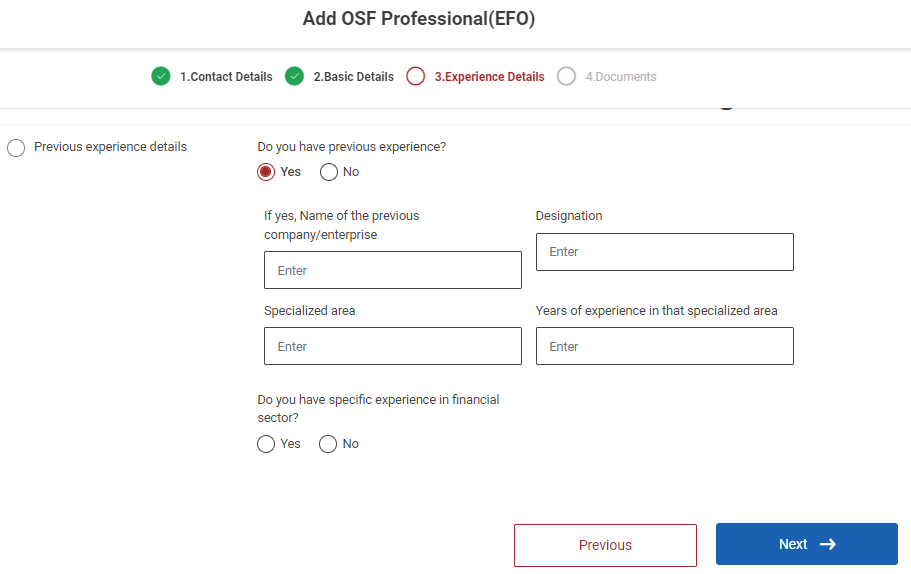
Third Tab : Experience Details
Step 1 : Complete the ‘Previous Experience Details’ section of the add professionals
Step 2 : Do you have previous experience? : If the professional has previous experience click ‘Yes’ or choose ‘No’
Step 2.1 : If yes, Name of the previous company/enterprise: Enter the name of the previous company or enterprise
Step 2.2 : Designation : Enter the name of the designation
Step 2.3 : Specialised Area : Enter the specialised area
Step 2.4 : Years of experience in that specialized area : Enter the years of experience in that specialized area
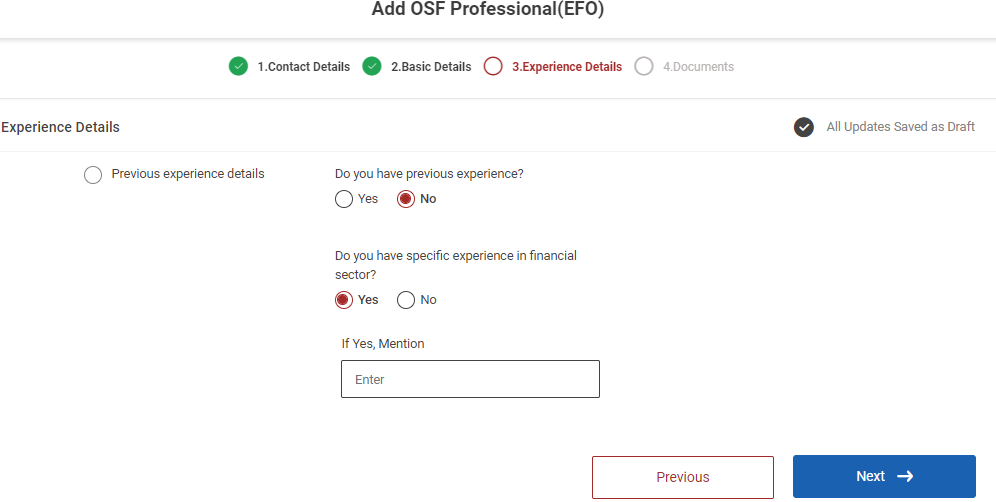
Step 3 : Do you have specific experience in the financial sector? : If the professional has specific experience in the financial sector click ‘Yes’ or choose ‘No’. If ‘Yes’ enter the name in the mentioned box.
Step 4 : Once the information is entered, click on the ‘Next’ option. The information will be saved as a draft
2.9 How to Add the Document in OSF Professional (EFO):
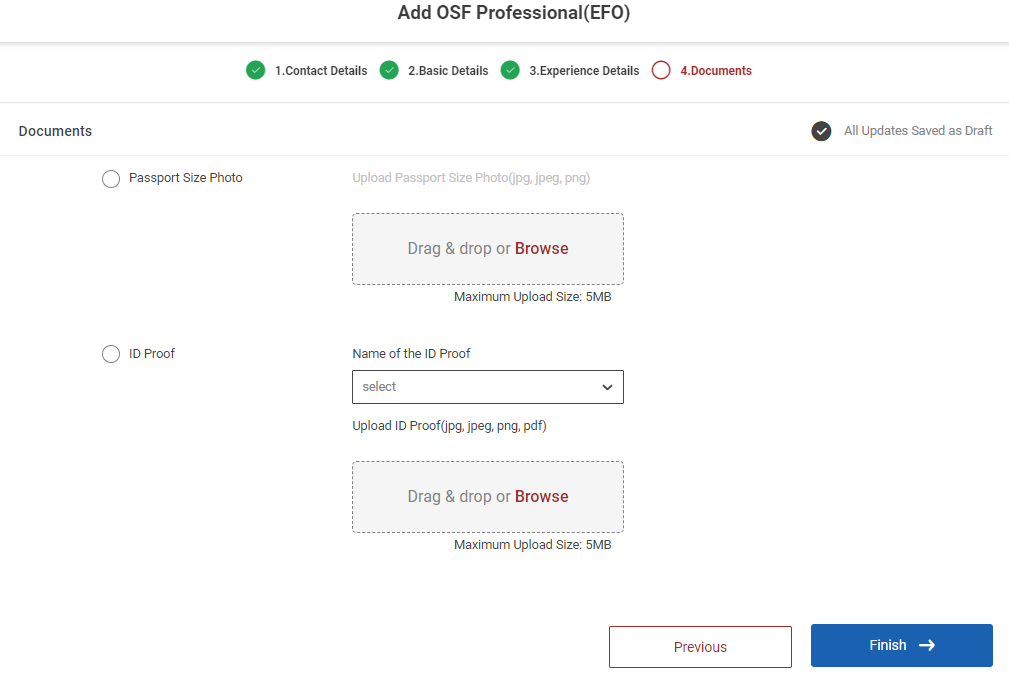
Fourth Tab : Documents
Step 1 : Complete the ‘Documents’ section of the add professionals
Step 2 : Passport Size Photo : Click ‘Browse’ to upload the passport size photo and the maximum file upload size is 5 MB
Step 3 : Name of the ID Proof : By clicking the dropdown to choose the name of the ID proof and Click ‘Browse’ to upload the name of the proof and the maximum file upload size is 5 MB
Step 4 : Once the information is entered, click on the ‘Finish’ option. The page will get redirect to the review and submit page
2.10 How to Review and Submit the Add Professional (EFO):
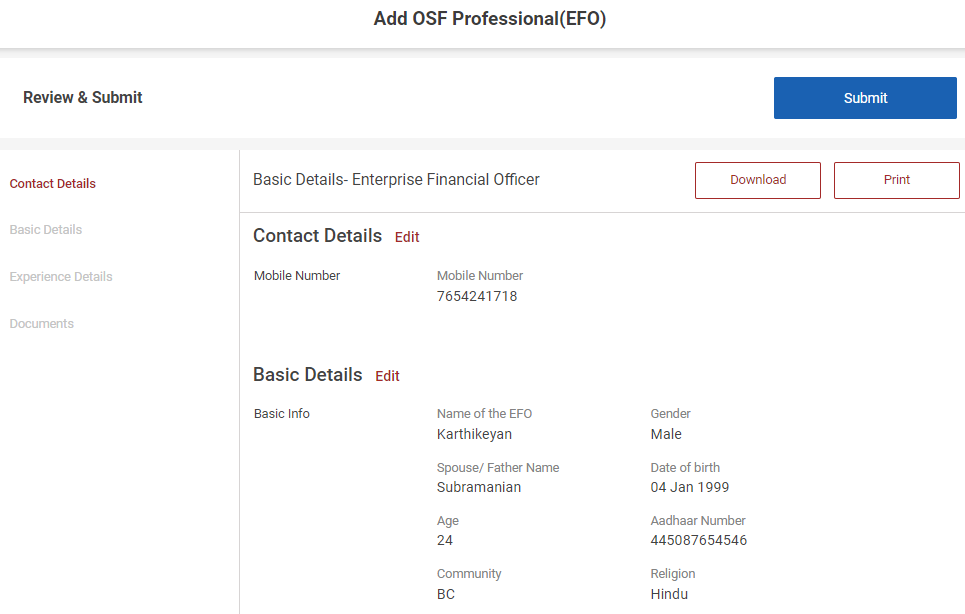
Step 1: Once the information is entered in the ‘Document’ section, click on the ‘Finish’ option. The information will be saved as a draft
Step 2 : The DEO can able to print the professional details by clicking the ‘Print’ option
Step 3 : The DEO can able to download the professional details by clicking the ‘Download’ option
Step 4 : Review the add professional details, if there are any changes that need to be made in any of the fields, please select the field to Edit, and update the changes and Click ‘Submit’

Step 5 : Once the data has been verified by the DEO officer, select -> Submit option -> A upload confirmation popup will appear on the screen click ‘Yes’ to confirm or choose ‘No’

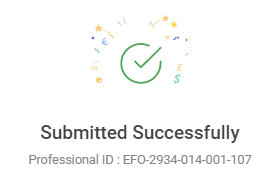
Step 6 : Once the DEO staff submitted, the popup will appear like ‘Professional Submitted Successfully’ and the EFO professional ID also generated.
3. How to View the EDO/EFO Professional Details:

Step 1 : Log in with their respective DEO username and password and click ‘Login’

Step 2 : After logging in to the VKP staff portal, select the OSF module under the business plan financing component
Step 3 : After selecting the OSF module, the user will be redirected to the respective home page

Step 4 : When logged in, click on the ‘OSF Setup’ on the left side menu
Step 5 : On the ‘OSF Setup’ tab, click the ‘OSF Professionals’ tab to view the list of professionals
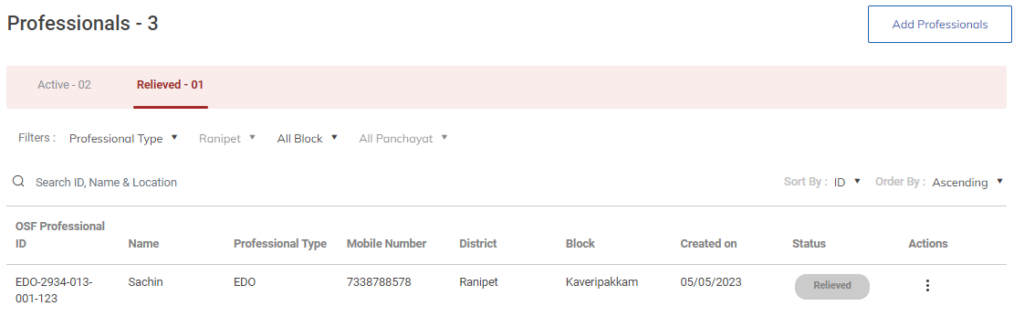
Step 6 : To view the EFO/EDO professional click ‘Active’ tab under the OSF Professional to view the list of active professional profile to view the details more
Step 7 : Once the DEO select the active tab the DEO can view the list of active professional along with the OSF professional ID, Name, Professional Type, District, Block, Panchayat, Created on, Status and Action tab details in the home page
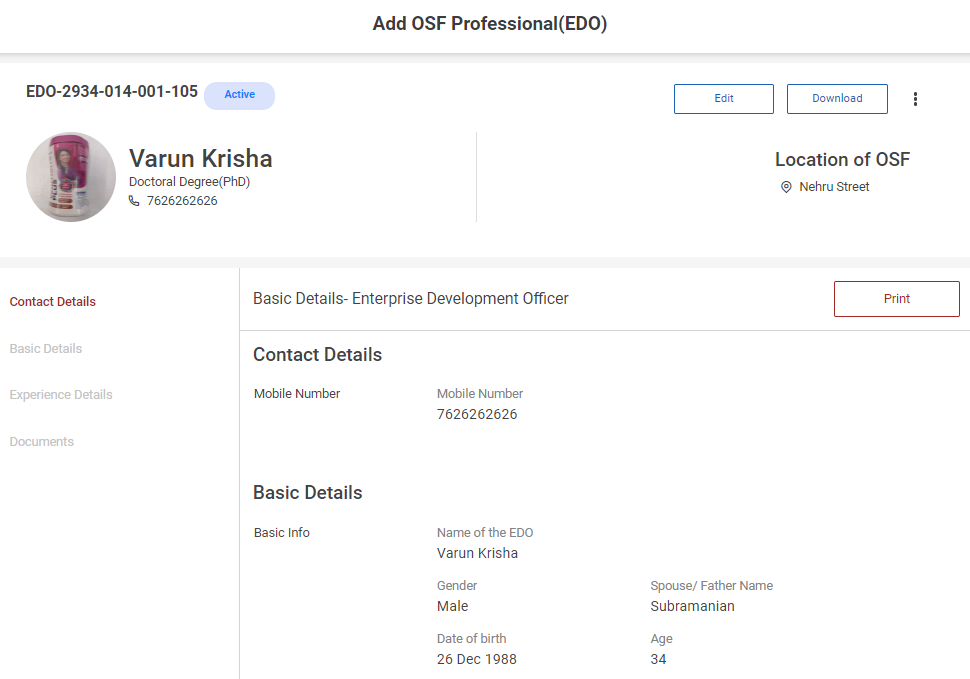
Step 8 : Click ‘Edit’ to update the professional details and click ‘Download’ to download the professional details in PDF
Step 9 : The location of the OSF details will get auto populated based on the user location
4. How to Create the OSF Centre Setup:

Step 1 : Log in with their respective DEO username and password and click ‘Login’
Step 2 : After logging in to the VKP staff portal, select the OSF module under the business plan financing component
Step 3 : After selecting the OSF module, the user will be redirected to the respective home page
Step 4 : When logged in, click on the ‘OSF Setup’ on the left side menu
Step 5 : On the ‘OSF Centre’ tab, click the ‘OSF Professionals’ tab to create the OSF centre setup
Step 6 : Click ‘Add OSF Centre’ and it will get redirected to the respective annexure page.
4.1 How to Add the Location of the OSF:
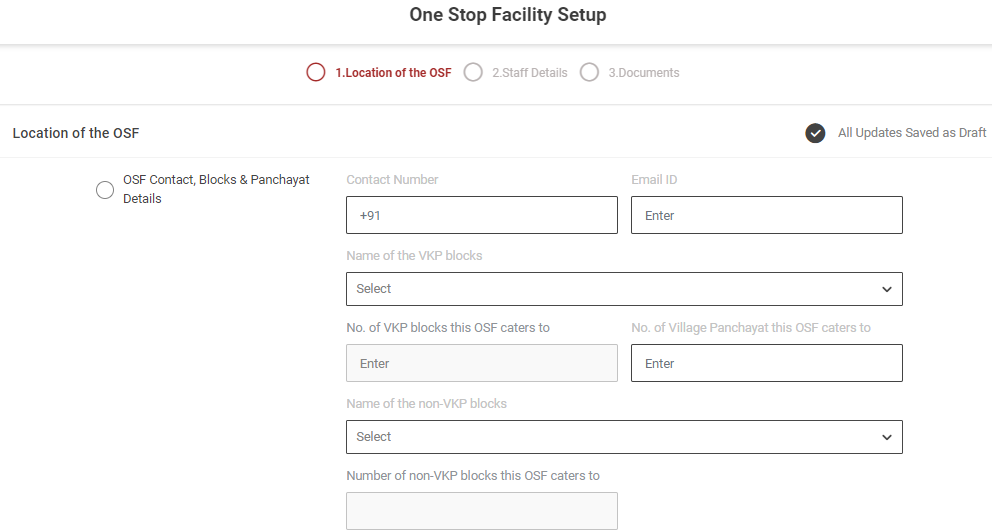
First Tab : Location of the OSF
Step 1 : Complete the ‘Location of the OSF’ section of the OSF setup
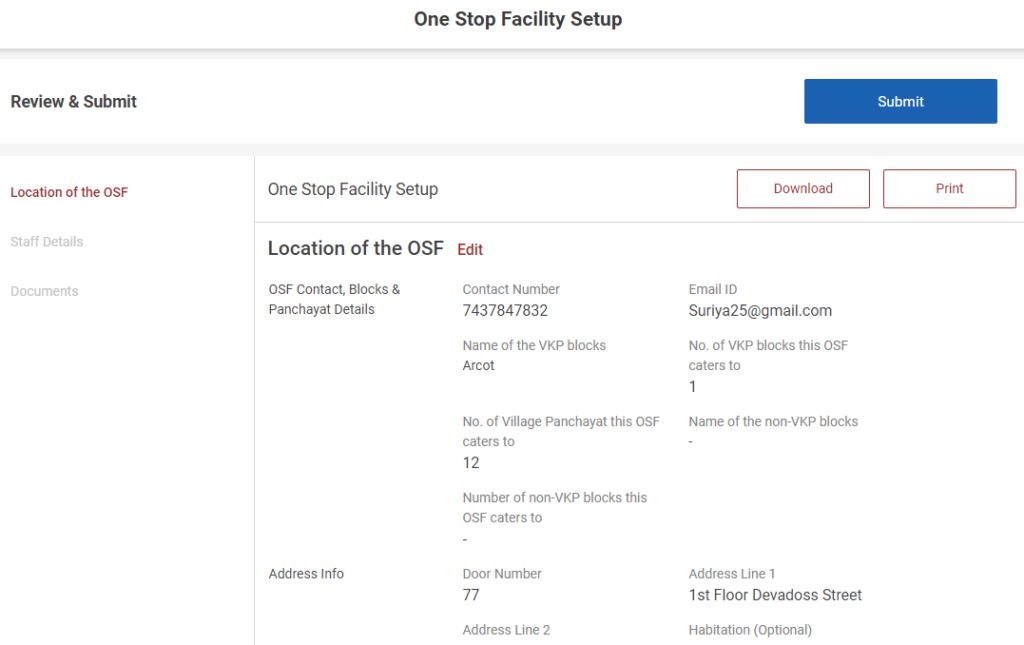
Step 2 : OSF Contact, Blocks, Panchayat Details :
Step 2.1 : Contact Number : Enter the contact number
Step 2.2 : Email ID : Enter the Email ID
Step 2.3 : Name of the VKP Blocks : By clicking the dropdown to choose the name of the VKP blocks
Step 2.4 : No. of VKP blocks this OSF caters to : The number will get auto populated based on the name of the VKP blocks
Step 2.5 : No. of Village Panchayat this OSF caters to : Enter the number of village panchayat this OSF caters
Step 2.6 : Name of the non-VKP blocks : By clicking the dropdown to choose the name of the non VKP blocks
Step 2.7 : Number of non-VKP blocks this OSF caters to : The number will get auto populated based on the name of the number of non VKP blocks this ISF caters
Step 3 : Address :
Step 3.1 Door No : Enter the door number
Step 3.2 Address Line 1 : Enter the address line 1 details
Step 3.3 Address Line 2 : Enter the address line 2 details
Step 3.4 Habitation : Enter the habitation details
Step 3.5 District, Block, Panchayat : The district, block and panchayat details will get auto populated based on the login
Step 3.6 Pincode : Enter the Pincode details
Step 4 : Once the information is entered, click on the ‘Next’ option. The information will be saved as a draft
4.2 How to Add the Staff Details in OSF Setup:
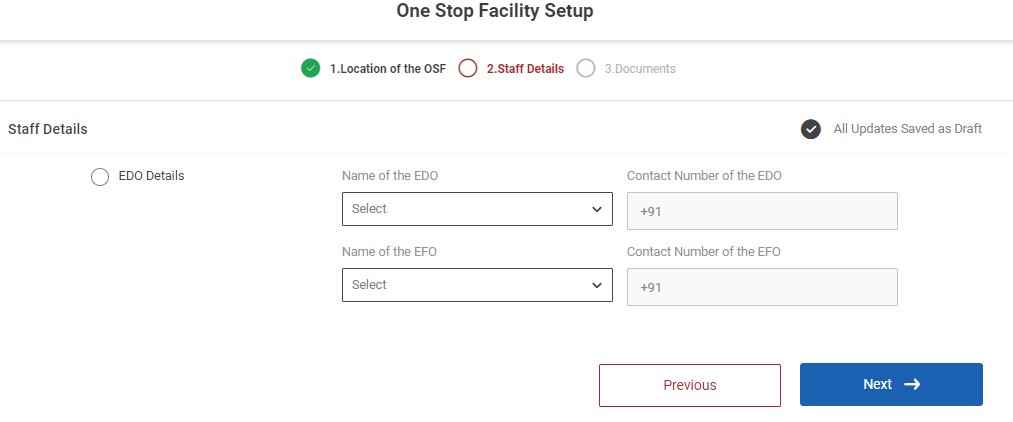
Second Tab : Staff Details
Step 1 : Complete the ‘Staff Details’ section of the OSF setup
Step 2 : EDO Details :
Step 2.1 : Name of the EDO : By clicking the dropdown to choose the name of the EDO
Step 2.2 : Contact Number of the EDO : The EDO contact number will get auto populated based on the name chosen in the name of the EDO
Step 2.3 : Name of the EFO : By clicking the dropdown to choose the name of the EFO
Step 2.4 : Contact Number of the EFO : The EFO contact number will get auto populated based on the name chosen in the name of the EFO
Step 3 : Once the information is entered, click on the ‘Next’ option. The information will be saved as a draft
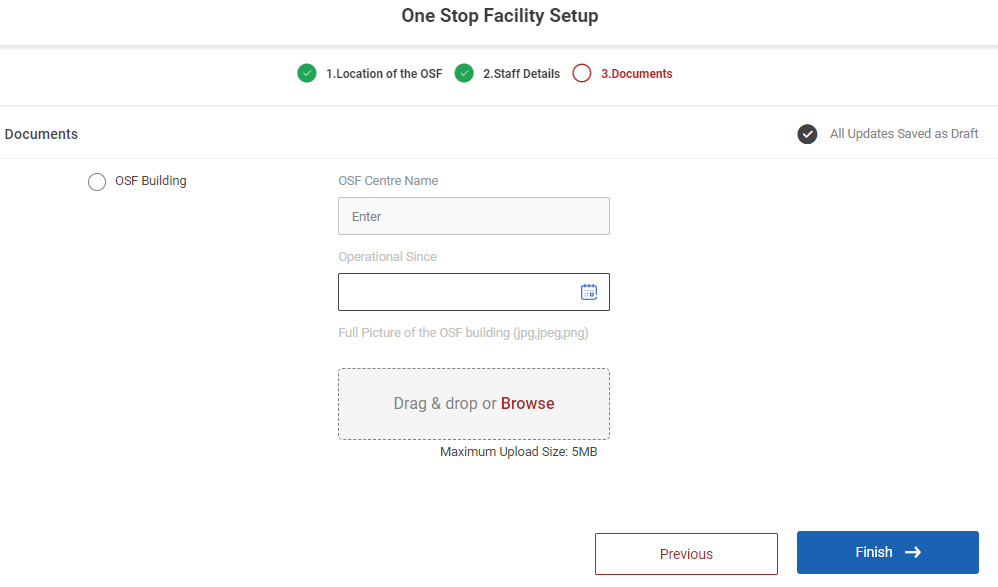
4.3 How to Add the Document Details in OSF Setup:
Third Tab : Documents
Step 1 : Complete the ‘Documents’ section of the add professionals
Step 2 : OSF Centre Name : The OSF Centre name will get auto populated based on the previous data
Step 3 : Operational Since : By clicking the calendar to choose the operational since
Step 4 : Passport Size Photo : Click ‘Browse’ to upload the passport size photo and the maximum file upload size is 5 MB
Step 5 : Once the information is entered, click on the ‘Finish’ option. The page will get redirect to the review and submit page
4.4 How to Review & Submit in OSF Centre Setup:
Step 1: Once the information is entered in the ‘Document’ section, click on the ‘Finish’ option. The information will be saved as a draft
Step 2 : The DEO can able to print the one stop facility setup details by clicking the ‘Print’ option
Step 3 : The DEO can able to download the one stop facility setup details by clicking the ‘Download’ option
Step 4 : Review the add one stop facility setup details, if there are any changes that need to be made in any of the fields, please select the field to Edit, and update the changes and Click ‘Submit’
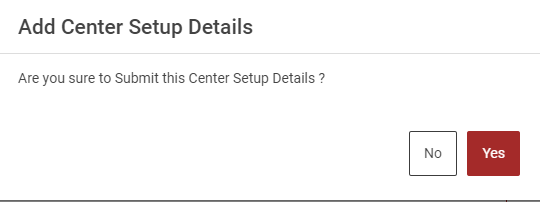
Step 5 : Once the data has been verified by the DEO officer, select -> Submit option -> A upload confirmation popup will appear on the screen click ‘Yes’ to confirm or choose ‘No’

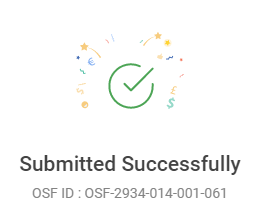
Step 6 : Once the DEO staff submitted, the popup will appear like ‘OSF Centre Submitted Successfully’ and the OSF ID also generated.
5. How to Continue the OSF Centre Setup from the Draft:

Step 1 : Log in with their respective DEO username and password and click ‘Login’

Step 2 : After logging in to the VKP staff portal, select the OSF module under the business plan financing component
Step 3 : After selecting the OSF module, the user will be redirected to the respective home page
Step 4 : When logged in, click on the ‘OSF Setup’ on the left side menu
Step 5 : On the ‘OSF Centre’ tab, click the ‘OSF Professionals’ tab to create the OSF centre setup
Step 6 : If the OSF centre, and continue the annexure from the draft, it will get redirected to the respective annexure page.
6. How to Delete the OSF Centre Setup from the Draft:

Step 1 : Log in with their respective DEO username and password and click ‘Login’

Step 2 : After logging in to the VKP staff portal, select the OSF module under the business plan financing component
Step 3 : After selecting the OSF module, the user will be redirected to the respective home page

Step 4 : When logged in, click on the ‘OSF Setup’ on the left side menu
Step 5 : On the ‘OSF Centre’ tab, click the ‘OSF Professionals’ tab to create the OSF centre setup
Step 6 : Click the dropdown under the action tab and click ‘Delete’
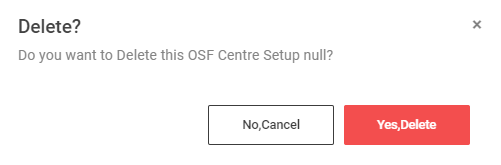
Step 7 : Once you click delete an confirmation popup will appear click ‘Yes Delete’ to delete the OSF centre setup or choose ‘No Cancel’ and the toast message like ‘Deleted Successfully’

7. How to Send Rework to the P&L Tracker :

Step 1 : Log in with their respective DEO username and password and click ‘Login’

Step 2 : After logging in to the VKP staff portal, select the OSF module under the business plan financing component
Step 3 : After selecting the OSF module, the user will be redirected to the respective home page
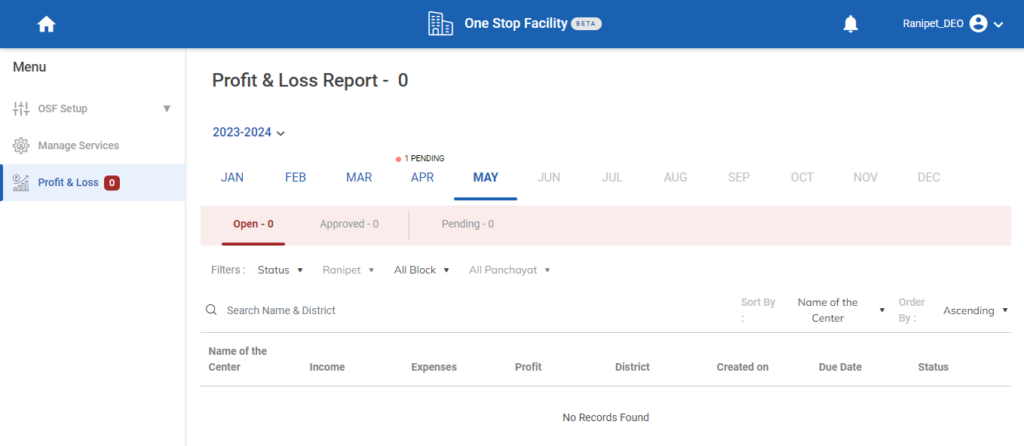
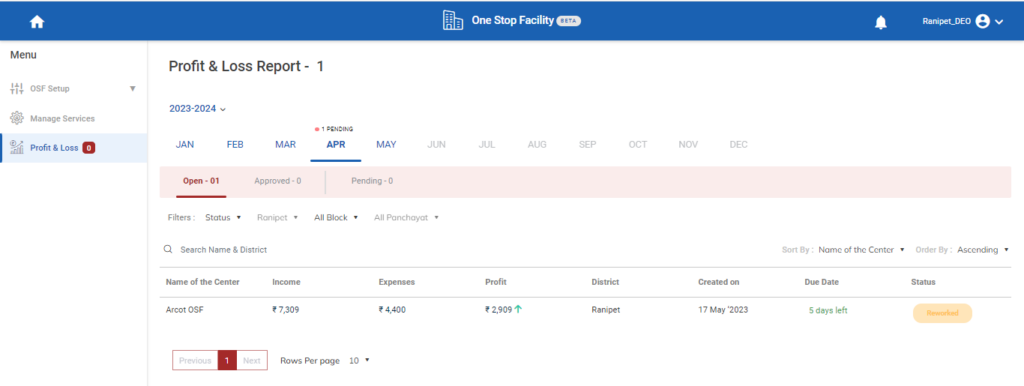
Step 4 : When logged in, click on the ‘Profit & Loss’ on the left side menu
Step 5 : Click the respective month and the DEO can view the name of the centre, Income, Expenses, Profit, District, Created on, Due date and the status details
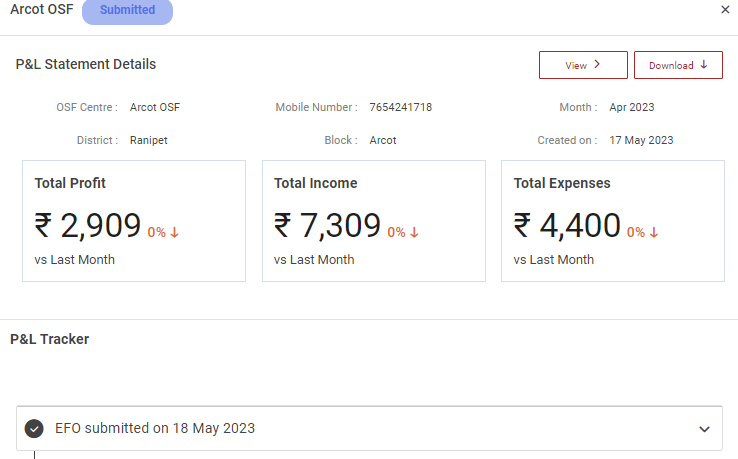
Step 6 : Select the application to view the details more
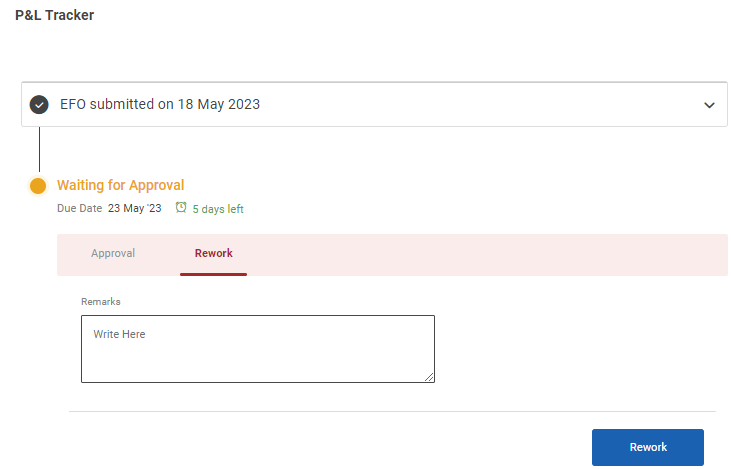
Step 7 : Once the EFO submitted the tracker, The DEO can send the P&L tracker to rework click ‘Rework’
Step 8 : Remarks : Enter the remarks in the remarks section and click ‘Rework’ and the received the popup appears like ‘Sent for Rework Successfully’

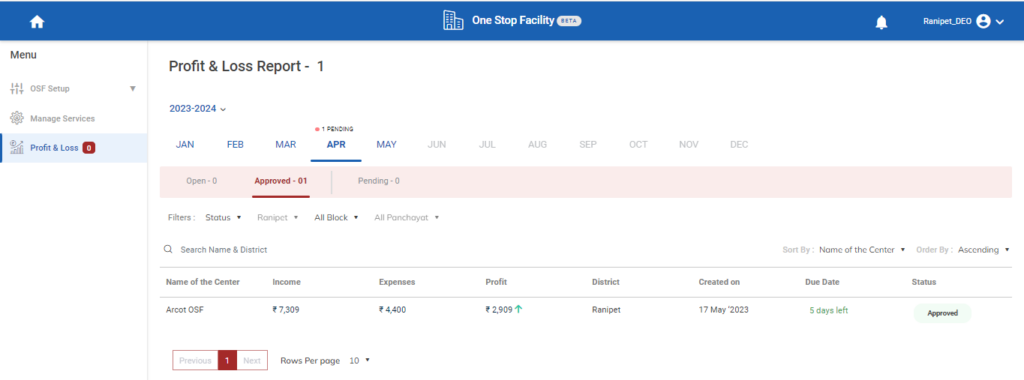
8. How to Approved the Reworked P&L Tracker :

Step 1 : Log in with their respective DEO username and password and click ‘Login’
Step 2 : After logging in to the VKP staff portal, select the OSF module under the business plan financing component
Step 3 : After selecting the OSF module, the user will be redirected to the respective home page
Step 4 : When logged in, click on the ‘Profit & Loss’ on the left side menu
Step 5 : Once the data has reworked by the EFO the DEO can view the name of the centre, Income, Expenses, Profit, District, Created on, Due date and the status details

Step 6 : Select the application to view the details more
Step 7 : Once the EFO submitted the tracker, The DEO can approve the application click ‘Approve’
Step 8 : Remarks : Enter the remarks in the remarks section and click ‘Approve’ and the received the popup appears like ‘Approved Successfully’
Step 9 : Once the DEO approves the application will moved to ‘Open’ to ‘Approved’
9. How to View the Approved P&L Tracker :

Step 1 : Log in with their respective DEO username and password and click ‘Login’
Step 2 : After logging in to the VKP staff portal, select the OSF module under the business plan financing component
Step 3 : After selecting the OSF module, the user will be redirected to the respective home page
Step 4 : When logged in, click on the ‘Profit & Loss’ on the left side menu
Step 5 : Once the data has approved by the DEO can view the name of the centre, Income, Expenses, Profit, District, Created on, Due date and the status details
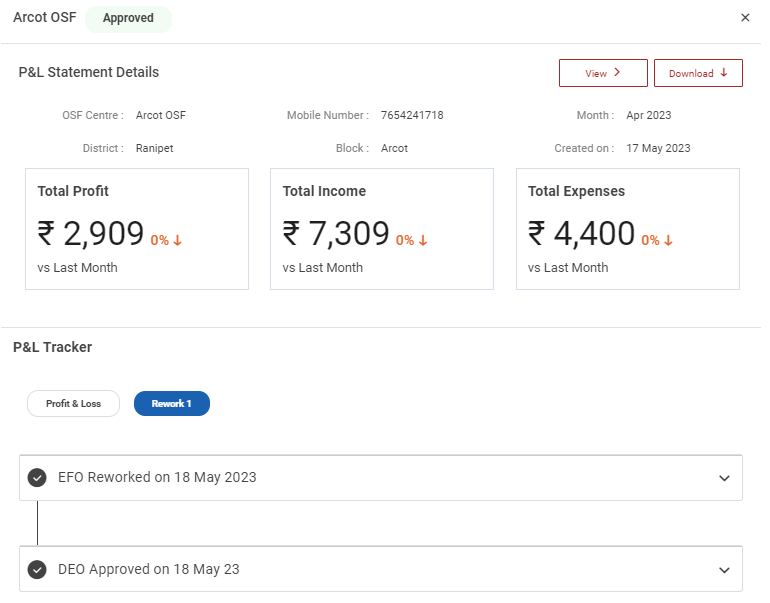
Step 6 : Select the application to view the details more
10. How to Relieve the EDO/EFO Professional Details:

Step 1 : Log in with their respective DEO username and password and click ‘Login’
Step 2 : After logging in to the VKP staff portal, select the OSF module under the business plan financing component
Step 3 : After selecting the OSF module, the user will be redirected to the respective home page
Step 4 : When logged in, click on the ‘OSF Setup’ on the left side menu
Step 5 : On the ‘OSF Setup’ tab, click the ‘OSF Professionals’ tab to view the list of professionals
Step 6 : To view the EFO/EDO professional click ‘Active’ tab under the OSF Professional to view the list of active professional profile to view the details more
Step 7 : Once the DEO select the active tab the DEO can view the list of active professional along with the OSF professional ID, Name, Professional Type, District, Block, Panchayat, Created on, Status and Action tab details in the home page
Step 8 : Click ‘Edit’ to update the professional details and click ‘Download’ to download the professional details in PDF
Step 9 : To relieve the OSF Professionals, click the dropdown and click ‘Relieve’

Step 10 : An confirmation popup will appear, If the DEO has relieve this mentor enter the relieving date and remarks in the remarks tab and click ‘Relieve’ or choose ‘Cancel’ and the toast message like ‘Professional Relieved Successfully’
Step 11 : Once the DEO mark as relieve the status of the OSF Professional has changed from ‘Active’ to ‘Relieved’